Stuffed Zucchini

Stuffed Zucchini

Boy, you can get some HUGE zucchinis locally. I tried to grow two plants but the bugs ate my seedlings. :( Luckily, even monsters like the one I bought only cost 50c at the market.

The huge zucchinis are nowhere near as tender as the little 6" - 8" guys you find at most grocery stores. So, while they're good to fry up (they take a while), they're really good to stuff and bake. You definitely get your veggies out of this one - this made enough for two meals AND we had filling left over. So there's enough filling to do one of those monster zucchinis.

I used TVP here because frankly, we don't eat that much meat at a time any more. TVP lets us put in extra fiber and protein, but get a lighter, fluffier mix with less calories. Feel free to substitute your choice of meats if you feel like it.

Also, this works great with any kind of summer squash, though not all should be cut into steaks. Those neat 8-ball types that are round are especially good to hollow out for individual servings and even large patty-pan squash can hold a fair amount.

Stuffed Zucchini [printable recipe]

Serves 4

  • 1 big zucchini
  • 1/2 lb ground beef or pork
  • 2/3 cup TVP (OR 1/2 lb ground meat, omit the broth)
  • 2/3 cup beef broth
  • 1 cup cooked rice
  • 1 medium onion, diced
  • 1/2 jalapeno, minced
  • 1/4 cup fresh basil, sliced
  • 1/4 cup bread crumbs
  • 1/4 - 1/2 cup shredded cheese
  • 3 large cloves garlic, crushed
  • 1 tbsp butter, melted
  • 1 tbsp Worcestershire sauce or soy sauce
  • 1 tsp smoked paprika
  • 1 egg
  • salt, pepper
  • oil

Preheat oven to 350F/180C.

Cut the stem and blossom ends off of the zucchini. Slice lengthwise and use a spoon to scoop out the seeds. If you remove some of the meat, set the meat aside and discard the seeds. Rest in a 13x9 casserole dish. Brush melted butter all over the insides, then season with salt and pepper. Bake for 20 minutes, then remove.

While the zucchini cooks... In a deep skillet, brown the ground meat. Pour off any excess fat and remove to a bowl. Saute the onion in either a bit of fat from the meat or 1 tbsp oil, until tender and translucent. Add garlic and jalapeno, along with any reserved zucchini meat, and continue to cook for another 2 - 3 minutes. Remove and combine with ground meat.

Combine TVP and broth in a small bowl and cover for 5 minutes. Stir gently to ensure TVP has fully reconstituted, then mix into the meat mixture. Stir in Worcestershire, rice, egg, basil, smoked paprika, salt and pepper.

Mound the mixture into the zucchini boats. Sprinkle liberally with breadcrumbs and then cheese. Bake for another 20 minutes until the cheese browns.

Slice into thick steaks and serve with rice or potatoes.

Braised Radishes and Zucchini

Braised Radishes and Zucchini

Okay, I admit - this is an odd one. Everyone, or so it seems, in the food world has been talking about cooking radishes this year. Food & Wine featured an article on a famous chef, I forget his name, presenting four different types in a little garden looking dish and various bloggers emulated it.

Now I've only recently decided that I like radishes - I spent a long while not liking them one bit! But I was really tired of putting red onion in my salads and needed something else with a tangy bite - enter the humble red radish. I'm not really sure now why I didn't like them before. :-)

Since radishes kept going on sale for really cheap - 4 for a dollar, for example - I decided I could waste a quarter on a recipe that might or might not turn out.

Turns out that they're actually really good braised. And probably roasted too, but I haven't tried that yet. They become very tender and mellow. I think when the weather gets colder, I'm going to try throwing some radishes in with the roasted veggies I like to make for winter salads. I bet they'll be good.

So, for a really easy side that takes next to no work, I'd definitely try these if I were you.

Braised Radishes and Zucchini [printable recipe]

  • 1 bunch radishes, greens removed
  • 1 medium zucchini
  • 2 tbsp butter
  • salt and pepper or lemon-pepper seasoning blend

Quarter the radishes and slice the zucchini into thick half-moons. In a deep skillet, melt the butter over medium heat and add the veggies when it's foamy. Sprinkle over some salt and pepper, toss to coat. Cook until radishes are tender, about 10 - 15 minutes.

Deconstructed Tortilla Salad

Deconstructed Tortilla Salad

Mangoes are in season now and we've been getting a bunch of them for great prices lately. We also lucked into a fresh, ripe pineapple so I decided to try making a fruit-based salsa. It came out beautifully!

It's hard to believe when a salsa I create from scratch comes out so nicely that just a couple of years ago I couldn't make a salsa if my life depended on it.

So, we decided to make a bunch of different components that we would normally put into a tortilla salad and used our freshly baked Tortilla Chips on the side. I think the only thing that might be missing is some shredded twice-cooked chicken. (Leftover chicken, like from a rotisserie chicken, shredded and sprinkled liberally with different spices like cumin, oregano and garlic powder, then lightly fried in a teensy amount of oil to brown it up.)

Did you know you can freeze avocados? Just mash a ripe avocado or dozen, combine with some lemon or lime juice (as if making guacamole), add salt and pack the mash into silicone muffin cups. Freeze until solid then remove from the cups and place in a freezer bag. Works great for guacamole, random lunchtime tacos and adding to salads like this.

Mango-Pineapple Salsa [printable recipe]

  • 1 ripe mango, seeded and diced
  • 1/2 ripe pineapple, cored and diced
  • 1 jalapeno, seeded
  • 1/4 c cilantro, minced
  • 1/2 white onion, finely diced
  • 1 - 2 tbsp lime juice
  • 1/2 tsp cumin
  • salt

Combine all, allow to rest for at least 30 minutes.

Citrusy Black Beans [printable recipe]

Adapted from a recipe in Cuisine at Home

  • 1 can or 1 1/2 c cooked black beans (or any variety/mix you prefer)
  • 1/4 cup orange juice
  • 3 cloves garlic, crushed
  • 1 tsp oregano
  • 1 tsp cumin
  • 1 tsp lard
  • salt and pepper

Over moderate heat, heat lard in a nonstick skillet. When hot, add garlic and spices then cook for 2 minutes. Add beans and orange juice. Cook, stirring occasionally, until juice is evaporated and beans are thick.

Today's Farmer's Market Haul

My haul from the Tooele market

It was such a great day at the Benson Grist Mill farmer's market that I just had to share.

We picked up all of this from three sellers - one with eggs, one with melons and one with everything else.

My haul from the Tooele market

For less than $20, we got some fantastic white onions, jalapenos, ripe tomatoes, an Israeli melon, some cucumbers, a huge zucchini, two white patty pan squashes, yellow wax beans and two dozen eggs.

My haul from the Tooele market

The farmer from whom we bought almost all of our veggies actually lives just a few blocks away from us. I found out that we can go to his house on Friday afternoons and get everything we could at the market, and even stop by his house Monday through Wednesday to ask for specifics. I plan to ask him whether he's going to have chard and kale this year and when he actually starts selling. It'd be great if we could stop by and pick up munchies earlier than August!

He didn't have the Armenian cucumbers today, sadly, but I have hopes that if we go to his house on Friday, we can still get one.

Lucky find of the day: A 1 franc coin from 1974 in our change!

Tortilla Chips, Tostadas and Taco Shells

Homemade Tortilla Chips and Citrusy Black Beans

Last time, I talked about Flour-Corn Tortillas. Once we made those for the first time, it was only a small step to thinking about making our own chips and taco shells. Turns out it's really easy (but probably not a great summertime recipe since it uses the oven and heats up the kitchen).

The neat thing about doing your own taco shells is that you can do the same thing as with the chips - brush them with a bit of oil and sprinkle any kind of seasoning you want. With the flour-corn tortillas, neither tostadas or taco shells seem to be prone to cracking and spilling the contents all over you like with plain corn.

There isn't really any difference between tostadas and taco shells - one is formed into a U-shape, the other is flat. I really like tostadas because it's easier to put a bunch of toppings on and nibble away at the outside. I never seem to be able to fit everything into a little taco! (But then, I always seem to want to put lots into everything. It's just that once I get some beans and some taco meat/tvp and some salsa and some cabbage and some cheese...and I've just exceeded the carrying capacity of a taco shell. Again.)

I can't say that we'll never buy taco shells again... but it'd be a real challenge to put them in the cart. These are so much better!

Tortilla Chips [printable recipe]

Preheat oven to 350F. Cut into wedges and arrange in a single layer on a baking sheet. Mist with non-stick spray or lightly brush with oil, then sprinkle lime juice and salt evenly over all. Bake for 7 minutes then rotate pan and cook for another 7 minutes. The chips should be starting to brown. Remove and let cool, they will continue to crisp up.

Taco Shells and Tostadas [printable recipe]

Ideally, cook the tortillas only halfway so they're still somewhat raw but not sticky - about 30 seconds per side.

For Tacos: Remove one of the racks from the oven.

Preheat the oven (minus the rack) to 350F. Carefully place each tortilla so that it hangs over two bars of the rack. It's okay if the edges touch, they shouldn't stick together.

Re-hang the rack in the oven, making sure you place it high enough that the tortillas don't drag or touch the other rack(s).

For Tostadas: Brush tortillas with a bit of oil, sprinkle some seasoning or salt over, then simply lay them flat on the pre-heated oven rack or on a sheet pan.

Bake for 10 minutes and check. If they are turning brown and seem hard enough, go ahead and remove them. If they're still soft-ish, let them bake for another few minutes.

For the taco shells, I found it was best to set up a cooling rack and place them so they could continue to hang from the rack. (I set the rack on top of some tall glasses to get the necessary clearance.) That way they weren't tempted to close up if some were a little softer than others. (My oven doesn't heat evenly.)

Flour-Corn Tortillas

We've tried making corn tortillas at home but it's really, really hard. Oh sure, the recipe itself is easy - it's no trouble at all to get a good dough going. The problem, however, is when you try to press them in the tortilla press (which we splurged on when it went on sale at the local Hispanic market). They stick or they crack and on the rare occasion when they don't do either, they wait and do it in the pan. Or on the plate.

Frustrating. I know it can be done, but I think there's a lot of experience behind it. Honestly though, it can be so frustrating that we wind up picking up a batch from the market, like a pack of 36 blue corn tortillas. (Yum, by the way.)

So, when Suzanne over at Chickens in the Road posted about her flour-corn tortillas that fix all of those problems, I knew we had to try them since the gluten in the flour helps keep the tortilla soft and bendable.

Well, it's now our go-to recipe for tortillas. We actually like them a bit better than just plain flour or corn tortillas!

On Friday, I'll post how to make chips, tostadas and taco shells out of these guys - they're fantastic!

And, as with all tortillas, these can be easily frozen and used later. Don't be afraid to make a big batch if you're up to pressing a bunch out. Just toss them into the freezer in a freezer bag for later.

Flour-Corn Tortillas [printable recipe]

Lightly adapted from Suzanne's recipe on Farm Bell Recipes
Makes about 16 taco-sized tortillas

  • 1 1/2 cups all-purpose flour
  • 1 1/2 cups masa harina
  • 1 teaspoon salt
  • 1 tbsp lard
  • 1 to 1 1/2 cups lukewarm water

Stir together the dry ingredients in a medium bowl. With a fork or your fingers, work in the lard until fully incorporated. Add about one cup of water and continue to work the dough. Add only enough water to bring it together into a soft, pliable dough. Cover the bowl and allow it to rest for 20 minutes.

Sprinkle a bit of flour (either one) over the top and knead for a few minutes. If the dough is a bit wet, add more flour. It should not be sticky, but satiny. Turn out onto a floured board and cut into 16 pieces. (Easiest way to do this is divide the dough in half, then each ball in half, continuing until you have 16 little balls.)

Set a cast-iron skillet over high heat. While it heats, begin to press out some tortillas.

If you have a tortilla press: Lay some wax paper, parchment, plastic wrap or a cut-up freezer bag over the plates. Place a little dough ball somewhat off-center towards the hinge, then press. Open the press and carefully peel off the tortilla.

If you don't have a press: Roll out each dough ball on either a floured surface or a silicone sheet until it's quite thin and about 5"-6" / 12 - 15 cm across.

Place the raw tortilla on the hot skillet. Fry each side for about a minute - small brown patches should appear. If not, the skillet's not hot enough or you're not frying long enough.

While the first tortilla cooks, press the next. Don't get ahead on either step - you don't want the raw tortillas to dry out. Place the cooked tortillas on a plate and cover them with a towel or keep them in the oven on Warm.

Deep-Fried Zucchini Flowers

Deep-Fried Zucchini Flowers
My apologies, Dear Reader, as I know I skipped the past week of posts rather unexpectedly. While I did some writing on Monday, particularly on my resume and cover letter for a job I really want, I didn't have enough energy left to set up my posts for the week. I wish I had because the next day my shoulder decided that it didn't feel like playing nicely any longer; between the pain in my shoulder and neck and the numb fingers and elbow from the pinched nerves, I couldn't easily sit at my computer and write. Luckily, it's relaxed once again so I can finally get some of my projects and writing done..only a week late. Sigh.

I've always wanted to try zucchini flowers. I've been seeing them on various food blogs and tv shows (when I watched tv anyway) but getting ahold of them is another story. I heard that the local farmer in Tooele who lives across from Arby's (and if you're local, you know the house, it's the one with all the flowers) would sometimes be willing to sell a baggie of them for a dollar or two if you could catch him before he packed them all off to whoever he sells to.

I never have. Of course, I usually catch him at the market, not at his house, so it's not really surprising.

So when we went to our usual hispanic market on Tuesday, I was very surprised to see baggies of freshly-picked zucchini flowers. (I would laugh if we brought them back to Tooele where they started from, but I have no way of knowing if they came from him.) They weren't very expensive - $2.50 for a half-full bag of an unknown quantity.

Stuffed Zucchini Flowers

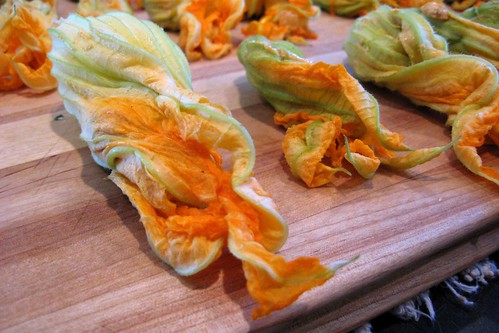
I immediately started looking for recipes when we got home. According to what I read, zucchini flowers don't last long (do flowers ever?) and need to be used within 24 hours of purchase. Some people eat them raw but most seem to like to fry them. The inner pistil (or stamen, whatever it is inside the flower, I am no botanist) thingie needs to be removed before stuffing.

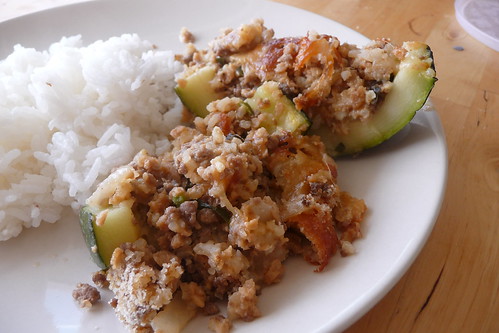
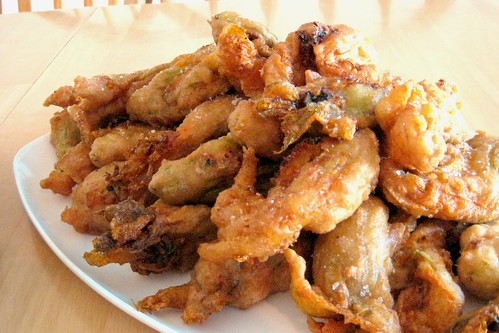
I decided to adapt several of the recipes I found into one and then further adapted it to what was on hand when I went over to a friend's to cook them up. (She has a deep-fryer and also wanted to try them. Win.) She had a bunch of different cheeses in her fridge, so it turned into a delicious quatro-formaggi blend.

These are definitely labor-intensive. It took me about an hour to prepare everything and I definitely recommend twisting the petal tips together. It helps them hold their shape and not open when you batter them. All in all, I think I got three dozen flowers out of the bag -- wow!

I thought these were really good, very much worth trying if you find them or want to attempt to prevent your zucchini plant from overwhelming you with zucchini. (I wanted a zucchini plant this year but the damned earwigs ate all three seedlings.)

If you come across the flowers and want to try something new, you should.

Stuffed Zucchini Flowers

Deep-Fried Zucchini Flowers [printable recipe]

Adapted from multiple sources
Makes 1 to 3 dozen flowers1

  • zucchini flowers1

Filling

  • 1 small zucchini, finely diced (1/4" cubes)2
  • 1 white onion, finely diced (1/4" cubes)
  • 1/2 tsp smoked paprika
  • 1 lime, zested and juiced
  • 2 ounces plain chevre or feta3
  • 1/4 cup marscapone
  • 2 ounces low-fat cream cheese
  • 2 tbsp grated parmesan or asiago
  • 1 - 3 tbsp half-n-half or milk, as needed
  • salt and pepper
  • olive oil

Tempura Batter

  • 1 egg
  • 1 cup all-purpose flour
  • 1 cup cold water
  • 1 tsp baking soda
  • 1/2 tsp salt

In a deep skillet over medium-high heat, heat olive oil until shimmering, then add diced zucchini and onion. Saute until nicely browned. Remove to a medium bowl.

Combine cheeses, smoked paprika, lime zest and juice along with a healthy pinch of salt and pepper with the zucchini mixture. It will be quite thick. Add half-n-half or milk to thin it slightly to a workable consistency, like cake frosting.

Prepare your preferred deep-fry method. If you have a fryer, fill it with the appropriate amount of oil as required for operation and begin heating it to 350F. (If you are using a Dutch oven, you already know more than I do. I think it'd be a couple of inches of oil.)

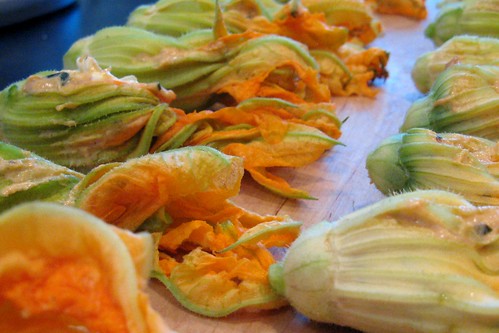
Rinse the flowers well and pat dry. Remove the little pistil thingie inside each flower along with any sharp leaves and discard. Carefully stuff each flower about half-full and twist the petals carefully to keep them shut. Arrange on a board. My small blossoms took about 1/2 tsp of mixture to come up half-way and large blossoms took between 1 tsp and 2 tsp to fill.

In a small bowl, whisk together all of the ingredients for the tempura batter.

Dip each filled flower in the batter and swirl to coat. Drop carefully into the hot oil - you don't want to splash. Don't overcrowd the fryer either - you don't want the oil temperature to drop very far.

Fry for 1 to 2 minutes until lightly golden brown. They will get a shade or two darker while they cool. Remove to a rack set over paper towels or newsprint to drain off excess oil and sprinkle over with salt.

Notes:

  1. I only filled my flowers half-full and many of my flowers were very small. Some were huge, so if you have the big ones, the filling will only make about a dozen. For this reason, I'm not putting a quantity for the flowers - there is way too much variation.
  2. A mandoline is a godsend here.
  3. I used what I had - look in your fridge and use any combination of melting cheeses for approximately 6 ounces total weight. Ricotta would be good, as would Monterey jack. Really, anything that melts will work.

Soy-Sunflower Butter

A few weeks ago, we saw a container of soy butter that looked intriguing but the price was exorbitant. It's pretty easy to make nut butters if you have a food processor, so we figured we'd look around for a recipe before spending the cash.

Turns out, we had everything already in the pantry! We like toasted soy nuts and sunflower seeds on our salads, so we always have some on hand. They're pretty cheap anyway - $1/lb for the soy nuts and not much more for the seeds.

Literally, this is so easy that all you need to be able to do is work a food processor and you can have some damn good butter in a few minutes. Use it anywhere you would use any nut butter - sandwiches, sauces, etc. It'd probably make a mean cookie!

Unlike many butters, there's no need to add extra oil to this one. Just remember to take it out of the fridge a few minutes before you need it to make it easier to spread.

Soy-Sunflower Butter [printable recipe]

  • 1/2 cup roasted soy nuts
  • 1/2 cup roasted sunflower seed kernels
  • 1/4 cup or more water

Put the nuts and seeds into the bowl of a food processor and pulse until it comes together into a ball. Add water to thin gradually until it becomes a paste. Taste it, add salt if necessary, add more water if you want it thinner, whack it about more for a smoother consistency. Scoop it into a air-tight container and refrigerate until needed.

Buffalo Burgers

Ahh, summer. It's too hot to cook inside, especially here, but from what I've been hearing, it's hot just about everywhere. Even our family in Latvia have been hit by some major heat. Me, I'll be glad when it's the end of September and temperatures return to something I can deal with on a day-to-day basis.

Still, despite the heat, July is a busy month if you live in Utah. Not only does Utah celebrate Independence Day like the rest of America, but there's also another excuse for a cookout - Pioneer Day on the 24th. It's basically the day when Brigham Young showed up in the Salt Lake valley with his famous, "This is the place" speech.

So, I took three things that are very common here in Utah and happen to go together really well:

** Buffalo, which I love for it's strong beefier-than-beef taste, still (kinda) roam in my state - they have a preserve on Antelope Island alongside said antelope. In Grantsville, near where we live, several people keep buffalo instead of cows. (And boy, when you see those massive giants off the side of the road, you look twice!)

** Burgers, quintessentially American, can be even better when made partially or fully with ground buffalo meat.

** Fry sauce. A Utah original, this is one of the things my state is definitely known for besides awful recipes made with Jello. There's several different ways to make it and most restaurants who serve fries will also serve fry sauce (of varying quality). In its most basic form, it's a 1:2 ratio of ketchup to mayo. I like mine with bbq, personally.

We wind up with a Pioneer Day special: buffalo burgers with oven fries and fry sauce. I love adding strong cheeses like blue cheese, roquefort, feta or chevre to the mix. The strong flavors of both cheese and buffalo play off of each other beautifully.

(You know how I said it's too hot to cook inside? I still bake the fries, even in this heat. I just like 'em better that way. But I bet some enterprising grillcook could throw these puppies in a foil packet onto the grill and get 'em good and tasty.)

Buffalo Burgers with Fries and Fry Sauce [printable recipe]

Makes 2 1/3 lb burgers

  • 2/3 lb ground buffalo
  • 1 tbsp Worcestershire or soy sauce
  • 1/2 tsp liquid smoke
  • 2 oz chevre, feta or blue cheese, crumbled
  • 3 cloves of garlic, crushed
  • 1 tbsp dried parsley
  • salt, pepper
  • 1 recipe New and Improved Garlic Sauce or Garlic Cheese Sauce (for extra cheesiness)
  • Ciabatta buns or rye rolls
  • Toppings: tomato, red onion, cucumber, avocado, etc.
  • Homestyle Oven Fries
  • Fry Sauce: ketchup, barbecue sauce and sour cream

Mix ingredients from buffalo through salt and pepper together well and form into two equal patties. Grill until done to your liking. Spread garlic sauce on buns, layer on toppings and enjoy.

On a Foreman grill, it takes about 6 minutes per patty to cook to well-done.

To make one of my takes on Utah-style fry sauce - mix 1 part barbecue sauce to 2 parts ketchup to 4 parts sour cream in a small bowl.

Baked Plantains and Burro Bananas

This recipe is one I decided to try on a whim with some black plantains we'd picked up on special. If you pick out green plantains at the store, you can let them ripen on the counter, but be careful of letting them go too far -- if mold develops, you probably need to use them without delay. (The peels are very very thick so a little bit of mold on the surface isn't a big deal. Just wash it well before you peel it.)

I didn't like Bittman's original way of cooking this dessert (which involves cutting slits in the peel and stuffing stuff in) because it's too much work both when prepping and eating. Instead, I like to peel them first to get the hard part out of the way.

The spices are pretty similar to the ones used for apple pies and pumpkin pies, so if you have a little container of pumpkin/apple pie spice, just use that instead. Or, substitute nutmeg or ground cloves for the cardamom. Super-easy.

In short, these are ooey, gooey treats for the banana lover that can be made in less than 30 minutes and is largely unattended - a great, fast dessert.

Hey! I decided to update this after making it with some burro bananas we had picked up on sale. Burro bananas are these short, squat bananas that can be eaten raw like normal bananas when ripe. They have this citrusy/lemony-banana flavor that's really fun and interesting. And guess what? They go great in this dish! In fact, they're even better than plantains! So, if you see burro bananas around, give 'em a shot. They're ripe when they're completely yellow (may have some black edges or spots).

Baked Plantains or Burro Bananas [printable recipe]

Adapted from The Best Recipes in the World by Mark Bittman
Serves 2

  • 2 ripe (black) plantains or 3 - 4 ripe (yellow) burro bananas
  • 2 tbsp butter, cut into teeny cubes
  • 1/4 cup brown sugar
  • 1/4 tsp cinnamon
  • 1/4 tsp ground cardamom or allspice

Preheat oven to 400F.

Peel plantains or burro bananas and cut them into chunks. Place them into a shallow baking dish (I use an 8x4 pyrex casserole). Sprinkle with brown sugar and dot evenly with butter. Sprinkle over with cinnamon and cardamom. Bake for 20 minutes or until bubbly.