Spicy Tortilla Soup

We watched a great independent Latino comedy called, "Tortilla Soup" on Netflix Instant. I wish that there were recipes from the show, but alas, I've not been able to find any. There was this squash blossom soup, you see, that looked amazing. If I can get blossoms from my farmer this late in the season, I think I'll try that next.

The day after we watched the show, I put together a version of tortilla soup inspired by the movie, attempting to recreate as best I could what I saw on screen. While I don't know how close it really is, it certainly came out beautifully!

Spicy Tortilla Soup [printable recipe]

  • 2 cups chicken stock
  • 1 cup veggie stock
  • 1 1/2 lb fresh, ripe tomatoes, seeded and chopped1
  • 1 jalapeno, seeded and minced
  • 1 medium yellow onion, diced
  • 3 - 4 cloves garlic, crushed
  • 1 1/2 cups shredded, cooked chicken2,3
  • 1/4 cup shredded cheese
  • 1 tbsp fresh cilantro, minced OR 1/2 tsp dried cilantro
  • 1 tbsp lime juice
  • 1/2 tsp cumin
  • 1/2 tsp oregano
  • 1/2 tsp thyme
  • oil
  • salt
  • sour cream
  • Flour-Corn Tortillas, cut into 1/4" strips and fried or baked until crispy

In a medium saucepot set over moderate heat, saute onions in oil with a pinch of salt until tender. Add garlic and jalapeno, continue to saute for another 2 - 3 minutes until everything is tender and fragrant. Season with cumin, oregano, thyme and dried cilantro (if using), deglaze with a bit of chicken stock.

Add chopped tomatoes, remaining chicken stock and veggie stock. Stir well. Bring to a simmer, increasing heat if necessary, and simmer for 10 minutes. Puree roughly with an immersion blender or in batches in a regular blender (return to the pot when finished). Stir in chicken, fresh cilantro (if using), lime juice and cheese. Cook for 2 minutes more.

Serve with a garnish of tortilla strips and sour cream.

Notes:

  1. Roughly a bit less than a 28 ounce can of tomatoes. You can use it all easily.
  2. Like leftovers from a roast chicken or a rotisserie chicken.
  3. If you're vegetarian, use cooked black beans instead and add them with the tomatoes. A tablespoon of nutritional yeast is also great (I used this myself).

Instant Mexi-Rice Mix

I think I've mentioned before that we are quite lazy. We like Mexican Rice but often, don't care to take the time to put it together. This is primarily because we figured out that we could cook it ahead of time and freeze it in appropriate sizes for later meals!

We use a 6-cup Wilton silicone muffin tin. Each muffin-cup holds just enough mix to make a great batch of Mexican Rice for two. (We split 1 rice cup of rice at dinner.) The recipe is quite scalable - just add one muffin-cup's worth of Instant Mexi-Mix per rice-cup of rice.

It can be easily doubled for a 12-cup muffin-pan as well, which would be good if your family eats 2 rice-cup's worth of rice at a time or more.

Instant Mexi-Rice Mix [printable recipe]

Makes 5 - 6 portions

  • 3 medium carrots, peeled
  • 1 large yellow onion
  • 2 red bell peppers, seeded
  • 1 large ripe tomato OR 2 ripe Roma tomatoes OR 2 tbsp tomato paste
  • 3 - 4 garlic cloves, crushed
  • olive oil
  • salt

Finely dice all of the veggies. In a large, nonstick skillet, add a couple teaspoons of oil and heat over medium heat. Cook carrots and onions separately with a pinch of salt until tender and begin to brown. Cook the garlic with tomato paste (if using) with the bell pepper until thick. Finally, if using fresh tomatoes, cook them until thick. As each veggie finishes, remove them to a large bowl where you can mix all of them together.

Pack evenly into a 6-cup silicone muffin pan1. Freeze until solid. Remove from the pan and store in a freezer bag until needed.

To use: Thaw Mexi-Rice Mix until it can be smooshed apart. Add one muffin-cup's worth of Mexi-Rice Mix per 1 rice-cup's worth of rice2. Add the amount of water needed for the type of rice being used and cook as usual.

Notes:

  1. Silicone muffin pans are wonderful because you can just pop them out when you're done. I assume that a metal muffin pan would require some nonstick spray as well.
  2. I use rice here as a catch-all. It will work for any grain or rice type that you think will taste good as Mexican Rice. Quinoa and bulgur would be quite good, for example, or a mix of rice and orzo or rice and wild rice.

Panzanella (Tuscan Bread Salad)

I should be back in a week, maybe two. Nothing's wrong, just taking a bit of a staycation while I work on some new projects and recipes.

This post is from August 2009 and is one of my favorite summer lunches once tomatoes are in season. My Tuscan friend tells me that the bread should be ground, so for that authentic, traditional flavor, send the soaked bread cubes through a grinder fitted with a coarse blade before putting the recipe together. For another Tuscan's take that's super-easy and doesn't need a grinder, see the comments. Traditionally, this seems to be a pretty soft salad, even if I do like a bit of crunch in mine!

Panzanella

Occasionally, I'll buy a baguette at the store to have with a meal. Sometimes it's a whim, sometimes I forgot to take a ball of dough out to make my own, sometimes I just don't feel like baking it myself. The only problem is, there's always some left over, even after snacks and lunch the next day. It doesn't take very long for a baguette to go stale unfortunately.

There are a lot of things you can do with stale bread, making bread crumbs is the first that springs to mind for me. But the tastiest I've found is panzanella, a Tuscan bread salad.

It's simple to make and throw together and makes an excellent lunch, even in the winter. While it probably tastes best with fresh, ripe tomatoes, it can be made with a decent brand of canned tomatoes (and always, of course, with your own) in a pinch. Though this recipe came about as another way to use up stale bread, I like to take fresh bread and toast it up into garlic bread just for this salad. Yum.

Panzanella (Tuscan Bread Salad) [printable recipe]

Serves 2

  • about 4" to 6" stale or fresh baguette or french bread
  • 1 15 ounce can diced tomatoes or 3 Roma tomatoes1, chopped
  • 2 - 3 tbsp fresh basil2, sliced
  • 2 slices turkey bacon or 1 thick slice bacon, cooked crisp and chopped (optional)
  • 1 tbsp balsamic vinegar
  • 1 tbsp olive oil
  • 1 tsp capers3
  • 1/4 cup red onion, diced
  • salt, pepper

If the baguette or french bread isn't too stale, slice it up and toast it. I like to spread butter or olive oil on top followed by a sprinkling of my garlic bread spice mix (dried parsley, granulated garlic, salt) before toasting. Let cool enough to handle, then chop up into bite-size pieces.

If the bread is already nicely stale, chop it into bite-size pieces. If using canned tomatoes, drain the tomatoes and reserve the liquid. Toss the bread cubes with the liquid in a medium bowl so they'll begin to soften. If using fresh tomatoes, chop tomatoes then toss with the bread cubes.

Combine drained tomatoes (if using), basil, bacon, capers and red onion with the bread. Drizzle over with balsamic vinegar and olive oil, add salt and pepper to taste, then toss well.

Notes:

  1. I don't bother peeling fresh tomatoes, but if it bothers you, blanch them and peel them before chopping.
  2. Any fresh herb will do here. I like basil for its peppery tanginess, but fresh oregano, thyme or marjoram would all work well, as would parsley.
  3. Adding a chopped roasted red pepper or some minced anchovy would also be good.

Making Mint Extract and Chocolate Mint Ice Cream

Chocolate Mint Ice Cream
I hope you all had a lovely weekend last week. It was Labor Day weekend and we spent it laboring over our truck which needed several repairs to stay safely on the road.

We finished off a little glass bottle of almond extract a few months ago and looked at the tiny bottle critically, trying to decide if it would be useful to re-purpose it.

As it happened, we had a scant bit of silver rum left, too little for a set of drinks but too much for most recipes. Our chocolate mint plant was doing great, sending out lots of little shoots ecstatically seeking the sun.

Put everything together and you get homemade chocolate-mint extract!

We took a small jar, stuffed it about half-full with clean mint leaves, then poured the rum over it.

After that, the process is even simpler: Stick it in a dark, cool section of the pantry for about a month. Try not to forget it's there.

When you finally remember where you put it, open the jar and sniff. It should smell like mint extract! The mint leaves will have given their all and will be dark brown and icky-looking. All that's left is to strain the extract into the jar you'll use to keep it. It's best if it's dark glass, like the bottles you see in the store.

I wanted to make something with it that would show off the extract so I could see how well it came out.

Well, it IS a chocolate-mint extract, so how about Chocolate Mint Ice Cream?

I'd found a fast, incredibly simple vanilla ice cream from Eagle Brand that I wanted to try. I'm terrible at making ice creams and sorbets - nothing ever seems to come out well, or it's so rock hard it's impossible to eat without nuking it to death. This one was supposed to be fool-proof.

In fact, there are only five ingredients, if you count the chocolate chips. Vanilla is even easier with only three.

All I can say is: I will not be making ice cream any other way for a very, very long time.

It's creamy. It's rich. It's easy. And IT WORKS. There's a lot of variations that can be used on this ice cream base too! Half-n-half isn't required, per se, but you do need to have some fat in there to make it creamy and scoopable.

Foodsubs notes you would need 1 1/2 tbsp of butter for every 7/8 cup of milk to make 1 cup of half-n-half (10 - 18% fat). I've mixed heavy cream with skim milk, for instance, and that seemed to work out well.

It's even easy to scoop right out of the freezer the next day. I was impressed.

And the mint flavor? Absolutely incredible.

Chocolate Mint Ice Cream [printable recipe]

Adapted from Eagle Brand
Makes 1.5 qt

  • 1 qt half-n-half
  • 1 14oz can of sweetened condensed milk
  • 1 tbsp vanilla extract
  • 1 tbsp mint extract
  • 1/2 - 3/4 cup mini semi-sweet chocolate chips

At least one day ahead of time, place the bowl of your ice cream maker in the freezer. Stick the can of sweetened condensed milk in the fridge.

When you're ready to make ice cream, stir together the half-n-half and sweetened condensed milk in a large bowl. Add both extracts. Stir thoroughly.

Start your machine and slowly pour in the ice cream base. When the ice cream is thick, sprinkle in chocolate chips. Follow your manufacturer's recommended freezing instructions.

I have a Krups model which took about 30 minutes to reach my desired consistency. I sprinkled in chips about halfway through.

Scoop out the ice cream into a freezer-safe container and freeze for 2 - 3 hours to harden it before serving.

We finished off a little glass bottle of almond extract a few months ago and looked at the tiny bottle critically, trying to decide if it would be useful to re-purpose it.

As it happened, we had a scant bit of silver rum left, too little for a set of drinks but too much for most recipes. Our chocolate mint plant was doing great, sending out lots of little shoots ecstatically seeking the sun.

Put everything together and you get homemade chocolate-mint extract!

We took a small jar, stuffed it about half-full with clean mint leaves, then poured the rum over it.

After that, the process is even simpler: Stick it in a dark, cool section of the pantry for about a month. Try not to forget it's there.

When you finally remember where you put it, open the jar and sniff. It should smell like mint extract! The mint leaves will have given their all and will be dark brown and icky-looking. All that's left is to strain the extract into the jar you'll use to keep it. It's best if it's dark glass, like the bottles you see in the store.

I wanted to make something with it that would show off the extract so I could see how well it came out.

Well, it IS a chocolate-mint extract, so how about Chocolate Mint Ice Cream?

I'd found a fast, incredibly simple vanilla ice cream from Eagle Brand that I wanted to try. I'm terrible at making ice creams and sorbets - nothing ever seems to come out well, or it's so rock hard it's impossible to eat without nuking it to death. This one was supposed to be fool-proof.

In fact, there are only five ingredients, if you count the chocolate chips. Vanilla is even easier with only three.

All I can say is: I will not be making ice cream any other way for a very, very long time.

It's creamy. It's rich. It's easy. And IT WORKS.

It's even easy to scoop right out of the freezer the next day. I was impressed.

And the mint flavor? Absolutely incredible.

Chocolate Mint Ice Cream [printable recipe]

Adapted from Eagle Brand
Makes 1.5 qt

  • 1 qt half-n-half
  • 1 14oz can of sweetened condensed milk
  • 1 tbsp vanilla extract
  • 1 tbsp mint extract
  • 1/2 - 3/4 cup mini semi-sweet chocolate chips

At least one day ahead of time, place the bowl of your ice cream maker in the freezer. Stick the can of sweetened condensed milk in the fridge.

When you're ready to make ice cream, stir together the half-n-half and sweetened condensed milk in a large bowl. Add both extracts. Stir thoroughly.

Start your machine and slowly pour in the ice cream base. When the ice cream is thick, sprinkle in chocolate chips. Follow your manufacturer's recommended freezing instructions.

I have a Krups model which took about 30 minutes to reach my desired consistency. I sprinkled in chips about halfway through.

Scoop out the ice cream into a freezer-safe container and freeze for 2 - 3 hours to harden it before serving.
Rice Cooker Pasta

I was feeling lazy the other day and didn't feel like cooking. We'd been cooking up a storm with a bunch of experiments earlier in the week, so I wasn't in the mood to cook. I did, however, want to try this recipe for pasta in a rice cooker that a friend of mine passed on.

She recommended that we use rice pasta because it can stand up to a lot of cooking without losing an al dente texture, so we picked up a little bag at Winco to try it. It turned out pretty well! The rice pasta has a definite texture all of its own and works well in long-cooked pasta dishes.

As usual, I can never leave well enough alone. I tweaked and played with it happily. I did manage to forget that I really abhor any kind of pepper in pasta sauce, so if you're a fan, just add in part of a pepper. (I added half of a sweet pepper we picked up from our local farmer. Artis thought it was good but I hated it every time I took a bite with a bit of pepper mixed in.)

This came out extremely filling, particularly with a little salad on the side. I honestly thought that I'd want more but when I finished, I was pleasantly full.

Also, this makes for a great emergency meal when you're too tired to cook, especially if you have jars of homemade pasta sauce laying around waiting to be used. If not, or if you don't feel like making a sauce, just add about half a jar of your favorite store-bought sauce.

Rice Cooker Pasta [printable recipe]

Adapted from a recipe on Food.com
Serves 2

  • 1 1/2 cups brown rice pasta, uncooked
  • 1 1/2 cups hot water
  • 1/2 onion, diced
  • 1/2 cup TVP + 1/2 cup hot broth
  • 1/4 cup dried mushrooms
  • 3 cloves garlic, crushed
  • 1 can crushed tomatoes
  • 1 generous splash of your favorite red wine
  • 1/4 cup shredded cheese or ricotta1
  • 1/2 tsp each oregano, basil, thyme
  • 1 tsp veggie or mushroom bouillon
  • salt and pepper
  • olive oil

Fry up onion, pepper and garlic in a skillet over medium heat until the edges are browned. Season with spices, salt and pepper. Deglaze with a splash of red wine. Add one can of crushed tomatoes. Heat until bubbly, then pour mixture into the pot of a rice cooker. Stir in pasta, cheese, TVP, mushrooms and water. Press Cook. When the cycle finishes, serve with a side salad, a bit of Parmesan cheese and garlic bread, if desired.

Notes:

  1. I didn't have any ricotta on hand and I forgot to add in the shredded. I did, however, use nutritional yeast which can add a cheesy, buttery flavor. (This is one of my latest experimental foods.) Cheese would make this dish even better.

Simple, Fast Pizza Sauce

Boy, I just finished one of the best pizzas we've ever made. Talk about good! I wish I could share a photo of this delectable beast of a pizza, but alas, it was not meant to be.

Here's what we had: A homemade whole wheat rosemary pizza crust with a red wine tomato sauce, slices of fresh ghost eggplant from our garden lightly fried, fresh tomato slices from the farmer's market, sauteed onions, bacon, fresh basil and slices of fresh mozzarella. Top that off with some sliced olives and there you have it. A damn good pizza.

Now, there's about as many ways to make a pizza sauce as there are to make pizza. I usually do something different every time, tweaking this or fiddling with that, so this is a little snapshot of one of our sauces. Sure was good though and beats those canned pizza sauces handily.

A note on the ingredients, yes, I do use canned tomatoes here. Tomatoes were late this year coming into the season for the really good stuff, probably because of the weird cold spring we had. Canned tomatoes are reliably good year-round, having been canned when the tomatoes are ripe -- and not that fake "ripe" they sell in stores. If you have beautiful garden-ripe tomatoes, use those, naturally.

Simple Fast Pizza Sauce [printable recipe]

  • 1 can diced tomatoes (about 2 cups fresh)
  • 2 cloves garlic, crushed
  • 1" of anchovy paste or 2 anchovy fillets
  • 2 tbsp red wine
  • 1 1/2 tbsp dried onion flakes1 or 1/2 small yellow onion, diced
  • 1/2 tsp marjoram
  • 1/2 tsp oregano
  • 1/8 tsp crushed red pepper
  • salt and pepper
  • 1 tbsp olive oil

Saute fresh onion, if using, in olive oil in a saucepot over medium heat. When lightly browned, add garlic and cook an additional 30 seconds. Pour in tomatoes with their juices and add remaining ingredients. Stir well and reduce heat to a bare simmer. Let cook, stirring occasionally, for 10 minutes. Puree with an immersion blender or in a real blender before using.

Notes:

  1. I have dried onion flakes on-hand because they make great toppings for bagels and they can be easily added to doughs without upsetting the dry-liquid balance.

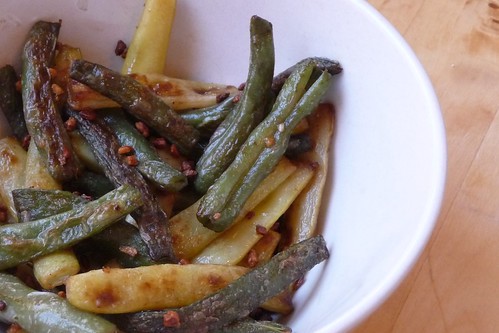
Fried Wax Beans

Fried Wax Beans

This is an incredibly simple dish that is tasty all out of proportion to its ingredients.

In short, this is a recipe that lives and dies by the quality of its ingredients.

We had found yellow and purple wax beans at the farmer's market and I couldn't resist. My husband had been wishing for yellow beans for some time, but you don't often see green beans at the local store, much less yellow. I thought the purple ones were fantastically cool, so a few handfuls went in for a treat.

Turns out that purple wax beans turn green when you boil them. Damn.

Despite the unfortunate loss of color, these are so very good. Believe me, you'll never want to so much as think about green beans in a can again after you've had these tasty morsels.

Fried Wax Beans [printable recipe]

  • 1/2 lb yellow wax beans, stems trimmed and cut into 1" pieces
  • 1 - 2 tbsp butter
  • 2 - 3 cloves garlic, minced or 1 tsp dried minced garlic
  • salt, pepper

Bring a pot of salted water to a boil and add beans. Cook for 10 minutes or until nice and tender, then strain.

In a saute pan, melt butter over medium heat and add strained beans, a pinch of salt and some freshly ground pepper. Fry, tossing frequently, until the beans begin to color. Add garlic and stir. Continue to cook until the beans are darkly golden and the garlic is nicely browned.

Cauliflower Gratin

Cauliflower Gratin

We had a head of cauliflower that we wanted to turn into a gratin. Originally, we had it all planned out, then promptly failed to write it down and forgot everything. Whoops.

So, I went looking for a gratin recipe to try. It seemed that most of the recipes I came across fell into one of two camps - either based on Ina Garten's recipe and essentially a mac'n'cheese with cauliflower or based on Thomas Keller's recipe as given in his book, Bouchon.

I'm not a fan of mac'n'cheese, nor of alfredo or bechamel. The only time I make bechamel is when I'm making stuffed, baked pasta and even then, I mix it with a red sauce. Plus, I just didn't want that much butter.

Keller's recipe, though more involved, was much more appealing. When I made it, however, it didn't seem very involved. It may have a lot of steps, but they're all pretty easy. So don't let the length of the recipe fool you, okay?

I had to make some substitutions, which isn't surprising, and I altered some of the quantities to suit what I had. It came out wonderfully all the same.

I'm really happy I decided on this one because it turned out so deliciously good. I'm really looking forward to doing it again when I have some horseradish on-hand because it'd be even better.

Cauliflower Gratin [printable recipe]

Adapted from Thomas Keller's recipe in Bouchon

  • 1 head cauliflower
  • 1 tsp white wine or cider vinegar
  • 2 tbsp butter
  • 1 small yellow onion
  • 3 - 4 cloves garlic
  • 1/2 tsp thyme
  • 1/2 tsp dried parsley flakes1
  • 1 cup half-n-half
  • 1/4 tsp crushed red chile flakes or 1/2 tsp horseradish2
  • 1/8 tsp curry powder
  • 1/3 cup grated cheese3
  • 2 tbsp fine bread crumbs, or so
  • 2/3 cup water
  • salt and pepper

Preparing the cauliflower Remove the leaves from the base of the stem and cut out the core. Chop the florets into bite-size pieces and remove the stems, placing them in a small bowl. Cut away the tough exterior of the core as necessary, then chop it into chunks and combine with the stems. Process the stem and core pieces in a food processor until finely minced (but not pureed!). You should have between 1 and 2 cups, if not, chop up some florets.

Bring a pot of water to a boil, add salt and vinegar4. Blanch the florets for 2 minutes, then strain and place in an 8x8 casserole dish. Sprinkle with salt to taste.

Preparing the sauce In the pot or a large saucepan, melt butter until foamy. Add onions and garlic, cook until translucent. Season with salt, pepper, thyme, parsley, curry powder and chili flakes (if using horseradish, don't add it). Add the minced cauliflower core bits and water, then simmer for 5 to 6 minutes. Most of the water should evaporate and the cauliflower will be tender.

Stir in the half-n-half and simmer for another 2 minutes. Remove from the heat and allow to cool for a few minutes. If using horseradish, add it now. Pour the mixture into a blender and puree until smooth. Taste and add salt if necessary.

Preparing the gratin Pour the pureed sauce over the cauliflower florets evenly. It should come about halfway up the side of the dish.

If you want, you can stop here and refrigerate this for up to an entire day. The flavors will blend together and it will be even better. Just don't put the cold dish into a hot oven - let it come up to room temperature first.

Preheat the oven to 425F.

Sprinkle the gratin with bread crumbs and cheese. Bake for 15 minutes. Test the center (if you chilled it) with a metal skewer or a butter knife - if you touch the tip to your lip or tongue, it should feel hot.

Finally, broil for 2 minutes to evenly brown the top. Serve.

Notes:

  1. If you have fresh thyme and/or parsley, you should use that. Keller says to put in the sprigs whole, then remove it - it helps preserve the whiteness of the dish. Since I had only dried in the cupboard, I didn't worry about it.
  2. Horseradish would have been soooooo good. But chile flakes worked too.
  3. He called for Comte or Emmenthaler, I used Italian blend from a bag. Boy, let's hope he doesn't find out! Could you imagine Keller ever using cheese in a bag? No, I didn't think so. I don't get paid the big bucks so it's cheese in a bag for us.
  4. Did you know that adding vinegar helps preserve the color of the cauliflower? It also helps preserve the structure of boiling potatoes - a great thing if you're intending to fry them up later. Science is neat!

A Simple Pesto

One of the best things about the local farmer's market is being able to get baggies of fresh basil cheaply and easily. And the best thing about big bags of basil is PESTO!

There are so many ways to make pesto, many of which don't even call for basil but for some other green, leafy thing. Spinach, parsley, you name it. Some with nuts, some with cheese, some with both.

So, this is only one simple way to make pesto and the high quantity of nuts and tomato make this a fairly dull-looking sauce. I have to say though, it's definitely tasty.

I like to make a concentrated paste that's easy to store then mix it up with enough water to thin it to my desired consistency. Pasta water works great because of its high starch content.

Tomato-Basil Pesto [printable recipe]

  • 1 heaping cup of fresh basil, stems removed
  • 4 sun-dried tomatoes
  • 3 - 4 cloves garlic
  • 1/4 cup walnuts
  • 1/4 cup olive oil
  • 1 ounce Parmesan or Asiago
  • 1/4 cup water
  • salt and pepper

Combine everything in the bowl of a food processor. Process until a thick paste forms, adding just enough water to enable the processor to efficiently work. Store in the fridge until needed.

To use: Mix with sufficient water to make a sauce to your taste.

Honey-Cranberry TVP

Just a quickie today. I've mentioned that we've been eating a lot of TVP because it's so easy to flavor and add. I especially like to use it in place of ground meat for tacos - it tastes just like taco-seasoned ground chicken! We wanted to do something a little different and my husband was thinking of the sweet pork and raspberry-chipotle chicken offered at a local Mexican restaurant that just opened here in our town.

It came out so well, I thought I'd share. It's sweetly spicy, a bit fruity and goes extremely well with refried black beans, some cabbage, onions, salsa and tortilla chips.

Honey-Cranberry TVP [printable recipe]

  • 1/2 cup TVP
  • 1 tsp honey
  • 1 tbsp cranberry concentrate (or crushed cranberries)
  • 1/4 tsp chili-garlic sauce
  • 1/2 cup + 1 tbsp chicken broth
  • salt

Combine everything in a small bowl and cover. Let rest for 5 - 10 minutes so the TVP can absorb the liquid and fluff up.