Welcome!

Hi there! Thanks for stopping by! If you're new here, don't forget to bookmark me or sign up for new post alerts via RSS or Email. You can even have new posts directly delivered to your Kindle or Kindle application, thanks to Amazon.

If you're here because of the profile on me in today's Tooele Transcript, you might be interested to know that I'll be doing a review series on our local restaurants over the next several months.

A big, heartfelt thank you to all of my readers who helped me get here. I couldn't have, and wouldn't have, come this far without you. Cheers!

Stuffed Acorn Squash

I'm so happy that winter squash are making their way back into stores. Prices are low this year on them, so it must have been a good year for growing -- I don't remember acorn squash starting out at 68c each last year!

Winter squash store extremely well. If you find a sale, buy a bunch and put them somewhere cool and dry. Garages and laundry rooms often are good places to store squash. As long as the rinds are hard, you have nothing to worry about.

Preparing acorn squash is pretty straightforward - it's just as with pumpkins. Chop in half, scoop out the seeds and remember, the rind isn't really good eats.

I came up with this the other week because we have a bushel of apples to use, squash tempting me every time I walk by it and crisp fall weather at last. It's easy and delicious.

Stuffed Acorn Squash [printable recipe]

Serves 2 with leftovers

  • 1 medium acorn squash, halved and seeded
  • 1 medium apple, peeled, cored and diced
  • 1 leek, light green and white parts only, thinly sliced
  • 3 cloves garlic, crushed
  • 8 "Lil' Smokies" or 2 bratwurst or other sausage, diced
  • 1 1/2 cups cooked rice (from 3/4 cup dried rice)2
  • 1/2 cup walnuts or other nuts, toasted if desired
  • 2 tbsp pepitas (roasted, hulled pumpkin seeds)
  • 1/2 tsp ground cumin1
  • 1/4 tsp ground coriander
  • 1/4 tsp ground mustard
  • salt and pepper
  • butter or oil
  • shredded cheese

Preheat oven to 350F.

Scoop out the squash halves so there is about 1/2" remaining flesh on the rind. Finely chop the excess squash and remove to a small bowl. Rub a bit of butter (or olive oil, if you prefer) all over the insides, season with salt and pepper. Bake for 25 minutes, then remove to cool slightly.

While the squash bakes, heat a tablespoon of oil in a large skillet and saute the leek until tender. Add the garlic, spices, apple, leftover squash and sausage, continue to cook until sausage and squash are nicely cooked. Taste and adjust seasoning as needed.

Combine sausage-apple mixture with the cooked rice, pepitas and walnuts. Stuff the squash halves (if you have leftovers, just serve it on the side later) and sprinkle with cheese. Bake for another 15 minutes or until cheese is browned.

Notes:

  1. My husband suggested a spice blend similar to Indian-style rice. However, you can use just about any combo of spices you really like.
  2. I used my favorite Jasmine rice, but brown would be excellent here as well. Other grains, like bulgur or quinoa, would also be good.
  3. This will probably make more stuffing that the squash needs, but it's good on its own, so I just serve some on the side or save it for lunch the next day.

New Site Feature! Clip Posts to Evernote

I've been using Evernote for a while now to save all the great recipes I come across as I browse the web. Sometimes that's challenging because clipping often grabs everything else on the page too and I wind up carefully selecting the text I want to clip rather than saving full web pages.

Now, every post of mine has a Clip icon (see the little green elephant at the bottom?) that will allow you to grab just that post. You can even see all the posts you've snagged from here when you click to Clip in the little box that pops up so you can save your Clip to any of your notebooks, assign tags and add a note for yourself. Really convenient, I think.

If you're not a member of Evernote, no worries! You can create a basic, free account* in seconds when you Clip. You can clip just about anything and access it almost anywhere. I scan a lot of recipes from magazines because Evernote will OCR the images and make them searchable.

I hope you find this as useful as I do!

  • Full disclosure: If you sign up later for a premium account, I do receive a small bonus.

On Peaches and Problems

Not every recipe will be successful.

This one was saved by the peaches and the vanilla that managed to bring it through even despite the problems. I don't often talk about failures here, part because failures are only interesting to read for so long and part because I like to put recipes up that work, that I love and want to enjoy again with friends. But, I made a promise that I would talk about what happened to those peaches and this is that story.

A friend of a friend offered me some peaches from her mini-orchard of five peach trees (!!) and wondered what I would opt to do with them. At the time, I had no idea - there are so many wonderful ways to use peaches! It would depend on how many and the size before I could decide.

Now, my favorite thing to do with peaches is turn them into Easy Peach Freezer Jam. (I still don't do hot-water canning! For some reason, that just scares me. Maybe next year.) But I've already put up two batches and there's enough peach jam in the freezer for the winter.

Another option was to make the open-faced Peach Galette from last year. It was fantastic, plus since it only needs two peaches, it might be just the thing to use up any leftovers.

One factor that also played into my decision was the packet of 30 Tahitian vanilla beans that had just arrived at my door, courtesy of Vanilla Products on eBay. Now, I know what you're thinking - vanilla beans off ebay?? They are wonderful. Clear explanations, 100% positive feedback over thousands of transactions and primo product. I'm very happy with the beans I received and am looking forward to many happy hours making desserts that were never an option due to lack of real beans.

Peach and vanilla go hand-in-hand, especially in pie, so with five ripe peaches and a packet of beans fresh from the mailbox, it had to be pie. Plus, not only have I not made one yet this year, I've never actually made a traditional American peach pie before. It's old-hat to folks in peach country, but for me, it's all new.

To make any peach dessert, you almost always have to remove the peel first. This is still easy, but it does take a little bit of time.

How to Peel Peaches Cut an "x" into the bottom of each peach, then bring a big pot of water to a boil and dunk them in for 30 seconds each. Then, remove them to an ice bath, also known as shocking, to stop the peaches from cooking. The peels should then easily slip and slide right off.

Sounds easy, right? Guess what, it is with one caveat: the peaches MUST BE RIPE. I had a bag of peaches earlier this summer that weren't quite ripe and I fought those damn things every step of the way, from getting the peels off to getting the stone out. If they're ripe, really, truly, actually ripe and not ripened simply with ethylene gas, everything will proceed quickly and easily.

I found my favorite pie crust recipe and printed out yet another copy to pin on the fridge while I worked. I carefully pushed it into place in the new-to-me ceramic pie/tart dish I found and turned my attention to the peaches.

I had just enough peaches, about 2 to 2 1/4 pounds, for the recipe I had in mind. Or should I say, recipes, since I was riffing on at least three different ones to create the final filling. I blanched and shocked, rubbing the peels off with my thumb carefully and then cutting each into little bite-size chunks.

Traditionally, both peach and apple pies call for sliced fruit instead of chopped fruit. I opted to chop instead to make it easier to remove from the pan and eat. I never seem to get a clean slice with sliced fruit!

The peaches were tossed with a tablespoon of lemon juice, 1/2 teaspoon of cardamom, a dash of cloves, the seeds from one vanilla bean and two tablespoons of tapioca starch. Why tapioca? One, it was more accessible in the pantry than cornstarch and two, I like how tapioca sets up cleanly. I added a splash of milk and a pinch of brown sugar for extra flavor.

I patted it all into place, the vanilla's scent wafting up delightfully. My whole pantry smells like vanilla, did you know? Even though they're wrapped in three freezer bags, I can still smell it faintly in the air when I open the doors.

Problem is, my "pie" looked kinda bare. I didn't want to make another pie crust, so I opted for streusel, my favorite pie topping.

Now we get to the reason why you're not seeing photos or a true recipe on this post: I tried a recipe from Southern Living and it failed miserably. The crust and pie filling came out beautifully but the streusel damn near ruined it.

I'm not sure if the recipe from Southern Living was off by not including any kind of fat, or if I put too much on, even after cutting it by half and not even using all of what I made or even if I failed to cook it long enough. The upper layer of the topping was basically raw, though most of it was cooked through.

In the end, it was all eaten and, once you took off some of the raw streusel, it was actually pretty darn tasty. Next year, when peaches come into season again, I'll try again, but next time, I'm thinking a traditional crust for the top instead. I'm not eager to repeat the great raw streusel experiment again!
Slow Cooker BBQ Chicken

I cannot believe I haven't talked about this yet. This is the first recipe that we made in our new slow cooker and it is absolutely fabulous. (Kudos to ArachneJericho who recommended it to us!) I've already made this three times and we haven't even owned our slow cooker an entire month!

I love barbecued pulled meat. Chicken and pork especially. But I've never really attempted to make it myself because it seemed so complicated and involved lots of oven-time, which heats up our small kitchen incredibly. (However, in the winter, it makes for a nice room to play board games while watching the snow fall!)

I'm not a fan of recipes that call for adding one bottle and two cans of this or that to meat in a slow cooker. I'd rather add all the little tweakable ingredients and wind up with something amazing waiting for me at dinnertime. This fits the bill. It's easy - the sauce can be made up the night before - and relatively inexpensive, since bone-in chicken leg quarters, drumsticks or thighs are usually the cheapest chicken cuts you can find in a store. Most importantly, it's delicious.

The only problem with it is that it's not well suited to throwing together in the morning before work. I have done it on LOW, it took about 6 hours, but more would not have been terribly beneficial. This is one you want to prep in the morning, leave the crock in the fridge and stop by at lunch to turn on the slow cooker so dinner is ready when you get home.

Slow Cooker BBQ Chicken [printable recipe]

Lightly adapted from Food Thinkers
Serves 2 with lots of leftovers or 4 with very few

  • 2 to 4 chicken breasts and/or leg quarters, skin removed, bones optional
  • 385g | 1 1/2 cups ketchup1
  • 40g | 3 tbsp brown sugar
  • 20g | 1 tbsp Worcestershire
  • 15g | 1 tbsp soy sauce
  • 2g | 1 tsp crushed red chili flakes
  • 1g | 1/2 tsp garlic powder

Mix up everything but the chicken in a small bowl. Arrange chicken in one layer on the bottom of a 4 - 6 qt slow cooker and pour the sauce over evenly. Cook on HIGH for 3 to 4 hours. Remove bones if necessary and shred chicken well. Mix shredded chicken with sauce well then serve.

Notes:

  1. Ketchup manufacturers are FINALLY seeing the light! Hunts now proudly exclaims that their ketchup contains no high fructose corn syrup. Heinz has about three different types of ketchup that are really good - Simply Heinz, Reduced Sugar Heinz (uses Splenda), and Organic Heinz (which tastes the best, in my opinion). Using a not-so-sweet ketchup is key to a great sauce.

Salsa Verde

The harvest is winding down but some veggies besides squash are still showing up on our farmer's market stand in spades. Notably for the past week or so: tomatillos in green, white and purple!

I picked some up last week and then bought four pounds this week to put up for the winter. I'll probably continue to buy pounds of them until they're out of season.. which could be as early as tomorrow. It all depends on frost.

This is what I'm turning them into: a mild, rich salsa verde. I used a jalapeno in one batch and fruity red peppers of unknown name in another. You want something not too spicy but not too mild. Floral is a bonus.

Artis absolutely adores this salsa and so do I, which is why I'm putting up so much for the winter. I think this is my best salsa yet.

Salsa Verde [printable recipe]

  • 1 lb tomatillos, husked and washed
  • 1 jalapeno, seeded
  • 1/2 medium onion, roughly chopped
  • 2 cloves garlic
  • 1 tbsp cilantro
  • 2 tsp lime juice
  • 1 tsp cumin, divided
  • 1 tsp oregano
  • 1/4 tsp smoked paprika
  • salt, pepper
  • non-stick spray

Halve tomatillos and spritz with non-stick spray. Season with salt, pepper and half of the cumin. Broil until sizzling and browned in spots, about 10 minutes.

In a food processor, add onion, jalapeno and garlic. Pulse to roughly chop a couple of times. Add tomatillos, lime juice and remaining spices. Pulse until finely chopped. Taste, adjust seasoning as needed.

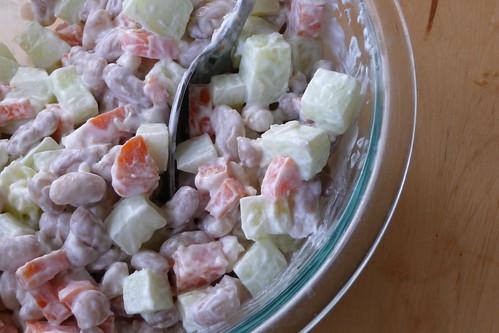
Latvian Bean Salad

Latvian Bean Salad

Summer's almost over, sadly enough. The quantity of produce we can acquire from our local farmer is diminishing week by week with squashes taking over the bulk of the offerings.

I'll miss being able to pick out fresh cucumbers or be enticed by overflowing baskets of colorful peppers. Eggplants are disappearing, our little ghost eggplant, no longer so little, has stopped blooming. The three eggplantlings that are still growing will be our last for the year. The two purple brussels sprouts have grown into monsters with tiny brussels sprouts forming at the base of every leaf. They love the chill of autumn, a welcome respite from the high temperatures of summer. We're hoping to have sprouts from our garden by Thanksgiving. For $1.50 spent on a whim, they're giving back in spades.

We've begun saving seeds from our Mexibell pepper plant so we can try to have one again the spring, along with seeds from the banana peppers we love to buy from our local farmer. We learned a lot this year about gardening - next year, we'll try again on tomatoes and zucchini.

Today's recipe is a traditional Latvian recipe that my husband grew up with. Of course, the beans he used were from his mom's garden: big, red and white patterned beans that were buttery and soft. One day, I'd like to grow some too, but I don't think they're well suited to Utah's dry desert climate. Luckily, peruano beans make an excellent replacement, even if they're smaller.

It's an easy recipe, just combine handfuls of everything until you have enough for however many people you need to feed.

Latvian Bean Salad [printable recipe]

  • cucumber
  • carrot
  • cooked beans, any varieties but the bigger, the better
  • sour cream or mayo
  • horseradish
  • salt

Peel, seed and dice cucumber into small cubes. Wrap a peeled carrot in a bit of plastic wrap and microwave for about a minute to make it more tender. Remove wrap (carefully!) and let cool. Dice into small cubes. Toss cucumber and carrot with beans, sprinkle with a pinch of salt, then stir in a spoonful of sour cream. Add a bit of horseradish to your taste if you like.

Slow Cooker Chili

I promise it won't be all slow cookers all the time, but I do have this nifty new toy. :D We're working on adapting some of our favorite Latvian recipes to it, like plovs and šķovēti kāposti, which we think are very well-suited. (The plovs was made to my father-in-law's recipe, which is braised in a sealed roasting pan in the oven. It worked well but there's still some testing to do before I write the final recipe.)

One thing I really wanted to do with our new slow cooker was make a real chili. I've tried before on the stove, but never had a successful chili worth sharing. In fact, I've only made one successful chili in my life: the Three Bean Vegetarian Chili. Even so, it's not quite what I think of when I think chili so I wanted to try again with a more traditional recipe.

I'm really happy with this one. It came out beautifully and absolutely delicious. It also scales well, since the original recipe made enough for 12 and required a much larger cooker than we have. Cutting it by half made it fit perfectly in our 5qt and it should still fit in a 4qt.

Slow cookers are ideal for this kind of meal - the longer it cooks, the better it gets, so this is definitely a recipe to throw in before leaving for work. I cooked it for 8 hours until we couldn't stand it any more and dug in, but it easily could have gone another two. I might add this just keeps getting better -- the following day's leftovers were superb.

Now, I used a mix of ground beef and TVP chunks. I wanted to see how the TVP chunks would stand up to this form of cooking in particular. I'm happy to say that they did great - they were indistinguishable from beef! I love TVP - the extra fiber and ability to take on whatever role is required makes this one of my favorite ingredients. If you have the finer TVP, it will still work fine, but if you can get chunks, you won't be sorry. I found mine marked as "Soy" in the local Mexican grocery.

Slow Cooker Chili [printable recipe]

Adapted from Not Your Mother's Slow Cooker Cookbook
Serves 6

  • 1/4 lb lean ground beef, crumbled
  • 1/2 cup TVP chunks1 + 1/4 cup hot water
  • 1 medium onion, finely chopped
  • 1 cup green cabbage, shredded
  • 3 cloves garlic, crushed
  • 3 14oz cans diced tomatoes, undrained
  • 1 6oz can tomato paste
  • 1 1/2 sweet red bell peppers, seeded and diced
  • 2 cans pinto beans OR 3 cups cooked beans
  • 1 bay leaf
  • 1 tsp ancho chile powder
  • 2 tsp pasilla chile powder
  • 1 tsp smoked paprika
  • 2 tsp ground cumin
  • 1 tsp ground coriander
  • salt
  • oil

In a medium skillet, heat oil over medium heat. Cook onions until soft.

Combine all ingredients in a 5qt to 6qt slow cooker and stir well. Cover and cook on Low for 6 - 8 hours.

If it is too thin, let it cook longer with the lid off. The longer it simmers, the better the chili will be.

Notes:

  1. Alternatively, use 1/4 lb pork sausage for carnivores or 1 whole cup of TVP chunks and omit the beef for vegetarians and vegans.
  2. A note for carnivores: Since my beef is home-ground from extra-lean roasts and used in small quantities, I didn't bother to cook it separately. If you're using a fattier grind, definitely cook it prior to putting it into the cooker to get rid of that fat. It won't be nice in the chili. Smoked sausage would also be excellent in this dish, but I'd definitely brown that first to get as much flavor as possible into the chili.

Slow Cooked Pintos Picadillo

Recently, we gave in to temptation after we cashed in our change jar and bought a handsome new 5qt programmable slow cooker. We'd been talking about it for several months and after talking it over with a close friend of ours who loves her slow cooker, we decided to do it.

To go along with it, she recommended "Fresh from the Vegetarian Slow Cooker: 200 Recipes for Healthy and Hearty One-Pot Meals That Are Ready When You Are" by Robin Robertson. We had a lot to learn and while I know meat dishes are incredibly popular for slow cookers, we also love to eat vegetarian dishes.

I have to say, I love this book. It has some fantastic recipes and so far, we've tried a few and been incredibly happy with the results. I also love the slow cooker we bought - it's the right size for us and looks wonderful in our kitchen. The only bad thing I can say is that summer is hanging on here in Utah and the temperatures have been far too high to really be in the mood for the kinds of stews and chilis that slow cookers excel at. Winter is almost here so I'm excited to make full use of this fun new toy of ours.

A couple of days ago, we decided to make another recipe and decided on a vegetarian version of picadillo. Boy, is this ever good. If you have a slow cooker, this should definitely be on your shortlist! It's sweet and spicy, but not too spicy. It's just right, especially with a glass of wine.

Pintos Picadillo [printable recipe]

Adapted from Fresh from the Vegetarian Slow Cooker: 200 Recipes for Healthy and Hearty One-Pot Meals That Are Ready When You Are
Serves 2 to 4

  • 1 medium yellow onion, diced
  • 1/2 red bell pepper, diced
  • 2 - 3 cloves of garlic, crushed
  • 3 cups cooked pinto beans1 or 2 cans, drained and rinsed
  • 1 can diced tomatoes, drained
  • 2 banana peppers, chopped or 1 can chopped green chiles
  • 1 tart apple, peeled, cored and diced
  • 1 cup veggie stock
  • 1/2 tsp smoked paprika
  • 2 cups cooked rice
  • 1/4 cup black olives, chopped
  • 1/4 cup walnuts, chopped
  • salt and pepper
  • oil

Over moderate heat, saute bell pepper and onion in oil until soft, about 5 minutes. Transfer to a 4qt slow cooker and stir in garlic, beans, tomatoes, chiles, apple and stock. Season with salt, pepper and paprika. Cover and cook on Low for 6 to 8 hours.

When the dish is finished cooking, stir in cooked rice, olives and walnuts. Taste and adjust seasoning if needed. Serve with sour cream.

Notes:

  1. I think this would be great with any bean really. Reds would be delicious, for example. Next time I think will mix reds and blacks.

Flor de Calabaza Sopa (Squash Blossom Soup)

You know how I mentioned in Spicy Tortilla Soup that there was a squash blossom soup in the same movie that I wanted to make?

I remembered on Friday to ask my local farmer if he still had any squash blossoms. It's getting really late in the season, but he still had some left. (He also told me that during the height of the season, he was filling and selling 350 bags per day. Per day! Each bag contains between 3 and 4 dozen blossoms and sells wholesale for $2 -- retail is between $2.50 (at the ethnic grocery I shop at) and $5 (or more at the yuppie shops).

He scrounged up a half bag - only about 3 dozen small blossoms - which I bought for a buck. I love buying produce from him! We get such great stuff.

Now, as I mentioned before, squash blossoms are highly perishable. They must be used within 48 hours of purchase so they don't go to waste. I used 2/3rds of my small bag to make this light and floral soup. The other third went into quesadillas with shredded cheese and a bit of salsa. (Which is also fantastic.)

Unlike stuffing and frying, sauteing blossoms calls for the green "cap" to be cut off. Doing this makes it easy to remove the stamen and any stray little prickly leaves. Don't skip this step, the prickles are uncomfortable to eat!

We also tossed in a "Mexi-bell" from our garden. They're just ripening now, turning from dark green to bright red seemingly overnight. Mexibells are a hybrid bell pepper that is both sweet and spicy. It combines the best of sweet bells and jalapenos! I'm glad we decided to pick one up for a couple of bucks at Walmart -- it was definitely worth it!

This soup is wonderfully light and makes an excellent first course or side soup for a Mexican-themed meal. I chose to preserve the texture of the various ingredients, but you can also puree it with some cream for a luscious rich soup.

Flor de Calabaza Sopa [printable recipe]

Serves 2

  • 1 1/2 tbsp butter
  • 1/2 medium white onion, finely diced
  • 3 cloves garlic, crushed
  • 3 cups / 90 g squash blossoms, cap and stamen removed, chopped
  • 1 cup chicken broth
  • 1 cup veggie broth
  • 1/2 jalapeno, minced or sweet red bell pepper, finely diced
  • 1/2 tsp cumin
  • salt
  • sour cream (optional)

In a medium saucepot over moderate heat, melt butter. Saute onion with a pinch of salt until translucent, then stir in garlic and the chile pepper. Continue to saute, stirring frequently, until the peppers are tender. Add the blossoms and cook just until wilted, about 45 seconds. Season with cumin and stir in broth. Bring to a simmer and cook for 5 minutes.

Taste, adjust seasonings accordingly. Serve with sour cream as is or puree.