Rauga pankūkas (Latvian Yeast Pancakes)

Breakfast

Periodically, I post a recipe from Latviešu ēdieni by Ņina Masiļune.

One of the things my husband has been missing from his home country is eating rauga pankūkas or yeast pancakes. I'm not really sure why it took us this long to get around to making them but after we replaced the dead yeast (always check your expiration dates!) he decided he really wanted to make a batch for our Sunday breakfast.

Now I've said before that if breakfast were up to me, we'd subsist on bagels because they're easy to pop in the toaster and load up with cream cheese. When I was single, that was basically breakfast every day -- on the days I managed to eat breakfast at all! My husband just shook his head at me and, ever since we met, has always made breakfast for the two of us. Sundays, however, are special.

Since we allow ourselves an extra hour of sleep and Sundays are usually slow-moving days, he likes to make something that maybe takes a bit more work or is a bit more special than an ordinary day. One Sunday might involve crepes with my homemade freezer jam, another might be a Dutch baby or popovers, maybe even fresh-baked muffins. And last Sunday, he opted to finally make yeast pancakes.

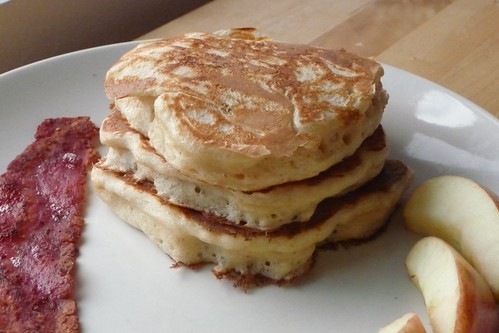
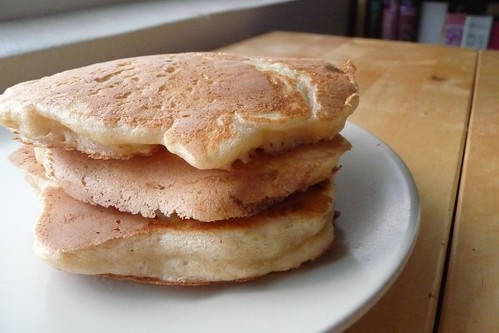
Yeast pancakes, or rauga pankūkas as they're known in Latvian, are similar to regular pancakes, except for two important differences: first, in place of baking powder, yeast is used, and second, no fat is used in the batter at all. While you can put this together the morning you wish to have it, we found that involved getting up too early, so after allowing the pancakes to rise for 90 minutes, we put it in the fridge overnight. The results are a fluffy, beautifully thick pancake with great flavor, perfect with preserves or maple syrup.

Rauga Pankūkas

Rauga Pankūkas (Latvian Yeast Pancakes) [printable recipe]

Adapted from Latviešu ēdieni by Ņina Masiļūne Serves 2
  • 200 g all-purpose flour1
  • 200 g milk
  • 1 egg, separated
  • 20 g sugar
  • pinch of salt
  • 10 g / 1 tsp / 1/2 packet active dry yeast
  • butter or oil for frying
Beat the egg yolk together well with sugar and salt. Warm the milk to between 120F and 130F, then stir slowly into the beaten egg2. Sift the flour and yeast together in a shallow dish, then slowly add the wet ingredients to the dry. Mix just until a soft batter comes together. Sprinkle the top with a bit of flour and set to rise in a warm place for 1 1/2 to 2 hours. If you're making this the night before, cover the batter with plastic wrap and place it in the fridge overnight, then proceed with the remaining steps in the morning3.

Beat the egg white until it becomes white and fluffy, soft peaks optional. Fold into the batter in thirds, being careful not to overmix. If the batter is too stiff, add a bit of water or milk to loosen it up enough to be scoopable. Wet a spoon4 before portioning each pancake so the batter doesn't stick and fry as with ordinary pancakes in a non-stick griddle or pan set over low to medium-low heat in a bit of butter or oil until golden brown and delicious.

Notes:

  1. We used a mixture of 120 g all purpose flour and 80 g whole wheat pastry flour in one of our sets. The pastry flour gives that whole wheat taste without adding too much gluten.
  2. Tempering isn't necessary here as the milk is below the temperature at which eggs curdle (between 160F and 170F), but you can do it if it makes you feel better.
  3. If you want to make these just before breakfast, the easiest is to prepare the batter through the rise the night before. Then all you have to do is beat some egg whites. Otherwise, you'll be up at 7a to have a 10a brunch on the breakfast table.
  4. Wetting the spoon in between pancake batter portions is important. This stuff sticks.

From Scratch: Red Enchilada Sauce

Red Enchilada Sauce

My husband and I wanted to make Baked Chile Rellenos the other night but discovered we were out of enchilada sauce. We stopped at the store, but nothing good was to be found, since we refused to pay exorbitant amounts for not-so-great cans.

I got down an old mexican cookbook I found at the thrift store and flipped through it. Sure enough, there was a recipe for enchilada sauce. (So far, I've only found one ingredient she calls for canned: tomatillos. I believe it's because fresh were completely unavailable at the time of writing fifty years ago.)

Luckily, we had everything called for so we set out to make our own enchilada sauce for the first time.

The verdict? Quick, easy and very tasty. Beats the hell out of the canned stuff, but it's not as thin either. I'm not sure what I think of the eggs/dairy portion and it cooks down to more brown than red, but it tastes damn good.

Red Enchilada Sauce [printable recipe]

Adapted from The Complete Book of Mexican Cooking by Elizabeth Lambert Ortiz
Yields approximately 6 cups

  • 6 ancho chiles (large, dark red, dried chiles)
  • 1 cup hot water
  • 1 lb peeled, chopped and seeded tomatoes OR 1 15oz can diced tomatoes
  • 1 medium onion, chopped
  • 4 cloves garlic, crushed
  • 1 tsp dried epazote or 1 sprig, fresh (optional)
  • salt, pepper
  • sugar (to taste)
  • 1 cup cream or chicken broth
  • 2 eggs, beaten
  • 2 tbsp lard or oil

Prepare the chiles by removing the stem and seeds before tearing into pieces. Place in a small bowl and cover with hot water. Let rest for 1 hour.

Blend chiles, the soaking water, tomatoes, onion, garlic and epazote (if using) to a smooth puree. Heat lard in a medium saucepot over moderate heat and add the puree. Cook, stirring constantly, for 5 minutes. Season to taste with salt, pepper and sugar, stir in the eggs and cream/broth then remove from heat.

From Scratch: Tartar Sauce

Tartar Sauce

Tartar sauce is one of those sauces that many folks, including myself before last year, seem to believe is easier to buy than to make.

That is not so, my friend.

Making your own tartar sauce takes less than 5 minutes of work and results in a creamy, tangy sauce perfect for spreading over a fillet or dunking with a fried fish finger. After we made this, I threw out the old bottle of tartar sauce and swore never to buy it again -- it's that easy and that good.

Tartar Sauce [printable recipe]

  • ~1/4 cup sour cream
  • ~2 tbsp mayo
  • 1 small gherkin or 1 quarter pickle spear, diced
  • 1 - 2 green onions, minced
  • ~1 tbsp lemon juice
  • pinch of salt
  • 1 tsp chives (dried or fresh) (optional)
  • 1 large clove garlic, crushed (optional)

Combine all ingredients in a small bowl and mix well. Taste and adjust ingredients as necessary to your liking. Chill for 30 minutes before using.

Boston Cream Pie

Boston Cream Pie

Boston Cream Pie is not a true pie. It isn't baked in a pie dish nor consist of tender, flaky pie crust with pastry cream. Rather it's a sponge cake that is sliced in half and layered with pastry cream then topped with ganache. It is also one of my very favorite desserts.

I developed a taste for it when I lived in Santa Cruz, California. It was only available at one of my favorite diners for a few months each year, but I took full advantage of it when it was "in season".

When my birthday came around last week, I decided what I wanted was Boston Cream Pie. (When else do you get to have an excuse to have your cake and eat it too?) I haven't had any Boston Cream in probably two or three years. It's not very popular in local restaurants that I've seen here in Utah, though you can find inferior imitations at the local megamarts. But how to make it?

I saw a lot of recipes calling simply for boxed yellow cake, vanilla pudding and chocolate chips. That's not a Boston Cream Pie, folks. Really. According to my Ratio book, the recipe I adapted may not precisely follow the ratio for a true sponge cake -- I believe this is because of the modifications Cooking Light used to "lighten" the calories, but it is close. (Now I wish I'd read that chapter before I went looking, because I would have made a sponge cake by his ratio just to try it out.)

I have to say that the sponge cake and pastry cream came out absolutely delicious. I was not happy, however, with the glaze. Not at all. Too sweet in all the wrong ways and too thin to effectively coat the top since most of it ran down and puddled around the bottom. In the recipe below, I gave my favorite ganache recipe by Alton Brown, which I really, truly should have used instead.

Plus, I would have liked it if the cake hadn't stuck. I would have loved to try this new method for slicing a cake layer in half but I stupidly used non-stick spray + flour for the cake pan preparation and it caused part of the cake to stick. Badly. So badly that it ripped at an angle and I basically trimmed the bottom layer so it would lie flat. Every time I do this, I swear I will use Crisco + flour just like I have for my entire life and every time I forget, I wind up swearing at this result.

Still tasted good though. Isn't that the most important thing in the end? I thought so.

Sponge Cake

Boston Cream Pie [printable recipe]

Adapted from Cooking Light Makes a 9" cake
  • 1/2 cup + 3 tbsp sugar, separated
  • 4 tbsp butter
  • 1 1/2 tsp vanilla extract
  • 1 1/2 tsp baking powder
  • 1/2 tsp salt
  • 1 egg yolk
  • 2 egg whites
  • 1 1/2 cups cake flour, sifted
  • 3/4 cup milk
  • Vanilla Pastry Cream (recipe follows)
  • Ganache (recipe follows)
Preheat the oven to 350F. Grease and flour a 9" cake pan.

Whip egg whites until foamy, adding 3 tbsp sugar gradually and continuing to whip until stiff peaks form. Make sure the bowl and beater(s) are sparkling clean and dry before you begin. Set aside.

In a separate bowl, cream together the remaining 1/2 cup of sugar and butter until light and fluffy. Add the egg yolk and vanilla extract, beating for another minute or two until well combined. Sift together the flour, baking powder and salt, then slowly beat in, alternating with the milk, until fully combined.

Stir in a quarter of the egg whites into the cake batter to lighten it, then gently fold in the remaining egg whites. Pour the batter into the greased cake pan and bake for 35 minutes. A toothpick or wooden skewer inserted in the center should come back cleanly.

Cool in the pan for 10 minutes, then transfer cake to a rack to cool completely.

Evenly slice the cake in half horizontally, placing the bottom half cut-side up on your cake plate. Spread on the pastry cream. Top with the other half and spread the ganache over the top evenly. (It should spill down the sides a little.) Chill the entire cake in the fridge for at least one hour so that the glaze can set before serving.

Vanilla Pastry Cream [printable recipe]

  • 1 egg
  • 1/3 cup sugar
  • 2 1/2 tbsp cornstarch
  • 1 1/4 cups milk
  • 1 1/2 tsp vanilla extract
Beat egg lightly and set aside. Combine sugar and cornstarch in a small pot or a deep skillet and begin heating on medium heat. Gradually add milk and whisk to blend. Bring to a boil and cook for about a minute, stirring constantly. Remove from heat.

Temper the egg by stirring in a quarter of the hot milk mixture (slowly!), then add the egg-milk mixture gradually into the remaining milk mixture while stirring constantly. Place back on medium heat and cook for another minute or until thickened. Do not stop stirring! Remove from the heat and stir in the vanilla. Pour into a bowl and cover with plastic wrap, pressing it onto the surface so that a skin doesn't form, then refrigerate until needed.

Ganache [printable recipe]

Not the horrid stuff I described above but a delectable ganache frosting. This, in short, is the frosting I wish I had used. I've used this ganache over the past several years and always been pleased with it.
  • 4 oz bittersweet chocolate, chopped or chips
  • 4 oz cream (heavy or whipping)
Combine the two ingredients in a microwave-safe bowl. Heat on 50% power until chocolate is mostly melted. Stir well to finish melting and combine.

Allow to cool to room temperature before spreading. Alternatively, whisk on high speed with a mixer to make fluffy ganache frosting.

Garlic Burgers & Homestyle Oven Fries

Garlic Burgers & Homestyle Fries

Last night, my husband and I got home from a sudden shopping trip to Winco because we were out of just about everything. (My fridge! Empty! Horrors!) The problem with this was that we had planned to make a pot roast for dinner, which takes 4+ hours in the oven. Not good for hungry tummies at dinnertime. Something had to be done.

We had purchased a large 4-lb beef chuck roast because it was on sale, sounded good and we could grind the other half of it up for burgers, taco mix and pelmeņi fixin's. I honestly don't know why I even bothered buying pre-ground meat from the store after my dad gave me a meat grinder attachment for my Kitchen-aid stand mixer. Grinding your own meat at home produces consistently fluffier, tastier, easier and cheaper ground meat. I love working with it, while the storebought stuff was always somewhat icky to handle and cook.

So, since I was grinding meat that night anyway, my husband suggested that we do garlic burgers like the ones at Woody's Drive-In, a popular "old-style" burger joint in Holladay. I agreed - on the condition that he make homestyle baked french fries and garlic sauce.

Mm. Talk about good! We are definitely doing these garlic burgers again - better than just about anything you could get at a local restaurant - and packed with garlic flavor. (Maybe not Acme Burger or The Counter, but those aren't local to us, unfortunately.) And if you're not doing your own fries, you should start. Those freezer bags full of reformed potatoes just can't compete. These fries are baked, so they're easier and healthier than frying, and still packed with flavor and fluffy fry goodness.

Garlic Lovers' Garlic Burgers [printable recipe]

Yields 1 burger
  • 1/4 - 1/3 lb ground beef
  • 4 cloves garlic, minced/crushed
  • 1 dash liquid smoke
  • pinch of salt and fresh ground pepper
  • 1 tsp Worcestershire or soy sauce
Combine the beef with the liquid smoke, salt, pepper and Worcestershire or soy sauce. Split in half and flatten into a thin, flat patty. Spread garlic evenly over the surface of one patty, staying a little away from the edges. Place the other patty on top and press the edges in to seal.
Preparing Garlic Burger Patties Sealing up the Garlic Burger Patties
Grill until done to your liking. (I cooked mine for 4 - 5 minutes on a Foreman indoor grill.)

. . .

Baked Thick-Cut Homestyle Fries

Homestyle Oven Fries [printable recipe]

Makes enough for 2
  • 3 medium Idaho or russet potatoes
  • small pinch of hot Hungarian paprika
  • 1/4 tsp smoked paprika
  • 1/2 tsp paprika
  • 1/4 tsp onion powder or granulated onion
  • 1/4 tsp garlic powder or granulated garlic
  • salt
  • non-stick spray
  • oil

Preheat oven to 425F.

Cut potatoes into steak fries. Make sure fries have been patted dry if the potatoes were stored in water. In a large bowl, mix together the potatoes with all of the spices, tossing well to ensure even coverage. Drizzle about 2 tsp of oil, tossing to combine.

Spread fries evenly on a cookie sheet lined with silicone or foil. Don't overcrowd. Bake for 30 - 45 minutes, depending on fry thickness, tossing every 10 to 15 minutes. Spray with non-stick spray about halfway through.

Serve with garlic burgers and garlic sauce for a great garlicky meal!

. . .

Need a dipping sauce for the fries? Or want to add a bit more garlic to your burger? Spread on some Garlic Sauce!

. . . Notes:

  1. I've mentioned before that we love paprikas of all different types. But, if you don't have anything other than regular paprika, that's okay too. It will still taste great.

Thoughts on Pelmeņi

Boiled Pelmeņi with Vegetables

For my birthday today, I wanted to talk about one of my favorite Latvian foods: pelmeņi. I've always loved dumplings of all sorts, especially potstickers and gyoza which have been the source of many a great meal for me over the years. These aren't very different - simply a different mix of ingredients. They're not natively Latvian - pelmeņi are a very popular Russian (and previously Soviet) "fast food" and are found all over Eastern Europe. Then again, pelmeņi are related to ravioli, gyoza and wontons - every country and culture seems to have their own twist on stuffed pasta.

When I first came back to the States from Latvia, I went to this little Russian store called Luybochka (959 E 3300 S Ste A, Salt Lake City) soon after in search of pelmeņi, dark rye bread and other foods I missed. I found he carried great homemade pelmeņi (ask, it's behind the counter) along with a lot of stuff I'd been looking for, but it's a long way from here to there when we don't get into Salt Lake that often. Certainly not often enough to satisfy our pelmeņi cravings. There was only one thing left to do: make it ourselves.

Making pelmeņi is as involved as making ravioli or potstickers (gyoza) by hand. You just have to roll out a very simple pasta dough and cut out circles, then wrap them around a bit of filling. It's best done with friends or family around who can help fold.

Following written directions on folding pelmeņi can be as difficult as writing them. I recommend checking out this photo recipe on Cāļa virtuve for step-by-step photos. Below, you can see my finished raw pelmeņi right before being frozen.

Folded Raw Pelmeņi

Pelmeņi [printable recipe]

Adapted from Cāļa virtuve
Serves 6 or freezes well in small portions

Dough:

  • 2 cups all-purpose flour
  • 1/2 cup warm water
  • 1 egg
  • 1 pinch of salt

Filling:

  • 1 lb ground meat -- I used 1 lb of ground petite sirloin for the ones shown
  • 1/2 large onion
  • 2 - 3 cloves of garlic, crushed
  • 2 tbsp milk
  • 1/2 tsp dried dill
  • 1 tsp dried parsley or 1 tbsp fresh
  • 1 tsp basil
  • 1 tsp marjoram
  • 1 tsp crushed red chile flakes
  • salt and pepper

Dough - Method #1: Mound the flour on a clean, large surface (cutting board, table, counter, etc..) and sprinkle with a bit of salt. Form a well in the center and crack the egg into it. Using your (clean!) hands, mix together into a dough, adding water until it comes together. (You may not need all of the water, depending on the day.) Knead until smooth and elastic - about 5 - 7 minutes.

Dough - Method #2: In the bowl of a stand mixer fitted with a dough hook, combine flour, salt, egg and a bit of the water. Mix, adding water as required to produce a strong dough. Knead on medium-low speed until smooth and elastic - about 2 - 4 minutes. [This is my preferred method. I love my mixer!]

Let the dough rest for 30 minutes or so while you put together the filling.

Filling: Grate, grind or process the onion and garlic, then mix all ingredients together thoroughly.

Roll out the dough to about 1/8" thickness. Using a small biscuit/cookie cutter or a glass, cut out as many rounds as will fit. I use a 2 1/4" / 58 mm cutter myself.

Spoon a small amount of filling - my rounds take between a teaspoon and a teaspoon and a half - into the center, then stretch the dough over it (as necessary) to form a half moon shape. Crimp the edges shut, then bring the ends together and pinch - similar to a tortellini.

OR: Cut even smaller rounds out and place the filling in the center of half of them. Cover each round of filling with another dough round and crimp the edges down.

Freezing: If you're not planning to cook them all immediately, arrange the pelmeņi on a sheet pan and place flat in a freezer for several hours. Once they have frozen completely, seal in freezer-safe ziptop bags and freeze for up to 6 months.

Cooking and Serving: For a full meal, I figure about 150g to 200g of pelmeņi per person. There are several ways you can prepare these - these are two of my favorite.

Method #1: Cook the pelmeņi for 10 minutes in just enough boiling, salted water or chicken broth to allow them to float. During the last 5 minutes of cooking, add a bag of frozen veggie mix. Ladle pelmeņi, broth and veggies into bowls. Stir in a tablespoon of sour cream and a teaspoon or two of soy sauce (adjust to your taste).

Method #2: Using a deep fryer or in 1/2" of peanut oil in a wok or deep skillet, heat oil to about 350F. Drop in pelmeņi and fry until golden brown on all sides. Remove and drain, patting off any excess oil. Serve with plenty of sour cream. [Note: I take no responsibility for the sheer addictive delight of fried pelmeņi. Eat at your own risk!]

Notes:

  1. This is just one type of filling. Obviously you can put just about any type or combination of meat in.
  2. I ground the onion and steak together in my meat grinder. However, there are many ways to accomplish the same end result, including processing both in a food processor, using pre-ground meat and grated onion, and so on. I find grinding it myself in the meat grinder gives the best and fluffiest texture.

Pomegranate Salad

Pomegranate Salad

I noticed the fuss made by other foodie bloggers over pomegranates the last few months, but I didn't really think about it. I noticed the bins of pomegranates that eventually showed up for a month at even my rural town's grocery stores, but I didn't think much of them. To be honest, my knowledge of pomegranates pretty much began and ended with the myth of Persephone and Hades.

I didn't really "get" the concept of how Persephone could eat six seeds, resulting in her staying six months, one for each seeds, with Hades each year. To me, seeds in fruit were seeds in fruits like apples, oranges, pears and watermelons: the stuff you spit out, cut out or otherwise avoid. As far as I was concerned, you'd have to be pretty desperate to eat an apple seed, much less six of them.

In fact, the seeds of the pomegranate, which are more properly called "arils", are the only edible part of the pomegranate. The outer shell consists of the thick, bitter pith, with membranes covering the arils that look like honeycomb when they're pulled away. The glossy red arils, however, burst in your mouth with pops of highly concentrated flavors intermingling sour and sweet.

I found this out when my mom decided to try a pomegranate at Christmas, preparing a quick salad of spinach greens, avocados and pomegranate. At first, I wasn't sure if the whole aril was edible, being as there is a tiny hard seed inside each one (which is why it is called an aril), but they are - it is only the husk of the fruit that is discarded. (If you try to taste a bit, you'll quickly understand why.) Once I got used to it, I found I really liked pomegranate! They're fun to crunch and add a lot to a simple salad.

So, my husband and I decided we wanted to have pomegranate again and bought one just before they went out of season. (Pomegranates have a short window of availability from October to January, and it's even shorter in my small town.) We weren't disappointed.

They're easy to open and here's my method. I scored the skin of the pomegranate with a sharp knife and pulled away the husk in sections, following the natural sections inside. Then, I simply pulled the inner membranes off the arils and ran my thumb along the side to "pop" them off into a bowl. It worked very well for me, but I know another recommended method is to cut the pomegranate in half and rinse the arils out under running water into a sieve.

We had a couple of pomegranate salads and I'm sorry to see them disappear from stores. They were awfully good. Next October, when everyone goes gaga over pomegranates being back in season, I won't pass them by.

This recipe doesn't specify units because I feel they're arbitrary, with the exception of a couple of suggested portions. Use as much as you want and whatever your favorite salad ingredients are. Since this recipe was used at lunch, I didn't put too much in.

Pomegranate Salad [printable recipe]

  • red onion, minced
  • 1/4 to 1/2 ripe Hass avocado, chopped, per person
  • spinach, arugula or mixed greens
  • sun-dried tomatoes, chopped
  • pomegranate arils (about 1/6th of a typical fruit per person)
  • hard-boiled egg, chopped
  • your favorite vinaigrette

Combine everything in a salad bowl and toss well.

Penne with Sausage, Eggplant and Feta

Penne with Sausage, Eggplant and Feta

Ever have one of those days where you just couldn't wake up?

Yeah, that was my day today.

I even napped in my desk chair for a bit this afternoon with Mickey, my 18 lb kitty, purring happily away on my chest, head snuggled into my cheek.

Which is why this post is woefully late... and consists of the most excellent meal we made for ourselves just a few minutes ago.

We had an eggplant to use up and had been planning to make a vegetable lasagna, before we found that we'd forgotten to save some mushrooms, peppers and a few other things. In short, the recipe was limping along on some eggplant and pasta noodles. Something had to be done.

I suggested my favorite eggplant dish: Eggplant Parmesan. My husband shook his head - he had his heart set on pasta.

And so, he found this recipe and I cooked and you can read about it. Once I'm done, I've promised myself a glass of mulled wine, so I'm going to stop here so I can go have a glass. Or two. Enjoy.

Penne with Sausage, Eggplant and Feta [printable recipe]

Adapted from MyRecipes
  • ~1 pound peeled eggplant, diced
  • 1/2 pound sausage
  • 6 cloves garlic, minced or crushed
  • 2 tablespoons tomato paste
  • 1 teaspoon dried oregano
  • 1 (14.5-ounce) can diced tomatoes, undrained
  • 3 cups collard greens, stemmed, finely chopped
  • 8 ounces uncooked wheat penne pasta
  • 1/2 cup (2 ounces) crumbled feta cheese
  • salt, pepper
  • olive oil

Start a medium pot of water boiling.

Over medium-high heat, cook sausage in a large skillet until browned (about 6 - 7 minutes). Remove to a large bowl. Cook eggplant with a drizzle of olive oil until soft and tender, about 6 - 7 minutes. Remove.

Cook wheat penne according to package directions or for approximately 11 - 13 minutes, until al dente. Drain and remove to the bowl of sausage and eggplant.

While pasta cooks, saute collard greens with a drizzle of olive oil until tender, about 5 minutes. Remove and toss with other items in the large bowl.

Combine the diced tomatoes, garlic, oregano, pepper and tomato paste in the skillet. Cook, stirring occasionally, until thickened, about 3 - 4 minutes.

Toss the sauce with the pasta and everything else. Spoon into pasta bowls and crumble some feta cheese on top.

Brazilian-style Collard Greens

I'm always surprised by how many collard greens are required to make a satisfying dish. I never feel guilty, however, if I wind up using a ton of these dark, leafy greens with their negligible caloric impact and high nutritional values.

I've heard that they're fairly easy to grow in the right climate (but isn't that so for everything?) and I'm even tempted to try a packet of seedlings next to the tomato plants I plan to attempt. I could easily munch my way through several helpings of collard greens without even a pause.

Still, I'm not from the South - neither the Deep South of the United States nor South America. I don't have very many recipes in my repertoire for collard greens. While doing some research into recipes for dinner, I came across a story on epicurious about Brazilians' love for collard greens.

This recipe was presented as a typical Brazilian dish, noting that the greens should be chiffonaded (sliced into very thin ribbons) as finely as possible. Unlike many boiled and braised recipes, the ultra-fine ribbons cook extremely quickly, making this easy-to-prepare dish a plus in my book.

We heartily enjoyed this method of making collard greens. I'm thinking about trying it with some swiss chard in the summer, when bags stuffed full of chard go for a dollar at the market.

Brazilian-style Collard Greens [printable recipe]

Adapted from Epicurious.com
Serves 2

  • 8 ounces collard greens, destemmed
  • 5 cloves garlic, crushed
  • 1 pinch of salt
  • 1 splash of lemon juice
  • 1/2 - 3/4 tsp crushed red chili flakes, to taste
  • olive oil

Chiffonade collard leaves. (Roll up tightly into a cigar shape and slice as finely as possible.) Crush garlic to a paste and sprinkle over with salt.

Heat olive oil in a large skillet over medium heat until it shimmers, then cook garlic and chili flakes, stirring, 30 seconds. Add collards and liquid smoke (if using), cook, stirring periodically, until just tender, about 3 to 4 minutes. Finish with a splash of lemon juice.

Char Siu Bao (Chinese BBQ Pork Steamed Buns)

Char Siu Bao

My mom gave us for Christmas a big basket of goodies from one of her trips to a local asian grocery, along with a challenge to find a way to use some weird ingredients she found during her shopping trip. (Which is why over the next little while, you can expect to see some rather odd recipes showing up!) She also gave us a beautiful two-tiered bamboo steamer, which my husband had only seen in pictures. (Thank you Mom!)

After explaining all the different things we could make with a bamboo steamer, my husband was really intrigued by the idea of steamed buns, or bao. I promised him I'd make him char siu bao or Chinese barbecued pork buns within the week.

Now, I've steamed a lot of different types of dim sum but I've never made bao before. Turns out, it's not a big deal: the yeast dough is quite simple to make and the filling is deliciously easy.

If you have an asian grocery nearby that you can buy precooked char siu, you can skip to the filling part entirely. Just dice it up and add it to the sauce.

Also, I'll warn you: I'm not too familiar with all the variations of char siu. I went with a recipe that I liked but it's fairly dissimilar from the restaurants in my area, for example.

You don't need to use pork either. I'm planning to fry up some diced chicken and eggplant for my next set of bao. Should be good (and if/when it is, I'll post about it).

Char Siu Pork [printable recipe]

  • 1 lb pork roast, trimmed
  • 4 cloves garlic, crushed
  • 3 1/4″ slices of ginger, sliced
  • 1/4 cup soy sauce
  • 1 tbsp hoisin sauce
  • 1 tbsp white wine
  • 1 tbsp honey
  • 1 tsp Chinese 5-spice powder

Combine all ingredients and marinate roast overnight in a sealed container.

Set a rack inside a roasting pan or rimmed sheet pan. Preheat oven to 400F and boil some water in a kettle. Rest pork on the rack and pour boiling water into the pan so the meat will stay moist. (You do not want the pork to sit IN the water, just ABOVE the water.)

Roast the pork for 15 minutes at 400F, then flip the roast over and reduce to 350F. Continue to roast, turning every 15 minutes and basting with the remaining marinade until cooked through. (Check with a meat thermometer.)

I sliced mine into inch-thick slices and roasted for about 45 minutes. Allow to cool and proceed to making the filling.

Char Siu Bao Filling [printable recipe]

  • 1 1/4 cups Char Siu, diced
  • 1/4 cup hoisin sauce
  • 2 tbsp soy sauce
  • 1/2 tbsp chili garlic paste
  • 3 green onions
  • 5 cloves garlic, crushed

Saute the garlic for a minute or two over medium heat in a bit of oil. Combine everything in a small bowl and set aside.

Bao Dough [printable recipe]

  • 3 cups all-purpose flour
  • 1 cup cake flour
  • 1 1/2 tsp dry yeast
  • 1 1/4 cup warm water (105F to 110F)
  • 2 tbsp sugar
  • 1 pinch salt

Proof the yeast: Combine yeast, sugar and water in a mixing bowl and let rest for 10 minutes.

Knead the dough: Add dry ingredients and knead for 5 - 10 minutes (by hand or by stand mixer) until the dough pulls together and becomes shiny and tight. Remove to an oiled bowl and let rest for 15 minutes, covered.

Raw Char Siu Bao

Char Siu Bao [printable recipe]

  • 1 recipe Bao Dough
  • 1 recipe Char Siu Filling

Prepare the buns: Portion the dough into 16 pieces. Flatten each piece into a disc and put about 1/2 tbsp of filling (or so) in the center. Pinch the edges together so it forms a nice, smooth ball. Let them rest for 10 minutes on some parchment paper.

Steam: Arrange the buns with space in between on some parchment paper or cabbage leaves in a covered steamer. (Mine is bamboo, as you can see.) Steam the buns for 8 - 10 minutes.

Serve: Serve them hot and fresh or allow them to cool completely then store in a ziptop bag in the fridge (or freezer). If you freeze them, reheat by steaming for 5 - 8 minutes. Buns are good hot or cold.

Notes:

  1. As you can see from the picture, I forgot to put some parchment or cabbage leaves down. (Okay, I didn't have any cabbage leaves, but I could have used a collard leaf.) These little puppies stick! I've a lot of scrubbing to do to get these steamers clean again. So don't make my mistake, okay?