All*You Grocery Challenge

We've been preparing over the past week to attempt this year's All*You Grocery Challenge. Now, we're not trying to "cheat" by stocking up a month's worth of groceries so we can easily stay under budget, rather we've been inventorying what we have in our pantry and freezer. We've gotten lazy about our grocery spending and sometimes those impulse purchases don't get used the way we thought they might.

I'm hoping that our little garden grows and lots of fresh produce comes springing up - we've planted all sorts of veggies and I'd like to start canning this year. Last year I learned how to make freezer jams, this year I want to learn to preserve salsas, tomatoes and other fun things. We need space to do this and we don't need to hang on to a lot of food we aren't going to replace once we eat it.

So, over the next four weeks, we'll be following these rules:

  • We have exactly $50 to spend on enough food for the two of us each week.
  • Dining out has to come out of the budget, so we have to be careful unless someone else is paying.
  • We're allowed to eat out of our pantry and garden for "free".
  • We don't include household items or pet food in our grocery budget.
  • We can't "carry over" unused funds from one week to the next.

We don't eat out often, about once or twice a week. But I'm concerned about keeping under budget and still being able to grab a bite before shopping at Winco each week. (Never grocery shop while hungry.) There's options though - from coupons to packing a lunch for the park to inexpensive taco trucks, so we'll see.

Our goals:

  • come in under or at budget each week,
  • continue to eat healthy meals with little reliance on processed foods,
  • eat through the excess in our pantry, and
  • do it all creatively.

I hope it'll be fun! And I hope we are able to succeed. We don't have the easy access to double/triple coupon days, catalina/register rewards stores or discount groceries that many others do. If we don't succeed, well, at least we'll have gotten through a goodly amount of leftover pantry items that have been gathering dust!

Ryazhenka (Baked Cultured Milk)

See my post, On Baked Milk and Slow Cookers, for how to use a slow cooker to "bake" the milk before culturing.

One night, when we still lived in Liepāja, we were at Rimi picking up food for the next day or so and my husband decided he felt like ryazhenka. He loves the caramelized taste of the milk and thought I might like it. I did, though I couldn't drink much of it at once. (It actually wound up being my gateway to drinking kefir!)

But, I hadn't had ryazhenka again since well before we left Latvia together (and neither has he), so when we saw our favorite Russian market1 had started carrying it, we picked up a bottle. It was expensive2 but oh so worth it. The price, not to mention the drive necessary to get there, put ryazhenka firmly into the area of "rare indulgence". There had to be a way to make it.

After some research, I began to think that ryazhenka wasn't that hard and we could have had this much, much earlier if we'd known. All it is, as the name implies, is cooked cultured milk.

Although many of the recipes out there on the Net call for boiling the milk and then cooling it to a culturing temperature, I found I didn't get consistent results. Honestly, this would eliminate what I feel is the best part of ryazhenka - the caramelized flavor. Boiling also came very, very close to simply creating another batch of buttermilk -- which is not the same thing at all. And when you factor in the pain of cleaning burnt milk off of the bottom of a pot (we don't have a dishwasher), it's more than I want to do. Much easier just to turn on the oven and forget about it for a few hours.

  1. European Tastees in Ivy Place on 9th East in Salt Lake City
  2. $3.50 for a quart, ouch!

Ryazhenka (ряженка) - Oven-Baked Version [printable recipe]

Yield: About 1 quart

  • 2 1/2 quarts milk
  • 1/4 cup cultured buttermilk

Preheat oven to 350F. Pour milk into an oven-safe 13x9 casserole dish and place in oven. Bake for 4 - 5 hours until a golden brown crust forms on top of the milk. Remove from the oven, let cool slightly so that the crust can be removed. The milk should be light tan. Continue to cool to between 105F and 115F.

At this point, the baked milk is rather good - very sweet with caramel notes. You can stop here, cool it completely and chill.

While the milk is cooling, get your vessel ready. I use a Yogotherm, a styrofoam contraption designed for culturing yogurt. You can use anything similar that will help the milk hold on to its heat as long as possible - a Thermos, insulated carafe, bowl wrapped in towels and a heating pad set on low (Alton's yogurt maker), etc. Pour the milk into the vessel and stir in 1/4 cup of buttermilk. Cover or seal the vessel and leave it in a warm place for 10 - 12 hours (i.e., overnight).

The next day, you should have ryazhenka! Pour off the ryazhenka into a bottle or pitcher and store in the fridge. It will be thick-ish, much like drinkable yogurt.

Before I left for Latvia the first time, I figured I would try drinking kefir. I knew there were a lot of sour dairy dishes that I would be able to try and I wanted to have an idea what I was in for. So, I bought a bottle of plain kefir and took it home.

It didn't go well. It tasted incredibly sour - so sour, I couldn't drink it. It didn't bode well.

I tried kefir, couldn't drink it - but it was much milder than what I'd had in the States. It wasn't bad, just too much for me. (To this day, my husband wonders if the bottle I bought had, in fact, gone bad without anyone knowing.) Buttermilk (paniņas) was right out. Then, one night we were at Rimi picking up food for the next day or so and he decided he felt like ryazhenka. He loves the caramelized taste of the milk and thought I might like it. I did, though I couldn't drink much of it at once.

And that's how I started being able to drink all these "weird" sour dairy drinks. It was all ryazhenka's fault. By the time I left, I had developed a taste for kefir. When I came back, it was my drink of choice at restaurants and we often had a carton in the fridge.

But, I haven't had ryazhenka again since well before we left Latvia together (and neither has he), so when we saw our favorite Russian market (European Tastees in Ivy Place on 9th East in Salt Lake City) had started carrying it, we picked up a bottle. It was expensive ($3.50 for a quart) but oh so worth it.

The price, not to mention the drive necessary to get there, put ryazhenka firmly into the area of "rare indulgence". There had to be a way to make it.

After some research, I began to think that ryazhenka wasn't that hard and we could have had this much, much earlier if we'd known. All it is, as the name implies, is baked cultured milk. The store-bought one had the same consistency and tang of buttermilk, so we started with that. Buttermilk's easy to get and pretty cheap too, so if it went sour, it wasn't a big deal.

As it turns out...

Ryazhenka (ряженка)

1 quart buttermilk

Preheat oven to 350F. Pour buttermilk into an oven-safe casserole dish (I used an 8"x8" Pyrex baking dish) and place in oven. Bake for 4 - 5 hours until a thick brown crust forms on top of the buttermilk. Remove. Remove crust - ryazhenka should be the color of a latte - and pour ryazhenka into a jar or bottle and refrigerate overnight.

Mung Bean Pancakes

Mung Bean Pancakes

We've been having a lot of fun trying out new vegetarian and legume-based recipes. This one is from Bittman's How to Cook Everything Vegetarian. We had problems initially sourcing the dried mung beans but finally came across the right variety at one of the downtown Asian markets.

It is possible to do this recipe with whole, unskinned mung beans, as we did initially, but the skins leave a gritty texture on the tongue, so I don't recommend it. Look for "moong dal" at Indian specialty stores or split mung beans at Asian markets. They look like bright yellow split peas and should be fairly inexpensive.

I was fascinated by the texture and flavor after soaking that these little guys have. They taste just like bean sprouts but in a teeny tiny package! (Which is, you know, really not surprising, given bean sprouts in the store are germinated beans... but whatever. I was still excited.) Unlike regular beans, they don't need to be boiled after soaking - they're edible as soon as they've soaked. So, much much easier to work with and a good gateway drug into the fun of cooking with dried beans! ;-)

This recipe is a great way to get a ton of protein and fiber from a single part of your meal. All you need is a sauce and some veggies to make a full dinner... and these are filling, believe me. We had them with the Garlic Cheese Sauce I talked about last week, along with a simple cucumber-radish-tomato salad. I love how full of flavor they are - they're a lot like latkes or dosas.

Mung Bean Pancakes [printable recipe]

Lightly adapted from Mark Bittman's How to Cook Everything Vegetarian
Serves 2 as a main

  • 1/2 cup to 3/4 cup split, skinned mung beans (moong dal), soaked overnight
  • 1 egg
  • 3 cloves garlic, crushed or minced
  • 1/2 fresh jalapeno, seeded and minced
  • 2 - 3 green onions, finely chopped
  • 1 medium carrot, peeled and grated
  • salt and pepper, to taste

Puree the beans along with about 1/4 cup of water in a food processor until smooth and thick, adding water as necessary for a thick battery consistency. Stir in or pulse in remaining ingredients. The batter should now be like a very thick pancake batter.

Heat a 10" or larger skillet or griddle over medium heat and drizzle a bit of oil over. (Just like making pancakes. It doesn't take much if you have a good pan.) Ladle out a portion, swirl to a nice round and cook until well-browned, about 5 minutes. Flip and cook for another 5 minutes. Repeat.

Garlic Cheese Sauce

I originally made this sauce to go over Mung Bean Pancakes (which I'll post about next week) but when we decided to do a teriyaki pork pizza, we needed a cheesy white sauce for it. Turns out, with a few minor modifications, this sauce works great as a pizza sauce! Today, I'll post both variations - one light and saucy one for pasta or meat and one thick one for pizzas or garlic bread.

It can be quite strongly garlic, especially if you add another clove of garlic or use a persillade spice mix (parsley, minced dried garlic and salt), however, once it is cooked, it pulls together nicely and calms down. I've made it twice now and have been very happy with how it comes together -- I can see using this sauce over a lot of different items that often stump me when it comes to sauce application. Plus, it's easy to modify the thickness by using the milk to thin it to your desired texture.

Garlic Cheese Sauce I [printable recipe]

Yield: About 2 cups

  • 1 clove of garlic, crushed or grated finely
  • 2 tbsp ricotta or chevre
  • 2 ounces cream cheese or neufchatel
  • 1/4 cup milk
  • 1/2 cup sour cream
  • 1 tsp each dried basil, marjoram and oregano
  • 1/2 tsp dried parsley
  • 1/8 tsp (a dash) hot paprika or cayenne
  • 2 green onions, minced
  • 1/2 ounce Parmesan, Asiago or Romano
  • salt and pepper, to taste

Combine all in a small bowl and beat together thoroughly. Alternatively, combine all in the bowl of a food processor and pulse until the sauce is thick and mixed well.

Spread over a pre-baked pizza crust as a sauce, slices of french bread for a soft, garlicky spread or over savory crepes and pancakes.

Garlic Cheese Sauce II [printable recipe]

Yield: About 2 cups

  • 1 clove of garlic, crushed or grated finely
  • 2 tbsp ricotta or chevre
  • 2 ounces cream cheese or neufchatel
  • 3/4 cup milk
  • 1/4 cup fresh basil, sliced
  • 1 tbsp fresh parsley, chopped
  • 1/8 tsp (a dash) hot paprika or cayenne
  • 2 green onions, minced
  • 1/2 ounce Parmesan, Asiago or Romano
  • 1 tbsp white wine or broth
  • salt and pepper, to taste

Combine all in a small bowl and beat together thoroughly. Alternatively, combine all in the bowl of a food processor and pulse until the sauce is mixed well.

Ladle onto cooked pasta and toss well or pour over fillets of cooked fish or chicken for a creamy garlic sauce. Also would go well on steamed vegetables.

Happy Blogday!

Pretty Flower

I can hardly believe it -- The Kitchen Mouse is now one year old!

A heartfelt thank you to you: my readers, commenters and subscribers. I wouldn't be here still writing without you.

I've also been looking into pushing updates to the Kindle, now that Amazon allows such a thing for little bloggers like me. I'm happy to announce that if you'd like to read The Kitchen Mouse on your Kindle or Kindle application, you can subscribe here.

Here's to another great year!

The Cheesmo Cheese Press

Cheesmo Cheese Press

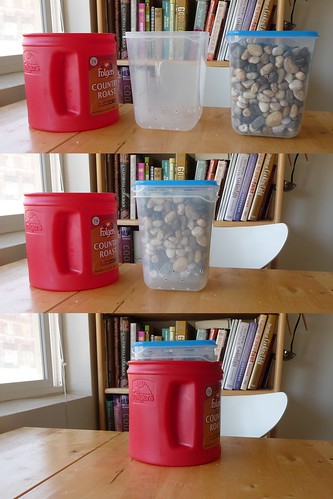
I talked a little bit about my cheese press in Biezpiens, Refined but, as Ivars noted, it can be really difficult to imagine what such a jury-rigged contraption looks like. So, I figured I'd take a little more time and try to explain better. (Also, so I can refer back to this when I make other fresh cheeses that benefit from being pressed rather than explaining all over again.)

My MacGyver'd "press" is incredibly simple and dirt-cheap - about $3 for some containers and nice rocks from the dollar store. Naturally, I could have used rocks from the yard but I didn't feel like picking through them for reasonably small ones.

Parts & Tools Required:

  • Two nesting food-safe tupperware-type containers
  • One container large enough to hold the nesting containers
  • Weights of some sort
  • A drill

We picked up two identical tall, 1-quart nesting tupperware containers at IKEA on clearance because they were floor models. Any kind of containers work for this, as long as you have something larger they will fit into to catch the whey. This can be as simple as a disposable or old pie plate. They also should be large enough to hold a goodly amount of cheese and weight: about a quart or bigger. It doesn't matter if they are round or square.

My husband drilled holes in the bottom of one and about 2" up the sides. He used a 1/4" drill bit so the holes would be big enough for drainage but not big enough for any stray bits to escape out of. If it cracks a little, it's no big deal.

I filled the other container with 5 pounds' worth of river rocks and sealed the lid on tight. Anything heavy works, including water. (Factoid: One liter of water weighs one kilogram.) When fiddling about building this, we seemed to get the best results if the weight is between 4 and 6 pounds. Anything less didn't work too well for us.

We set the whole thing inside an old Folger's coffee can on top of an old jar lid to catch the liquid. We use the little jar lid to raise the press up enough that the holes can drain and the whey doesn't immediately soak back into the cheese.

Why a coffee can? Because it's just big enough to go around the whole press, so it's easy to store in the fridge or on a shelf. Plus, my husband drinks a lot of coffee, we have lots of these hanging around, so I re-purpose them to hold different flours and cereals. (One of these holds about 3 1/2 pounds of flour, quite handy.)

That's it! My cheesemo cheese press. Cheap, easy and ugly. It works really well for basic cheeses like ricotta, biezpiens and Jāņu siers, plus it also works for pressing excess water out of tofu.

Biezpiens, refined.

Biezpiens

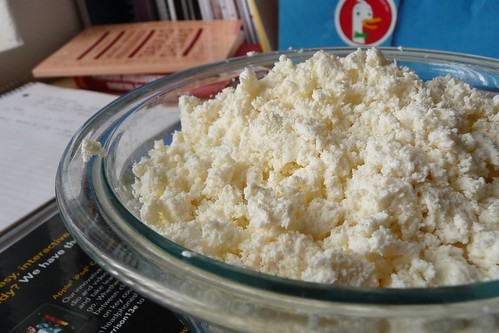
Yes, this is my messy desk, covered with notes and textbooks for my classes, books on Latvian language and my coupon organizer with its Duck Duck Go search engine sticker.

I've spoken in the past about Latvian biezpiens, roughly translated as "curdles." It's an essential part of making pankūkas, for one, and several desserts (like biezpiena maize).

It's also completely unavailable to me. You might find it in Brooklyn, maybe. And quark just doesn't cut it for me. It's just not the same. Since we can't easily go to Rimi and buy a pack or beg my mother-in-law's neighbor for some, we have to make it.

I've made biezpiens before, but every batch was different and I couldn't get it consistently working. It also relied too heavily on products that can be expensive or hard to obtain. Creamy kefir cheese, as much as I love it, isn't dry enough nor is it consistent in its texture, thanks to the lovely little live cultures driving my kefir production, for me to be able to consistently produce a nice biezpiens.

We've been experimenting with different methods of making it. And now, we've finally, finally found a way to make consistent, dry, crumbly biezpiens inexpensively, thanks to an accident while making ryazhenka.

Ideally, you need some form of press to press additional liquid out of the curdles when they're done being strained. If you don't have one, or can't rig one up, it's okay, but they won't be as dry.

Originally, I described my press here, but I've decided to break it out into its own post with pictures. Check it out here.

We tested two different methods: one with the oven and one with our rice cooker. The rice cooker is definitely our favorite - it's low, slow and unlikely to cause a mess. I believe that a slow cooker on its lowest setting would also work but please check it often. The oven method is faster but if you move wrong, you'll splash buttermilk all over and make a huge mess. Be warned.

We used one half-gallon plus a quart for the tests and wound up with about a pound of biezpiens, which packed our 1 quart bowl. Plenty, in short, for Jāņu siers and some pankūkas for dinner the next day.

Biezpiens, Refined [printable recipe]

Yield: About 3/4 pound per half-gallon of buttermilk Rice/Slow Cooker Method
  • 1/2 gallon buttermilk
Pour buttermilk into the cooker and set it to Warm. Close the lid and wander off for about 90 minutes to 2 hours. Open the lid and check: the buttermilk should have completely separated into a solid mass of curds floating on clearish whey. The top should be springy and dense, the curds somewhat moist but much, much drier than cottage cheese. If it is more like cottage cheese, close the lid and let it cook another 30 minutes. Oven Method
  • 1/2 gallon buttermilk
Preheat oven to 300F. Pour buttermilk into a 13x9 casserole or baking dish. Bake for 50 minutes to an hour. The edges will cook faster than the center, so test the center when you check on it. When ready, the buttermilk should have completely separated into a solid mass of curds floating on clearish whey. The top should be springy and dense, the curds somewhat moist but much, much drier than cottage cheese. If it is more like cottage cheese, let it cook another 30 minutes. After cooking via either method... Line a large sieve or colander with cheesecloth or butter muslin. Strain the buttermilk mixture through it and gather up the edges of the cloth. Wrap the proto-curdles loosely and place into the press. Place weight on top and then chill in the fridge for 24 hours. If you don't have a press, place the sieve into a bowl and rest a bowl of water or rocks or something on top of the cheesecloth-covered curdles in the sieve. Again, place it in the fridge for a day. The next day... Remove the biezpiens from the press. It should now be very dry, very crumbly white curds. It is now ready to be used in pankūkas, Jāņu siers, and other tasty biezpiens-based recipes. These don't last long, maybe one or two days in the fridge, so be ready to use them up fast.

Chilled Tomatillo and Cucumber Soup

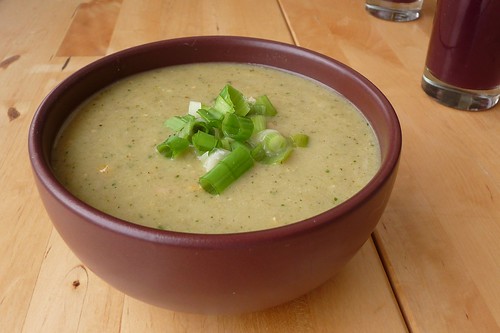
Chilled Tomatillo and Cucumber Soup

We have a bunch of different veggies in the fridge and sometimes the challenge is remembering everything so it gets used up before it spoils. When I made this, I had tomatillos, poblanos, cilantro, cucumbers and avocados to use up. I couldn't decide on a Mexican dish to make until I came across this one that sounded good to us both.

I must say this: it is extremely green. And cooking cucumbers is odd - I'm used to seeing chilled cucumber soups call for raw cucumber. But I have to say, it is extremely good. It needs the little crunchies from the sunflower seeds and some crumbled queso fresco or queso cotija would make it perfect.

This soup is subtle, spicy and rich. However, if you love fiery foods, you might consider using an additional chile or the whole jalapeno. Also, please note that this depends heavily on how spicy your chiles are. Right now the ones at my market are quite spicy.

If this summer is as hot as usual, I think this and other chilled soups will be in heavy rotation as I try to avoid running the oven or range overmuch when temperatures are over 100F.

Chilled Tomatillo and Cucumber Soup [printable recipe]

Adapted from Bon Appetit, July 2001
Serves 4 as a main

  • 2 poblano chiles
  • 1 tablespoon oil
  • 1 medium white onion, chopped
  • 3 garlic cloves, crushed
  • 1/2 pound tomatillos, husked and rinsed, cut into 1/2-inch pieces
  • 1 cucumber, peeled and chopped (about 2 cups)
  • 2 cups chicken broth (or all veggie, if vegetarian)
  • 2 cups veggie broth
  • 1/2 jalapeño, minced, seeded
  • 2 tablespoons lime juice
  • 2 tablespoons chopped fresh cilantro
  • 1 tsp oregano
  • 1 avocado, cut into chunks
  • 1/2 cup sour cream
  • 2 green onions, chopped
  • 1 cup cooked beans, any variety
  • 1/2 cup roasted corn
  • sunflower seeds (for garnish)
  • queso fresco, queso cotija or feta, crumbled

Broil poblanos 4 - 6" from heat until well blackened on all sides. Drop into a paper bag and close the top. After 10 minutes, peel the peppers and remove seeds, then roughly chop.

Heat oil in a large (5qt) pot over medium heat. Add onion, jalapeno and garlic, saute 5 minutes. Add tomatillos and cucumber, continue to saute
 until onion browns. Season with salt, pepper and oregano. Deglaze with white wine. Add broth and poblanos, bring to a boil before reducing the heat to medium-low and simmering until tomatillos are tender, about 5 - 10 minutes. Stir in lime juice and cilantro and remove to a sink filled with cold water and ice. Cool completely (about 30 minutes via this method).

Stir in avocado and sour cream, then puree the soup with an immersion blender. Finally, stir in beans and roasted corn. Taste and season with salt or pepper as needed. Sprinkle servings with green onions, sunflower seeds and crumbled cheese.

Serve with crusty bread.

Baked Jalapeno Poppers

I admit it: One of my sins is ordering jalapeno poppers at Arby's on the rare occasion that I stop in for a bite of lunch. I'll also order them just about everywhere else that carries them and every so often, I pick up a box of them at the store. They're not very good for me though.

Lately, my husband and I have been mulling over snacks. It can be incredibly difficult to make lots of small meals, but having healthy snacks around is a fiendishly difficult proposition for us. When cucumbers are on sale, those are snacks. We often grab an apple or half a handful of homemade granola. (The granola bars I attempted crumbled into their component pieces, so now we have a snackbox of granola in the fridge.)

Jalapeno poppers are snacks, in my head, but as I mentioned: their deep-fried fatty goodness isn't the best thing.

So, I puttered around and researched here and there until I came up with this baked popper recipe. Thankfully jalapenos are super-cheap and a little goes a long way. We like to have these with a smoothie and a movie for a late-evening snack.

It's not quite the same as the restaurants' version. It doesn't quite scratch that itch for me. But my husband loves them and I think they're pretty good. Good enough to share with you and add to my personal cookbook, in any case.

We're still looking for more snacks to make. Have a suggestion for a low-cal / low-fat snack? I'd love to hear about it.

Baked Jalapeno Poppers [printable recipe]

Makes enough for 2

  • 5 large jalapenos
  • 2.5 oz neufchatel cheese or cream cheese (about 1/3 of a package)
  • 2 oz sour cream
  • 1 green onion, minced
  • 1 clove garlic, crushed
  • 1/2 oz shredded cheese - any kind
  • 1/2 tsp each cumin, oregano
  • 1/8 tsp hot paprika (optional)
  • buttermilk or milk
  • bread crumbs
  • non-stick spray

Preheat oven to 400F. Slice the jalapenos in half, seed and remove the membranes. Beat together remaining ingredients with a spatula, except for the buttermilk, in a small bowl. Add enough buttermilk to thin it out to the consistency of a dip.

Fill each jalapeno half with the cheese mixture and lay on a foil-covered baking sheet. Sprinkle over with bread crumbs or press into bread crumbs in a small dish. Spritz each with non-stick spray.

Bake for 20 minutes or until the crumbs turn golden brown. (Depending on your oven, you may need to rotate the pan for even cooking.)

Tacos de Verdolaga con Achiote Frijoles Recado y Guacamole

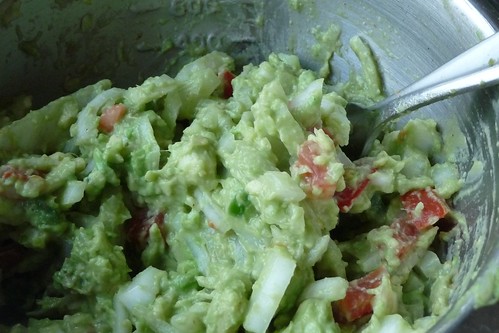
Guacamole with Tomatoes

All this week, I've been attempting to tempt you with delicious recipes for delectable Mexican food. Now, as promised, here's one way to wrap it all up together.

I speak, of course, of the humble taco.

While both of the recipes previously work wonderfully on their own and can be used with many varied meals, they go nicely together and fantastically well if you tie them together with a bit of guacamole.

Guacamole with Tomatoes [printable recipe]

Serves 2

  • 1 large, ripe Hass avocado
  • 1/2 medium white onion, finely chopped
  • 1 large or 2 regular cloves of garlic, crushed
  • 1 Roma tomato, or similar, finely chopped
  • 1 tbsp lime juice
  • 1/2 jalapeno or serrano, seeded and minced
  • 1/4 tsp cumin
  • 1 pinch of salt

Combine all ingredients in a small bowl and mash together thoroughly.

. . .

I strongly encourage you to make these three recipes, pick up some soft wheat tortillas and have a taco night. It's worth it, trust me.

Tacos are one of the great foods that really don't need a recipe. But, for my sake (and yours too), here's a "recipe" that links to all of the recipes used for the component parts.

Tacos de Verdolaga con Achiote Frijoles Recado y Guacamole

Serves 2

Spread a bit of each on a tortilla, fold in half and enjoy!