The Cheesmo Cheese Press
I talked a little bit about my cheese press in Biezpiens, Refined but, as Ivars noted, it can be really difficult to imagine what such a jury-rigged contraption looks like. So, I figured I'd take a little more time and try to explain better. (Also, so I can refer back to this when I make other fresh cheeses that benefit from being pressed rather than explaining all over again.)
My MacGyver'd "press" is incredibly simple and dirt-cheap - about $3 for some containers and nice rocks from the dollar store. Naturally, I could have used rocks from the yard but I didn't feel like picking through them for reasonably small ones.
Parts & Tools Required:
- Two nesting food-safe tupperware-type containers
- One container large enough to hold the nesting containers
- Weights of some sort
- A drill
We picked up two identical tall, 1-quart nesting tupperware containers at IKEA on clearance because they were floor models. Any kind of containers work for this, as long as you have something larger they will fit into to catch the whey. This can be as simple as a disposable or old pie plate. They also should be large enough to hold a goodly amount of cheese and weight: about a quart or bigger. It doesn't matter if they are round or square.
My husband drilled holes in the bottom of one and about 2" up the sides. He used a 1/4" drill bit so the holes would be big enough for drainage but not big enough for any stray bits to escape out of. If it cracks a little, it's no big deal.
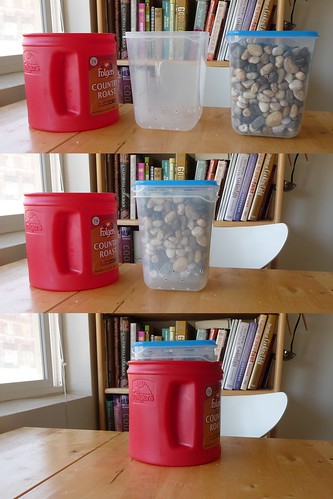
I filled the other container with 5 pounds' worth of river rocks and sealed the lid on tight. Anything heavy works, including water. (Factoid: One liter of water weighs one kilogram.) When fiddling about building this, we seemed to get the best results if the weight is between 4 and 6 pounds. Anything less didn't work too well for us.
We set the whole thing inside an old Folger's coffee can on top of an old jar lid to catch the liquid. We use the little jar lid to raise the press up enough that the holes can drain and the whey doesn't immediately soak back into the cheese.
Why a coffee can? Because it's just big enough to go around the whole press, so it's easy to store in the fridge or on a shelf. Plus, my husband drinks a lot of coffee, we have lots of these hanging around, so I re-purpose them to hold different flours and cereals. (One of these holds about 3 1/2 pounds of flour, quite handy.)
That's it! My cheesemo cheese press. Cheap, easy and ugly. It works really well for basic cheeses like ricotta, biezpiens and Jāņu siers, plus it also works for pressing excess water out of tofu.