Middle Eastern Eggplant Spread

Middle Eastern Eggplant Spread

I love eggplant, but most of the year I can't have it for various reasons (too expensive, too out-of-season/icky-looking). It's been in season for a little while, finally showing up at my local farmer's market where I scored a lovely, large specimen for less than a dollar.

Now I've been indulging in a lot of eggplant this summer, from stir-fries with crispily fried eggplant cubes, to my favorite Strange-Flavor Eggplant dip, to Ratatouille, and even Eggplant Parmesan, which I've been known to make three days running. What else could I do with it?

After looking around, I decided on a recipe called "Middle Eastern Eggplant Spread" that sounded interesting. It's from a book I checked out a little while ago from the library called The Roasted Vegetable by Andrea Chesman.

Being me, I didn't stick to the recipe very well. For one, it was missing an essential ingredient: garlic. Horrors! Since the oven was already running, it was pretty easy just to throw in half a head of garlic to roast alongside the eggplant.

It's not a particularly fast lunch to prepare at almost an hour, but the majority of the time is unattended, so it's a good weekend lunch to prepare while you're busy with chores.

Middle Eastern Eggplant Spread [printable recipe]

Adapted from The Roasted Vegetable by Andrea Chesman
Serves 3

  • 1 lb eggplant (about 1 medium)
  • 1 medium onion, thinly sliced
  • 1 tbsp olive oil
  • juice of 1 lemon
  • 2 tbsp parsley, finely chopped
  • 2 tbsp chives or green onions, finely chopped
  • 1 tbsp cilantro, finely chopped
  • 1/2 head garlic
  • salt, pepper
  • pita or other flatbread
  • tomatoes, chopped
  • tzatziki sauce (optional)

Preheat oven to 400F. Pierce eggplant several times with a fork or sharp knife and rest on a baking sheet. Drizzle a little bit of olive oil over the garlic and wrap in foil before placing it next to the eggplant. Roast garlic and eggplant for 40 - 60 minutes until tender and soft.

Toss onions with olive oil and a pinch of salt. Over low heat, cook onions in a large skillet until caramelized (dark brown and very soft), stirring occasionally, about 30 - 40 minutes. If desired, add a pinch of sugar with the salt to aid the caramelizing. (This can be done faster on higher heat, but since the eggplant has to cook for 40 minutes, might as well do it the slow and easy way.)

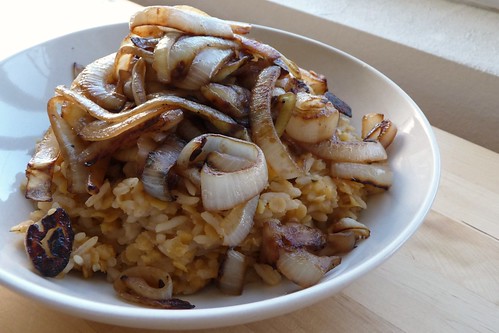
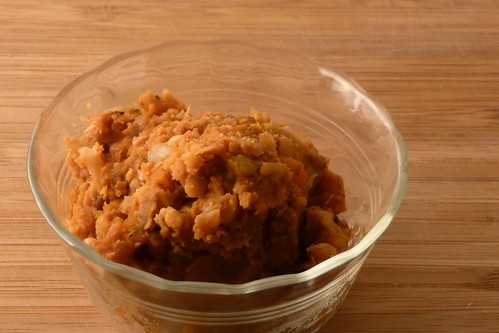
Remove eggplant and garlic from the oven and allow to cool for a few minutes. Peel eggplant and remove stem. Chop finely and remove to a medium bowl. Squeeze cloves out from papery husks and add to eggplant.

Add cilantro, parsley, chives, lemon juice, salt and pepper to eggplant-garlic mixture. Mash together well. Let rest for 30 minutes to allow the flavors to blend before serving warm or at room temperature.

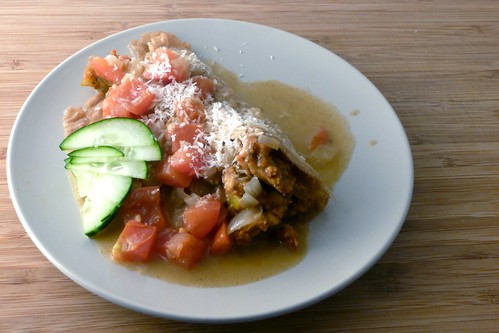
Spread on pita, top with chopped tomatoes and tzatziki sauce or use as a dip with flatbread or chips.

Notes:

  1. The original recipe called for the onions to be caramelized in the oven for 20 - 25 minutes. I tried that, it didn't work for me. I'll stick to caramelizing on the range, which works like a charm.

Butternut Squash Soup

Butternut Squash Soup

Fall is finally here. Pumpkins and other gourds are showing up at the markets and groceries, ripe corn tempts me from a neighbor's field.

We eat a lot of acorn squash during the fall and winter. It's an easy, cheap squash with great flavor. Lately, I've been experimenting with other squashes while we wait for acorns to come back in season and came across a nifty recipe for butternut squash.

I'd never tried butternut squash before, though it seems to be a staple in local farms judging from the quantities available at my little local market. When we cut it open, it was quite clear how it got its name: it really does smell like buttered, toasted nuts.

According to what I've read, Aussies will probably know this one as a Butternut Pumpkin, and it can be used as any other winter squash: roast it, mash it, puree it, etc. You could probably even make a butternut pumpkin pie (and that would be delicious!). The skin and stem aren't edible so peel it before eating and the seeds should be removed (and roasted for snacks!) before cooking.

I really enjoyed this soup, but I'm not sure what it needs. Here's the thing: When we began eating it, it tasted like it was missing something. By the time we finished, it was perfect. I still think it needed a bit more heat and a bit of a longer rest before serving, but I'm not sure.

If you make this, stop by and let me know how it turned out. I'd love to know if someone can figure out what it needs to be perfect on the first sip instead of the last.

Butternut Squash Soup [printable recipe]

Adapted from Emeril Lagasse
Makes approximately 6 - 8 cups

  • 1 2-lb butternut squash
  • 2 tbsp peanut or canola oil
  • 1 medium yellow onion, diced
  • 3 cloves garlic, crushed
  • 1 medium carrot, thinly sliced
  • 1/2 tsp ground cumin
  • salt, pepper
  • 1/2 jalapeno pepper, minced
  • 2 cups chicken stock
  • 1/2 cup white wine
  • 3 tbsp butter, cut into small pieces

Cut the squash in half, remove seeds, peel and cut into 1" chunks. In a large pot, heat oil over medium heat. Saute onion, jalapeno and garlic until edges begin to brown, then add carrot and spices. Cook for an additional 2 minutes. Add squash. Pour in white wine and make sure the fond (bits stuck to the bottom of the pan) is scraped up. Add stock and bring to a boil. Reduce to a simmer and cook for 15 - 20 minutes or until everything is tender. Puree until smooth using an immersion blender or transfer in batches to a blender or food processor. Stir in butter, taste, adjust seasoning as necessary.

Mujadarrah

Mujadarrah

One day, I was up at the University of Utah, waiting around for someone to get out of class. I had NPR on and was listening to a neat program called "The Splendid Table", which focuses on answering cooking questions. The day I was listening, one of the ladies on the show took a caller who had made something called mujadarrah and was complaining that it was very bland.

First, she explained what a mujadarrah is. Mujadarrah is a very simple, satisfying Middle Eastern comfort food. In its most basic (and most likely traditional), it consists of salt, broth, lentils, rice and fried onions. It's often served with a bit of tangy yogurt or sour cream to mix in.

The problem, she explained in her smooth, melodious voice, is that lentils, like boiling potatoes, can take a lot more salt and water than you might expect. The other problem is that when you're used to foods with a lot of spices, a dish without any spices can be very bland by comparison.

The answers were as follows: Use more salt. Add cumin, maybe some other spices you like. And check the water level to make sure there's enough liquid.

I couldn't wait to go home and try this recipe out. I made some changes and it came out beautifully. I've been making it ever since, but it's continually evolving. Tonight, I made it as follows:

Mujadarrah [printable recipe]

Serves 2

  • 4 cups vegetable broth or water
  • 3/4 c pink lentils (see note)
  • 3/4 c rice
  • 2 medium onions, sliced
  • 1 tbsp cumin
  • 1 tsp smoked paprika
  • 1 tsp thyme
  • 1/2 tsp freshly ground black pepper
  • salt
  • olive oil

In a large, lightly oiled skillet over moderate-low heat, fry onions with a pinch of salt until golden brown and soft, about 20 minutes. (This will take at least as long as the rice/lentils, so get it started then move on.)

In a medium, preferably nonstick pot, drizzle in a scant tablespoon of olive oil. Add rice and lentils, stirring to coat and cook for about 2 minutes. Add spices, a couple of healthy pinches of salt, and about 1/2 cup of broth. Stir well and cook for 1 minute. Add 2 1/2 cups of broth, reserving 1 cup for later, cover and bring to a boil before reducing to a simmer.

Cook for 20 minutes or until rice and lentils are tender, adding the remaining cup of broth about halfway through.

Serve, topping with fried onions and sour cream or yogurt (if desired).

Notes:

  1. Most recipes call for the larger green lentils which must be cooked for about 20 minutes before adding the rice in for an additional 20 minutes. I used the smaller pink lentils because I prefer the shorter cooking time.
  2. Lentils and rice will take a surprising amount of salt before they taste "right".

Boiled & Fried Potatoes… a new way

Boiled and fried potatoes is a pretty popular way to eat potatoes. My dad, for instance, grew up eating these in the South when he was a kid. My husband also grew up eating them in Latvia and I had them several times there. It's one of those easy things to do with potatoes that guarantees fully cooked, fluffy potatoes with lots of yummy edges.

Usually, I do pretty much what it sounds like - boil some potatoes, dry them slightly, fry 'em up in oil until the edges crisp up, then dump some dill or sour cream on top and dig in. (The dill and sour cream is a typically Latvian way of eating them, I admit, and is also how they're represented in Latviešu ēdieni.)

I recently started reading seasaltwithfood, who wrote about an easy way to make boiled and fried potatoes in one easy step that she, in turn, picked up from a commenter named Rene K. Seasaltwithfood's entry looked delicious so I decided to make it on a Sunday when a friend of my dad's caught too many trout and gave us three of them.

Wow.

I may have just found my new favorite way for making boiled-and-fried potatoes! The rosemary infused into the potatoes, making every bit of potato absolutely fragrant and wonderful. I only wish I'd added garlic, but alas, I forgot. I've corrected this oversight in my adaptation below.

Rosemary-Infused Boiled & Fried Potatoes [printable recipe]

Adapted from Rene K. and Seasaltwithfood
Serves 2

  • 3 small to medium potatoes, sliced into thick chunks
  • ~4 tbsp (50 g) butter, cut into chunks
  • 1 large sprig rosemary
  • 5+ cloves of garlic, halved
  • 1/4 cup onion, diced
  • salt

Place potatoes in a single layer (or as close as you can get) in a large, deep skillet, sprinkle over with onion and garlic. Add water until the potatoes are barely covered, then add butter, rosemary, and salt. Bring it to a boil and cook for 15 - 20 minutes, letting the water evaporate. Once it has, reduce the heat to medium and fry the potatoes until they're crispy, golden-brown and delicious.

Strange-Flavor Eggplant Dip

Have you ever purchased a cookbook and then never made more than a recipe or two from it?

I have.

There's no really good reason for it. It certainly seems to be a fantastic cookbook, no doubt about it, but for some reason, I've never fully explored it, not even sitting down and reading through it the way I do with many others; I've only read bits and pieces throughout. While I liked what I saw, I still haven't sat down with it.

But one recipe in particular caught my eye that day in the bookstore. I've made it several times; in fact, the way I find it is just to open the book, the spine is cracked on the start of the recipe because I've opened it to there so many times.

The book in question is The China Moon Cookbook by Barbara Tropp. The recipe? Strange-Flavor Eggplant Dip.

In a way, it was the title that grabbed me. Strange-Flavor? Now that I have to try. I thought. But just what is a strange flavor? Perhaps I should let her explain.

It turns out that in some of the more golden eras of Chinese history, the character for "strange" meant a positive-sounding "elusive" or "ineffable," as in a wonderful combination of flavors that can't be pulled apart." ... "[It's] a classic name for a series of Chinese dishes that typically employ a mixture of vinegar, sugar and chili..." -- Barbara Tropp
This dip is spicy, sweet and tart. It's easy to make and satisfying. I don't make it often because I'm liable to take my bowl of dip, a bunch of chopped up pita triangles and eat the entire bowl all by myself. (Although, considering one eggplant is little more than 100 calories, the dip is not so much the problem as the pita!) It is best the next day at room temperature, once the flavors have a chance to blend.

Strange-Flavor Eggplant Dip [printable recipe]

From The China Moon Cookbook

  • 1 to 1 3/4 pounds eggplant
  • 2 tbsp oil
  • 1/2 tsp sesame oil

Aromatics:

  • 1 tbsp minced garlic
  • 1 tbsp minced ginger
  • 1/4 cup minced green onion
  • 1/2 tsp crushed red chile flakes

Sauce:

  • 3 tbsp soy sauce
  • 3 tbsp packed brown sugar
  • 1 tsp rice vinegar
  • 1 tbsp hot water

Preheat oven to 475F.

Remove the leaves from the eggplant and prick in several places. Bake, turning once, until fork-tender, 20 - 40 minutes depending on size. Remove and slit lengthwise to speed cooling.

While still warm, remove the stem end and peel, scraping off the pulp and reserving. Process in a food processor until nearly smooth. Combine aromatics in a dish, combine sauce in a small bowl.

In a large skillet over med-high heat, add oil and swirl to coat. Stirfry aromatics until fragrant, 15 seconds. Add sauce and simmer. Add eggplant, stir well to blend and heat through.

Remove from heat, taste and adjust chile flakes, sugar or vinegar to achieve a zesty flavor. Stir in sesame oil. Refrigerate overnight to allow flavors to meld. Serve at room temperature.

Beet Green & Bacon Garlicky Mashed Potatoes

We went back to the local farmer's market on Saturday, hoping for some more fresh corn. The guy we bought from didn't have corn this time, but he did have beets. Huge beets averaging a pound and a half each! I'd never seen beets so large in stores here before. My husband's comment? "Now those are real beets!"

And best of all: they were 25c each for the big ones and only 10c for the "small" ones!

When my husband pointed them out, I knew we had to get some. At the time, I wasn't sure just how we'd prepare them yet, but they looked so good we couldn't resist.

The farmer told us not to waste the greens - both stems and leaves are edible. They cook up like spinach and, according to my reference book, best steamed and braised, but sauteing is a close third. Chard and turnip greens also cook up similarly, which is why tonight, I decided to saute the greens in a bit of butter until they wilted, just like I always do with chard.

They can be pretty strong, especially the older leaves, but they have a nice, if slightly astringent flavor to them. They taste a lot like spinach but not as mild.

With autumn finally peeking in and softly shooing summer out the door, making a mash just sounded like a great idea. (Mashes, however, do not photograph well, at least not for me tonight. I am not that good of a photographer OR a food stylist so you will just have to imagine. Plus I'm upset at my kitchen right now.)

One other thing I'll be describing in this recipe is how to pan-roast garlic. This is absolutely one of my favorite ways to prepare garlic and it's really, really easy. I used to roast garlic the traditional way - with olive oil, wrapped and baked in foil. It took forever and I hated running my big oven just for a ball of foil the size of my fist. Now I pan-roast them and it works beautifully.

Pan-Roasted Garlic [printable recipe]

A tip picked up from: Smoke & Spice

  • a head or more of garlic, broken apart but unpeeled, excess paper removed

Heat a cast-iron skillet (6″ is all you need here) over moderate heat until hot. Add garlic (do not peel!) to the pan. No, you do not need fat of any kind. Shake the pan periodically to keep the garlic from burning and cook until soft – about 10 – 15 minutes. Remove, let cool and peel off the skins.

Try to resist popping more than a couple of cloves in your mouth and enjoying the soft, roasted flavor.

Cast-iron is the best to use as it does not mind being heated without anything in it. I wouldn't recommend doing this on a regular non-stick - besides, there's nothing to stick anyway. Just look around your thrift stores and yard sales for good, polished cast-iron skillets and take good care of them. They'll take good care of you in return.

Beet Green & Bacon Garlicky Mashed Potatoes [printable recipe]

Serves 2 hungry people as a main and 4 - 6 as a side

  • 1 lb cauliflower florets
  • 1 lb potatoes, scrubbed and roughly chopped
  • 1 head Pan-Roasted Garlic (recipe above)
  • 1/4 c sour cream
  • about 6 cups of beet greens (about three large beets' worth), washed well, roughly chopped
  • 3 tbsp butter
  • 1/2 yellow onion, diced
  • 1/2 red onion, diced
  • 3 strips bacon, cooked and chopped
  • 1 tsp basil
  • 1/2 tsp dill weed
  • 1/2 tsp hot sauce (like Tabasco, use your favorite to your taste)
  • 1/4 tsp crushed red chile pepper
  • salt, pepper

In a medium pot, boil the potatoes in salted water until about 10 minutes from being done (they should still have some hardness to them). Add the cauliflower florets and cook until both are fork-tender. Drain and put back on the heat for a minute or two.

While the potatoes boil, saute onions with the spices in a bit of oil until tender and, yes, a bit brown. Remove.

In a large skillet, melt butter over moderate heat. Add chopped beet greens, a bit of salt and pepper, then cover for 2 - 3 minutes. Uncover and stir greens well. They're done when wilted.

Combine everything in a large bowl (or the potatoes' pot) and mash well. Add hot sauce to your taste and adjust other seasonings as needed.

Roasted Corn and Tomato Salsa

Roasted Corn and Tomato Salsa

I have a confession to make.

I have never been able to make salsa from scratch.

Until now.

I've made things like the arbol-tomatillo salsa for tacos con nopales and pineapple-tomatillo salsa (oooh, is that ever good), but those aren't really salsas in my mind (even if they are). Salsa, at least the way I want to make it, is chunky, loaded with ripe tomatoes, onion and cilantro.

But every time I tried, I'd fail. No idea why. But I finally broke the chain, I successfully made a fantastic scratch salsa for our taco bowls!

Of course, having fantastically fresh ingredients helped. The corn and tomatoes were picked that morning by the folks locally who grew them and I'm convinced that made a difference. See, it wasn't me who made the salsa great: it was the veggies.

Roasted Corn and Tomato Salsa [printable recipe]

Adapted from Emeril Lagasse

  • 2 small ears corn, in their husks
  • 1 medium anaheim or jalapeno pepper
  • 1 vine-ripened tomatoes, diced (seeded if necessary)
  • 1/4 red onion, diced
  • 1 clove garlic, crushed
  • 2 tablespoons roughly chopped fresh cilantro leaves
  • 1 fresh squeezed lime + its zest
  • 1 teaspoon salt, or to taste

I like to strip back the husks of the corn and remove the silk before cooking, but you can do it after too. Replace the husk and soak corn for 15 - 20 minutes in cold water while you preheat the oven to 350F.

Lay the ears right on the oven rack. Roast for 30 minutes then remove to a rack to cool. Remove the husks and silk (if necessary) and cut the kernels off the cob.

In a medium bowl, combine all ingredients and mix well. Let chill for 30 minutes to allow the flavors to meld, then enjoy.

Free-Form Peach Galette

Free Form Peach Galette

It's taken me a long time to reach the point where I can cook and eat at least semi-seasonally. There have been a lot of years where I simply didn't cook very often or not very creatively. In a way, I really regret that because I lived in places where fresh food is in abundance (Santa Cruz and Seattle) and I don't think I took advantage of it. Now I live in a podunk rural town that only has a market for six weeks each year and I'm eating better, cooking more, than I have in years (perhaps because I'm actually happy).

Last weekend, Artis and I went to the store and found fresh, ripe, local peaches on sale. Since we'd decided to do freezer preserving and the pectin had a peach preserves recipe on it, we bought a dozen peaches so we could make preserves and have peaches for breakfast.

Unfortunately, we had to go buy more. After making preserves, we had three peaches left and my father was coming over for dinner. I made a taco salad with fresh salsa and guacamole, then decided on a fresh, free form peach galette for dessert.

Ah, yes, now we come to the topic of today's post. Galettes.

I'd made one before, but I didn't like how it came out, so since I knew I had fantastic peaches, I knew I wanted a simple, simple recipe to showcase them. I found a likely contender at Smitten Kitchen, who takes photos that I can only dream of achieving one day.

I made my own adjustments, as always, and the galette came out perfectly. Beautifully golden-brown, not too sweet, extremely flavorful thanks to the ripe peaches, with just enough dark undercurrent to make everything 'pop'.

I admit, I'm terrible at making circles out of dough; some days I do okay and others, like today, I manage a kind of oblong amoeba. But amoeba galettes taste as good as circle galettes, so don't let rolling out dough stop you. Just make your own polygon. I'm not much of a baker or decorator, as I've mentioned in the past.

The best part of the recipe was where she recommended putting preserves on top or vanilla ice cream, and I just so happened to have this leftover bit of peach preserves from the afternoon's preserve-making, and just so happened to have a tart and tangy frozen yogurt I'd made the night before. Perfection.

The only real problem is.. it's gone. Supposedly it would serve 6 to 8 (mine was smaller), but... it served 3. None of us were able to resist having seconds. So, beware. You might find more on your plate than you expected.

Free Form Peach Galette

Free-Form Peach Galette [printable recipe]

Adapted from Smitten Kitchen's Nectarine Galette (in turn adapted from Alice Water's Apricot Tart)
Serves 6 (or perhaps less)

Crust:

  • 1/2 cup all-purpose flour
  • 1/2 cup spelt or whole wheat flour
  • 1/2 tsp sugar
  • 1 tsp salt
  • 6 tbsp (3/4 stick or 3 ounces) butter, chilled, sliced

Filling:

  • 2 tbsp ground pecans
  • 1 tbsp spelt or whole wheat flour
  • 1/4 cup sugar
  • 1 recipe for crust, as above
  • 2 - 3 ripe, fresh peaches, peeled and sliced thinly
  • 1 tablespoon butter, melted
  • 1/8 tsp ground clove
  • 1/4 tsp ground cinnamon
  • 2 tbsp sliced pecans (optional)
  • Peach or nectarine preserves

Preparing the Crust:

Combine all ingredients for the crust in a food processor. Pulse to blend until dough comes together in a ball. (You may need to add a tablespoon or two of ice water, go sparingly as it won't take much to bring it together.) Flatten ball into a disc, wrap in plastic and chill for at least 30 minutes.

On baking day: Let the disc soften so it can be rolled out. On a floured board, roll out into a large circle (or whatever polygon you can manage, like me) that's about 1/8" thick. Transfer to a baking sheet.

Note: You really want a SHEET here, not a pan with raised sides. The sides make it bloody hard to remove when it's done, so flip it over and use the underside. Just line it with some foil or parchment first so it doesn't stick.

Preparing the Galette:

Preheat oven to 400F. Stir together ground pecans, ap and spelt flour, one tbsp of sugar, clove and cinnamon in a small dish. Sprinkle this mixture over the rolled out dough, leaving a 1 1/2" to 2" thick border around the edges. Lay sliced peaches tightly in concentric rings, stopping at the edge of the sprinkled area. Sprinkle about 2/3rds of remaining sugar over the peaches.

Fold the borders up and over, resting them atop the peaches. Pinch off or roll under any excess dough and watch out for tearing -- the dough needs to be solid to keep the juices locked in. Brush the borders with melted butter and sprinkle with the remaining sugar.

Bake for about 25 - 30 minutes until the crust is golden brown and the edges begin to caramelize. If you wish, sprinkle the chopped pecans over the galette about halfway through. When it's done, slide it off the pan with a large spatula onto a cooling rack. Allow to cool for 20 minutes.

Serve topped with a bit of preserves and vanilla ice cream or frozen yogurt.

Notes:

  1. SK noted that this galette can be kept at room temp for 2 days (perhaps more) and longer in the fridge. Mine didn't last an hour before it was gobbled up and I think that's a greater "danger" than spoiling. The unbaked dough will keep in the freezer for a few weeks and for a few days in the fridge, if you need to make portions ahead.

No-Cook Freezer Jam

Half-Pints of Raspberry

I spent my weekend preserving, how about you? Canning season is well under way here in Utah, as everyone, it seems, tries to take advantage of the great harvest. Utah farms produce an astonishing amount given our location on high desert steppes, everything from peaches and cherries to cucumbers, squash, tomatoes and peppers.

Of course, fruit preserves are some of the most popular, along with salsa and corn. But I had no idea freezer canning was so damn simple! (Regular canning is fairly scary to a canning newbie like me.)

Our local grocery is having a major fruit sale - 99c for a pint of raspberries! 39c a pound for pears! - so we decided to look up some simple freezer jam recipes. (We have this half-full freezer after all.)

We picked up a flat of raspberries (12 6-ounce containers), several pounds of pears and peaches, some freezer pectin and sugar. My goals: Put up raspberry preserves (my favorite), pear preserves, raspberry-pear preserves and peach preserves.

Originally, I was going to use recipes I found online, but after reading the back of the pectin package, I used Ball's recipe instead. I'd trust them with my canning life, they've been around forever and almost everybody uses or has used their recipes or equipment.

The formula is dead simple and works for a lot of different fruit. We prefer a semi-chunky preserve, so fruits that don't crush well went in the food processor for a quick whiz around. I don't know if using a processor is really advised, but it was certainly easy. Otherwise, we used a "stomper", a Latvian-style wooden masher, to crush everything.

Crushing Raspberries

According to Ball, 4 cups of crushed raspberries is roughly 6 6-oz containers. What do you know, they're right! It was a little over, but not by much. It worked out to about 2 1/4 pounds raspberries to 1 pound sugar, and when we asked my mother-in-law about her ratio, it's almost dead on for hers. (I absolutely ADORE her raspberry jam. She makes it with fresh-picked raspberries from the forest near her house in the Latvian countryside. It is to die for and I've begged her for jars every time I go to Latvia.)

Now, these preserves are very fresh and spreadable, so only use absolutely ripe fruit. Canning fruit is usually blemished and banged up, but the flavor is the only thing that matters. The pears this week on sale were superb, if they weren't very pretty.

Ball advises that 4 lbs of strawberries is about 4 cups, but alas, strawberry season is over so we can't make my husband's beloved strawberry-rhubarb preserves.

We couldn't resist having crepes the next day to use up the remnants of our preserve-making binge, too! Mmm.. fruit-filled crepes.

There's still time to put up some jam if you have some extra freezer space. And, not to sound like a total shill for Ball, but their plastic freezer jam jars are really handy and easy to store.

Pints of Raspberry Jam

No-Cook Freezer Jam [printable recipe]

From Ball

Works great for: Raspberries and other berries, apricots, cherries, grapes, pears, plums and "most other tender fruit"

Yield: 5 - 6 8-ounce containers

  • 4 cups crushed fruit
  • 1 1/2 cups (~1 lb) sugar
  • 1 1.59-oz package Ball No-Cook Freezer Pectin

Stir together sugar and pectin thoroughly. Add fruit and mix for 3 minutes. Ladle into clean jars or freezer containers and let set for 30 minutes. Freeze or refrigerate.

Lasts: 3 weeks in the fridge, 1 year in the freezer

Peach Preserves

No-Cook Peach Freezer Jam [printable recipe]

From Ball

Yield: 5 - 6 8-oz containers

  • 4 cups (about 12) peaches, peeled and crushed
  • 1 1/2 cups (~1 lb) sugar
  • 3 tbsp lemon juice
  • 1 packet Ball No-Cook Freezer Pectin

Stir peaches, sugar and lemon juice together until well-blended. Let stand for 10 minutes. (For a thicker jam, boil peaches before adding sugar and juice.)

Gradually add pectin and stir for 3 minutes. Ladle into clean jars and let set for about 30 minutes. Freeze or refrigerate.

Lasts: 3 weeks in the fridge, 1 year in the freezer

. . .

As always, don't give spoilers a chance to survive. Make sure everything's squeaky clean, from your work surface to your equipment and especially your containers and lids.

Daring Kitchen September Challenge: Dosas

Dosas

It's September 14th, do you know what day it is? It's the day for Daring Cooks' Challenges to be unveiled!

This month, we were challenged to cook a fully vegan meal, meaning no animal products whatsoever. Debyi of Healthy Vegan Kitchen selected Indian Dosas from reFresh: Contemporary Vegan Recipes From the Award Winning Fresh Restaurants by Ruth Tal. She recommended making rice to serve with it, but we liked the filling enough (and ahem, forgot to put on the rice) that it wasn't really necessary.

Now, this represented two different firsts for me: I've never really made Indian at home and I've never tried to eat a completely vegan meal.

I do enjoy Indian, especially samosas and tikka paneer, but I've never really made a full meal myself. After making this, all I can say is, wow. I should do this more often! The filling was really good and I could see it making some good, healthy lunches for the two of us.

But going vegan or being an "alternative" cook? It's not for me. I didn't miss the animal products except for really wishing for an egg to thicken up the batter so it would cook properly... but realistically I can't see myself being happy on a vegan diet. There are simply too many great animal products out there to chow down on -- I may be vegetarian a day or two each week but I'm not turning in my omnivore card any time soon!

As for using spelt flour, it wasn't worth the extra expense. It was included in the recipe because it's generally well-tolerated by the gluten-free crowd and is basically a very mild wheat. (It tastes like it too.) I plan to use a stronger grain next time -- rye or buckwheat flour, perhaps -- but even regular whole wheat would be great.

It was, however, a great excuse to finally buy some almond milk to try. Turns out it's not too bad though a little grainy. My husband likened it to soy and hated it immediately but he didn't mind it in the pancakes luckily. I'll get to try it in some recipes that I found that call for it, so that's a good thing.

Overall, this turned out to be a great set of recipes. Next time... No fancy flours or milks, more spice and lots of exploiting of the Maillard reaction. There will be a next time, oh yes, there will.

Dosa Pancakes [printable recipe]

  • 1 cup (120gm/8oz) spelt flour1
  • 1/2 tsp salt
  • 1/2 tsp baking powder
  • 1/2 tsp curry powder
  • 1/2 cup (125ml/4oz) almond milk
  • 3/4 cup (175ml/6oz) water
  • oil or 
cooking spray, as needed

Combine the dry ingredients in a bowl, slowly adding the almond milk and water, whisking until smooth.

Heat a lightly-oiled nonstick 10" skillet over medium-high heat. Ladle about 1/4 cup2 of batter into the pan and swirl to create a round, thin crepe. When bubbles appear on the surface and it no longer looks wet, flip it over and cook for a few seconds. Remove from heat and repeat with remaining batter. Makes between 6 to 8 pancakes.

Notes:

  1. My plans for the future: Exchange spelt for buckwheat or dark rye flour, almond milk for regular milk, add one egg. I'd also add very thinly sliced green onions.
  2. The original recipe called for about 2 tbsp of batter, which was way too thin for my pan. I think the author was using an 8" pan. The key here is to use just enough to make a flippable, thin crepe.

Curried Chickpea Filling

Curried Chickpea Filling [printable recipe]

Makes enough for 2 to 4, depending on how it's served1

  • 5 cloves garlic, minced
  • 1 onion, peeled and finely diced

  • 1 largish carrot, peeled and finely diced
  • 2 medium hot banana chilies, minced2
  • 2 tbsp cumin
  • 1 tbsp oregano

  • 1 tbsp kosher salt
  • 1 tbsp turmeric (OR a mixture of saffron and colombo)
  • 4 cups (850gm/30oz/2 cans) cooked or canned chickpeas
  • 6 oz (1 can) tomato paste

Heat a large, deep saute- or saucepan over medium heat. Saute onion and carrot until lightly browned, add garlic and pepper, continue to saute until veggies are browned3. Add spices, stirring to combine thoroughly and saute for 1 - 2 minutes. Add tomato paste and cook for another 2 minutes. Remove to a large bowl.

Mash the chickpeas very well by hand or in a food processor (but stop short of hummus). Add to the pan and again saute until browned. Stir in veggie mixture and heat through well.

Notes:

  1. This recipe makes a fairly good amount, which is good because it is fantastic. We both loved it and plan to make it again (and spicier!). It would be excellent for sandwiches, on rice or in wraps, very good lunch takealong.
  2. I didn't add a bell pepper (too expensive for bad quality this week) and the chiles came from a local garden. It was okay, but not spicy enough. Maybe my chiles were mild?
  3. Here, browning the various ingredients turned out to be important. Despite the large quantity of spices, both of us felt it was still too bland without browning everything in sight. I'd also add more curry powder and turmeric (which I didn't have, so I substituted with some saffron and colombo, which I picked up in the Caribbean and otherwise have no clue how to use).

Coconut Curry Sauce [printable recipe]

Makes about 4 - 5 cups

  • 1 onion, peeled and chopped

  • 3 cloves garlic
  • 1/2 tsp cumin
  • 3/4 tsp kosher salt
  • 3 tbsp curry powder
  • 3 tbsp spelt flour
  • 3 cups (750ml/24oz) vegetable broth
  • 2 cups (500ml/24oz) coconut milk
  • 3 large tomatoes, diced
  • olive oil

In a lightly-oiled 3qt saucepan, saute onion and garlic until browned. Stir in spices and flour and continue to cook for another minute. Add vegetable broth, coconut milk and tomatoes. Bring to a simmer and reduce for 30 minutes until thick.

Notes:

  1. This was also excellent, but I'd do things differently next time. First, the spelt didn't add much, I'd just use regular flour. Second, the original recipe said to "simmer" when I think it actually meant "reduce". Whoops - I simmer with a lid on to keep the liquid in! Luckily, we could just leave it on the stove while we ate. Third, I disliked the texture of the tomatoes after boiling, so I pureed it with my immersion blender. Much better.
  2. This sauce can be frozen though it will lose some thickness. Definitely a keeper to pour over the filling and rice for lunches.

. . .

Unfortunately, there aren't many pictures this time. It was simply too late the day we made this and we were too hungry to fuss about for long. Plus, this recipe came together very quickly, which is nice for hungry people but bad for hungry viewers. ;-)