Panzanella (Tuscan Bread Salad)

Panzanella

Occasionally, I'll buy a baguette at the store to have with a meal. Sometimes it's a whim, sometimes I forgot to take a ball of dough out to make my own, sometimes I just don't feel like baking it myself. The only problem is, there's always some left over, even after snacks and lunch the next day. It doesn't take very long for a baguette to go stale unfortunately.

There are a lot of things you can do with stale bread, making bread crumbs is the first that springs to mind for me. But the tastiest I've found is panzanella, a Tuscan bread salad.

It's simple to make and throw together and makes an excellent lunch, even in the winter. While it probably tastes best with fresh, ripe tomatoes, it can be made with a decent brand of canned tomatoes (and always, of course, with your own) in a pinch. Though this recipe came about as another way to use up stale bread, I like to take fresh bread and toast it up into garlic bread just for this salad. Yum.

Panzanella (Tuscan Bread Salad) [printable recipe]

Serves 2

  • about 4" to 6" stale or fresh baguette or french bread
  • 1 15 ounce can diced tomatoes or 3 Roma tomatoes1, chopped
  • 2 - 3 tbsp fresh basil2, sliced
  • 2 slices turkey bacon or 1 thick slice bacon, cooked crisp and chopped (optional)
  • 1 tbsp balsamic vinegar
  • 1 tbsp olive oil
  • 1 tsp capers3
  • 1/4 cup red onion, diced
  • salt, pepper

If the baguette or french bread isn't too stale, slice it up and toast it. I like to spread butter or olive oil on top followed by a sprinkling of my garlic bread spice mix (dried parsley, granulated garlic, salt) before toasting. Let cool enough to handle, then chop up into bite-size pieces.

If the bread is already nicely stale, chop it into bite-size pieces. If using canned tomatoes, drain the tomatoes and reserve the liquid. Toss the bread cubes with the liquid in a medium bowl so they'll begin to soften. If using fresh tomatoes, chop tomatoes then toss with the bread cubes.

Combine drained tomatoes (if using), basil, bacon, capers and red onion with the bread. Drizzle over with balsamic vinegar and olive oil, add salt and pepper to taste, then toss well.

Notes:

  1. I don't bother peeling fresh tomatoes, but if it bothers you, blanch them and peel them before chopping.
  2. Any fresh herb will do here. I like basil for its peppery tanginess, but fresh oregano, thyme or marjoram would all work well, as would parsley.
  3. Adding a chopped roasted red pepper or some minced anchovy would also be good.

Caprese Salad

Caprese Salad

My mom brought over a bunch of tomatoes and jalapenos from a coworker of hers the other day. She gave us some Jetstars, Big-Beefstar and Better Boys to try, all of them perfectly ripe and beautiful.

Now, I'll be honest: I'm not a fan of raw tomatoes. I love salsa and tomato sauces, I think tomatoes are great for lots of things, but eating a slice all by itself? Yecch. These, however, changed my mind.

I know part of it is that for a few years, I didn't realize I was committing tomato sacrilege by storing them with the rest of the produce in the fridge. That icky, mealy texture? Tomatoes do not belong in the fridge!

When I lived near Seattle, I learned another lesson: Don't buy the overbred varieties that have as much in common with a real tomato's taste as an eraser. Central Market carried an heirloom called a "Bruno Rossi" that I fell in love with. There was no better tomato for salsa, as far as I was concerned, given its rich, dark flavor.

Now, I've learned the truth: A perfectly ripe tomato that has been left to ripen naturally from a breed that hasn't been bred to tastelessness in search of shelf life and perfect exteriors is wonderful.

We sliced up a bit of a Jetstar (I think? I can't easily tell these guys apart) for a salad. My husband tried a bit and happily announced that this was a good, ripe tomato, then offered me a bit. It was.. sweet. Juicy. Full of flavor with no hint of mealiness. It tasted like fruit (which, of course, it is). Still somewhat strange to me, so I tried it with some salt, as one is wont to do with a nice ripe tomato. Wow! Suddenly, it had depth! The sweet played counterpoint to the savory amped up by the salt. Now, that's good!

I figured these tomatoes deserved a dish that would showcase their flavor, so I suggested we try making one of my husband's favorite summer dishes, a caprese salad, the next day for lunch. (Unsurprisingly, he agreed.) A caprese salad is a traditional Italian mix of tomatoes, basil, mozzarella, olive oil and salt.

The trick to this salad is simple. Do not make it unless you have perfectly ripe and tasty tomatoes, preferably from someone you know that just picked them within a day. There's no way I would even consider making this with the tomatoes from the store that are ripened using gas, as the flavor and texture are just not that good.

This, though it's not the prettiest caprese I've ever seen, was the perfect dish for these tomatoes. I made it twice in two days, since I still had plenty of tomatoes to use up. I tried slices layered with a rich, soft mozzarella that fell apart if you looked at it hard and cubed then tossed in a fast, easy salad with a firm mozzarella. (I'm not sure my basil plant appreciated it, as scrawny as it is, but it'll just have to cope.)

I think I prefer the slices best. It allows you to easily get a bite with all of the components at once and I really liked the softness of the first cheese I tried. Either way, both are excellent and worth a spot on your summer picnic.

Fast and easy caprese salad

Caprese Salad (Tomatoes with Mozzarella, Basil and Olive Oil) [printable recipe]

Serves 2

  • 3 medium ripe tomatoes
  • 1 medium mozzarella ball
  • 1 handful fresh basil leaves
  • 2 tsp olive oil
  • salt

Slice tomatoes into thickish slices. Slice mozzarella into similarly sized slices. Arrange slices on plates, interleaving with basil. Drizzle lightly with olive oil and sprinkle with salt.

Alternatively... Chop tomatoes and mozzarella into similarly-sized cubes. Slice basil into ribbons. Toss with olive oil and salt in a medium bowl, then serve.

Notes:

  1. Giada de Laurentiis had a neat variation using toasted slices of french bread rubbed with a bit of garlic and topped with the caprese components.
  2. I served mine with a slice of Wasa crispbread and half of an avocado. Perfect lunch.

Daring Kitchen: Seafood & Artichoke Paella

Paella with a glass of wine

Talk about a challenge. I honestly wasn't expecting things to go the way they did. From failed mayonnaise to substituting half the main ingredients, at this point I couldn't tell you if I completed the challenge or not.

So what am I on about? It's the 14th of the month, which means it's time for a Daring Cooks challenge! This is my first one and also the first Spanish dish I've tried to make.

Olga of http://lascosasdeolga.blogspot.com and http://olgasrecipes.blogspot.com hosted this month's challenge. She chose a set of recipes for a cuttlefish and artichoke paella by José Andrés, whom she notes is one of the top Spanish chefs currently.

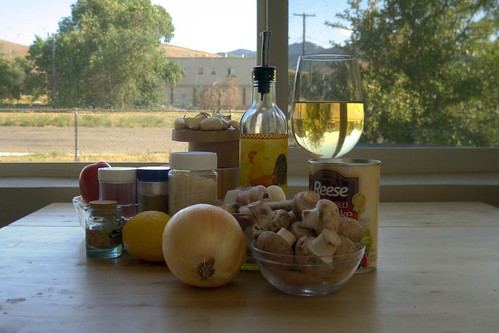
When it came time to source and buy all of the ingredients, I hit roadblock after roadblock. First, no cuttlefish in sight, which honestly didn't surprise me. But no squid? No frozen calamari rings? Nada. I wound up with a seafood medley made up of cuttlefish, squid rings, baby squid (cute!), octopus, clams, mussels and shrimp. It worked out and I have quite a bit of the bag left for later.

Next, no Spanish short-grain rice. I really thought my favorite market would have it, but alas, it was not meant to be. I wound up with a pound or so of Japanese shortgrain sushi rice, which I'd read earlier was what another Daring Cook used.

Finally, no fish stock. No fish heads either! I threw up my hands at this point and threw in some chicken-and-tomato bouillon by Maggi that I particularly enjoy. What's one more substitution between friends, right?

Oy vey, I get really tired of living where I do -- there is nothing available unless you're willing to drive fifty or sixty miles and try four or five stores.

Okay! Now that we kinda have our ducks in a row, let's get down to business. The recipes below have been adapted... heavily.

Let the preparations begin!

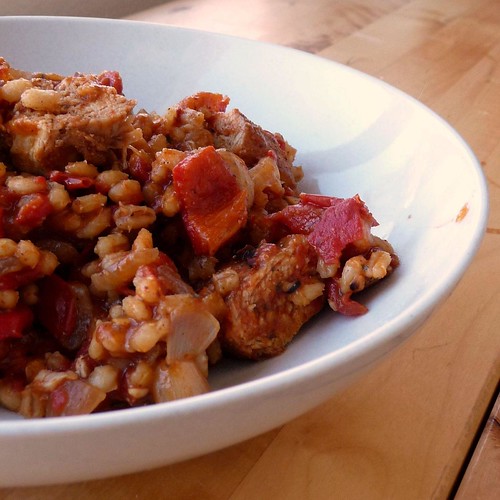
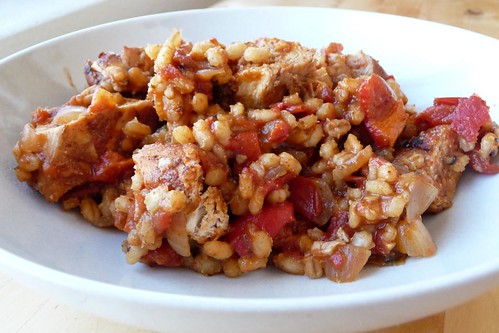
Making the paella is really pretty straightforward. The thing to remember is that Spanish rice dishes don't take a lot of stirring like Italian risottos, so once everything is cooking along nicely, leave it alone!

Seafood & Artichoke Paella [printable recipe]

Adapted from a recipe on Made in Spain by José Andrés

  • 1 can 6 - 8 artichoke hearts, cut into eighths
  • 6 crimini mushrooms, quartered
  • 1 bay leaf
  • 70 ml white wine
  • 150 g frozen invertebrate medley, defrosted
  • 1/2 recipe sofregit (recipe follows)
  • 150 g (1 cup) sushi rice
  • 3 cups chicken and tomato stock
  • 1 healthy pinch of saffron
  • 1 recipe allioli (olive oil and garlic sauce, optional)

Cut any large medley pieces into smaller chunks. Cut artichoke hearts into eighths and quarter mushrooms.

In a large paella or saute pan over moderate heat, add a tablespoon of oil and swirl to heat. Add invertebrates, bay leaf, artichoke hearts and mushrooms. Saute until the artichoke hearts turn golden. Deglaze with white wine and add sofregit. Stir thoroughly. Add stock and bring to a boil on high heat. Add rice and return to a boil for 5 minutes1.

Add saffron and stir in well. Reduce heat to low and simmer for an additional 8 minutes. The rice should be a touch softer than al dente. Remove from heat and let stand before serving for 5 minutes. Serve with allioli.

Notes:

  1. Spanish short grain rice is not stirred often as with Italian risottos. Olga recommends not stirring more than twice for any Spanish rice dish, this one included.

. . .

My sofregit came out very onion heavy; I would have preferred more tomato and less onion, I think. It smelled divine, however.

Sofregit Ingredient Preparation

Sofregit [printable recipe]

Sofregit is a fragrant Spanish red sauce composed of olive oil, tomatoes, garlic and onions which sometimes contains peppers and mushrooms.

  • 1 tbsp olive oil
  • 3 - 4 ripe Roma tomatoes, chopped
  • 1/2 small onion, chopped
  • 5 garlic cloves, crushed
  • 6 crimini mushrooms, chopped
  • 1 bay leaf
  • salt
  • 1/2 tsp cumin
  • 1/2 tsp oregano

Combine all of the ingredients in a medium saute pan over moderate-low heat. Saute until all veggies are nice and soft. Taste, adjust seasonings as desired.

Notes:

  1. This sauce keeps well and can easily be made ahead and frozen for use later on different dishes.
  2. I absolutely abhor green bell peppers and I usually don't care for any kind of pepper in my tomato-based sauces. If you do, throw in half a bell pepper with everything else.

. . . .

Oh, how I wish I could tell you about the wonderful, thick allioli I wound up with. How I would regale you with tales of my wrist nearly falling off as I made this the old-fashioned traditional way with a mortar and pestle.

In actuality, it failed. Miserably. In fact, despite everything I tried (egg yolk, more juice, more oil, more garlic, a food processor!) it never actually got to the point of the thick mayonnaise it should have. I've made this before (in a mortar with garlic and salt, the traditional way) and I remember it being a terribly long process but this is perhaps the second time mayo has locked up on me. It wasn't a problem with the recipe, rather it seemed to be just a problem with us. For whatever reason, mayo completely defeated me.

After both my husband and I spending most of the paella's cooking time on it, I gave it up. The light was going, our tummies were rumbling, dinner was late as it was, it just wasn't going to happen.

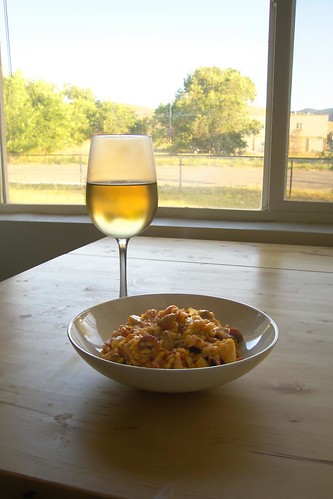
So, with a nice glass of chardonnay to accompany it for him and a cold glass of kefir for myself, we sat down to dinner. (And wound up with dinner theatre as cops went off-roading in the vacant lot across from our flat, but that's another tale.)

In the end, I'm glad I made this. It was really pretty good and I plan to make more paellas in the future.

Spinach and Sweet Potato Salad with Bacon Dressing

Spinach and Sweet Potato Salad

Several years ago, when I was still learning how to cook many basic recipes, I signed up for The Good Cook to take advantage of their four free cookbook offer. One of the books I selected was How to Cook Everything by Mark Bittman. I've since picked up copies of The Best Recipes in the World (very useful and the best one, I think) and How to Cook Everything Vegetarian. What I like about Bittman's books is that they're solid, simple recipes that usually work out very well. I tend to treat them as "base" recipes, adding my own twists and usually a lot more spice.

When I was at the library last, I saw a copy of Food Matters: A Guide to Conscious Eating on the display. It, like many other books coming out lately, professes to instruct the reader on how to eat more sustainably and reduce one's footprint, particularly in the area of meat. Bittman's no vegetarian and many of his ideas are good ones, such as reducing the amount of meat consumed and drastically increasing veggie intake. I've been using a reduced portion of meat for several years now in my cooking -- I usually use about 3 ounces of meat per person, though I often use 3 ounces total for two when I make stirfries.

Still, the book is strongly colored by his own medical problems that caused him to change his diet radically. He notes this throughout and advises the reader to take this into account. What he doesn't note is that it's very biased towards what he's comfortable eating each day. One of my problems is thinking up good lunches to make or have. This book is very heavy on salads for lunch which is great for many people besides me (salad every day is too much salad for me).

The recipes included were tilted heavily towards "base recipes", calling only for a large quantity of veggies. This is one aspect I liked and thought was a good idea for many folks who don't go "off recipe" very well. Since I already shop and cook this way, it wasn't as useful as it could have been. One of the other valuable aspects of this book were simple basics everyone should be able to do, like making roasted red peppers.

One of the recipes in particular sounded really interesting. I love spinach and I've been wanting to use sweet potatoes more, so I decided to make Spinach and Sweet Potato Salad with Warm Bacon Dressing for dinner the other night.

The things I loved: Roasted sweet potatoes are really, really good and don't need much to shine. A bit of olive oil, some salt and pepper, that's it. When it was combined with bacon and onions, it was even better.

The things I wasn't happy with: The dressing overall, the liquid parts that is, I wasn't happy with. I love citrus-y dressings, but this was just so.. bland. Boring. It needs pep and pizazz to really be great. Next time I'd add some crushed red chile flakes and some oregano to pep it up. But if I were just making something soft and warm and comforting, easy on the tummy.. this would be a great start.

Don't get me wrong. It was good. It just wasn't great. There were aspects I adored, like the roasted sweet potatoes that are going to go on the menu next week, and aspects I think need work. Overall, it's worth a shot.

As for the book... I'd recommend it. Everyone should incorporate at least these points: eat less meat, eat more veggies, eat foods that you prepare or have been simply prepared, stay away from overprocessed "food" and especially high fructose corn syrup. Eat primarily around the edges of your grocery store. Read the labels. Know your food, how it's been handled and where it comes from when possible. Your body will thank you.

Spinach and Sweet Potato Salad with Bacon Dressing [printable recipe]

Adapted from Mark Bittman in Food Matters
Serves 4
Best as a lunch or a side salad with dinner

  • 2 large sweet potatoes, peeled and chopped
  • 1/4 cup olive oil
  • salt, pepper
  • 4 slices turkey bacon (or 2 thick slices bacon)
  • 1 red bell pepper, cored and chopped
  • 1 small red or yellow onion, thinly sliced
  • 5 cloves garlic, crushed or 1 tbsp ginger, minced or grated
  • 1 tsp cumin
  • 1/2 tsp crushed red chile flakes
  • 1 tsp dried oregano
  • Juice of one orange
  • Zest of one orange
  • 1 pound fresh baby spinach leaves, washed

Preheat oven to 400F. Toss potatoes with 2 tbsp olive oil, salt and pepper, then spread evenly over a sheet pan. Roast, stirring occasionally, until browned and soft, about 35 minutes. Remove and let cool on pan until serving.

Cook bacon in a nonstick/nonreactive skillet over medium heat, turning once or twice, until crisp. Drain on paper towels. Pour off fat if desired, adding remaining 2 tbsp olive oil if needed. Add bell pepper, onion and garlic to the pan. Cook for 5 - 6 minutes, then add spices, zest and bacon. Cook for another minute. Stir in juice. Remove from heat.

In a large bowl, toss spinach with dressing and sweet potatoes. Adjust seasoning as needed. Serve.

Kotletes

Kotletes

Each week, I post one recipe from Latviešu ēdieni

My husband's been having cravings.

Cravings for the fluffy, meaty goodness called kotletes.

I, myself, am not really sure how to translate. It's somewhat like meatloaf and then again somewhat like squished meatballs. And "meat patties" don't sound particularly yummy.

So let's stick with kotletes, shall we? Or perhaps Mini Meatloaves, if pressed. Traditionally, these are shaped like teardrops, probably because of how the balls go squish between your palms (fun!).

As always, you can use just about any cut of beef and pork and just grind it up to suit. Or, ask the butcher for a "meatloaf mix", which usually consists of beef, veal and pork. (Hint: For super meaty flavor, grind some kidneys in too. I promise, you won't notice the kidney itself only that it tastes more like BEEF than like beef. If that makes any sense.)

Kotletes [printable recipe]

Adapted from Latviešu ēdieni
Serves many

  • 1 lb pork
  • 1 lb beef
  • 2 eggs, beaten
  • 2 - 3 slices of french bread
  • 1/4 cup of milk
  • 1 Tbsp marjoram
  • 1 Tbsp paprika
  • salt and pepper
  • 1/2 cup breadcrumbs, plus more for dredging
  • 1/2 medium onion, coarsely chopped
  • 6 cloves garlic, crushed
  • oil

Soak bread in milk, reserving half a slice. Grind beef and pork in a meat grinder or food processor until coarsely ground. Saute onion and garlic with a pinch of salt until edges begin to brown. Drain bread mixture. Combine onions, garlic, and bread with meat. Grind or process again until finely ground, running the remaining slice of bread last to catch any left-behind bits. Mix spices, bread crumbs, two big pinches of salt and eggs into meat mixture until thoroughly combined.

Form into 1/2" thick, teardrop shaped patties. Dredge in breadcrumbs and set aside.

Preheat oven to 325F.

In a large skillet set over medium-low heat, add 1 tbsp oil, swirling to coat. Brown kotletes nicely on both sides (about 4 minutes). Remove to a foil- or silicone-lined baking sheet, setting about 1" apart.

Bake for about 20 - 30 minutes, until done.

Vēlos... I wish...

Harvest

This is some of what my mother-in-law grew in her garden and harvested last week.

Basket of Tomatoes

I wish I was there to enjoy the fresh veggies and fruit, to visit with family (even if my Latvian is not very good) and to see Latvia and Liepāja in the summer.

Rudbekijas (Black-eyed Susans)

Even though it's a very pretty country in the fall and winter, I'm told that it's beautiful in the summer. When I was there last October, I was lucky enough to be able to see the fall colors as Latvia showed off.

Near Jaunpils Pils

But I still miss being there, and wonder what it's like in the summer. My husband, whose hobby is photography, has shown me Latvia through his eyes. Yet, it's no comparison to being there, munching on fresh veggies just picked from the garden out back, laughing and talking with family.

Harvest

Mammu, Tēti, liels paldies par bildēm!
(Photos of veggies and flowers courtesy of my in-laws.)

Tacos con Nopales (Cactus Paddles)

Have you ever walked into a Mexican grocery and been bewildered by all the neat produce and products that aren't normally seen in American grocery stores? I used to work next to one and found that not only were their avocados better (and cheaper!) but they had produce I wouldn't easily find anywhere outside of a gourmet grocery in Salt Lake.

One of those items is nopal or cactus paddle. You can get it pre-prepared in jars or fresh. I always would look at them and think to myself how neat it would be to prepare if only I knew how.

The other night, I was flipping through channels and came across Rick Bayless' cooking show, Mexico - One Plate At A Time. He happened to be making Mexico City-style street food (which sounded good immediately) and showed how to prepare nopales for cooking. Unfortunately for me, he neglected to actually discuss how best to cook it on the show, but his website turned out to have more info.

To select a good paddle, Bayless recommends choosing one that is vibrant and firm over a dull, limp one. Sounds pretty straightforward for any produce selection, if you ask me. Smaller is better as they will be less sticky and more tender. They last about two weeks loosely wrapped in the fridge.

Preparation is straightforward. Remove any spines by trimming the edges and scraping a large chef's knife over the nodes on the top and bottom to scrape off the spines. It's not necessary to peel it any further as the spines are the only thing you need to be concerned about. As for cooking, he recommended frying it in lard "until done" then slicing it into strips.

Well, that's all well and good, Mr. Bayless, but what does "done" mean to this gringa? Nothing to do, I suppose, but try it and find out. As it turns out, it's pretty easy to tell; the cactus will darken and become rather soft. It has a nice, nutty flavor to it too.

I have to say, I'm glad I finally tried cactus. Alone, they don't taste like much, but add them to well cooked steak and they're so complementary. They add a new dimension to the simply-cooked steak. And making street-style tacos was a great way to use some of the fresh corn tortillas we picked up on a whim.

No pictures today but maybe next time cactus makes it onto the menu. I need to figure out how to rig a camera and lighting setup for those days when dinner takes place after dark. Considering winter's only a couple of months away and it gets dark before 5pm, I'd better figure something out soon.

Tacos de Bistec con Nopales (Seared Steak Tacos with Cactus) [printable recipe]

Recipe adapted from Rick Bayless on Mexico -- One Plate at a Time here.

  • 1 1/2 to 2 cactus paddles
  • 1 tbsp lard, oil or bacon drippings
  • 1/2 lb thin-cut beef
  • 1/2 tsp oregano
  • 1/2 tsp chili powder
  • salt
  • 6 fresh, warm, small taco-size corn tortillas (toss in a dry, hot pan for 30 seconds a side)
  • 2 limes, quartered
  • salsa or pico de gallo
  • some crumbled queso blanco
  • cilantro
  • sour cream

Preparing the cactus: With a sharp knife, clean the cactus paddles by trimming all the edges and scraping off the spines. Add 1/2 tablespoon (or so) of lard or bacon drippings to a cast-iron skillet and set it over medium-high heat. Add the paddles and cook, turning occasionally, until done, about 8 to 10 minutes. Slice into strips and remove to a bowl.

Searing the meat: Generously salt and evenly sprinkle oregano and chile powder over both sides of each piece of meat. Wipe the skillet or griddle and return it to medium-high heat. Add the remaining 1/2 tablespoon of lard. When very hot (it’ll just begin to smoke), lay in the meat in a single layer. If it doesn’t all fit comfortably, you’ll need to do this in batches. Sear the meat on one side until brown (about 1½ minutes), flip it over, and sear the other side. Generally, this type of recipe calls for well done meat. Remove to your cutting board.

Chop the seared steak into ½-inch bits and scoop into a serving bowl. Serve with the cactus, salsa/pico, lime wedges, cheese and warm tortillas.

Never built a taco? Just take a tortilla, put some meat or beans on first, followed by cactus, salsa and cheese. Squeeze some lime over the top, sprinkle some chopped cilantro for flavor, fold in half and chow down. If it's too spicy, add a little sour cream before the cilantro. . . .

Every good taco needs a good salsa. Bayless made an interesting one from tomatillos and dried arbol chiles on the same episode that sounded good too. I found that using the quantity of arbol chiles he called for made too spicy of a salsa for me, but the roasted tomatillos were excellent.

If I didn't make salsa, I'd opt for a fresh pico de gallo. I love the bright flavors of pico, especially the one from Todo Mexico in Snohomish, Washington. That one is my favorite but so far, I've failed to recreate it. One day...

Arbol-Tomatillo Salsa [printable recipe]

Adapted from a recipe by Rick Bayless - Mexico -- One Plate At A Time here.

  • 1/4 ounce (about 8) arbol chiles (2" long, skinny, dark red, dried chiles)
  • 6 large garlic cloves, unpeeled
  • 8 - 10 medium tomatillos, husked and rinsed
  • 2 medium Roma tomatoes
  • Salt
  • Brown sugar, about 1/2 teaspoon

Toasting and roasting: In an ungreased skillet set over medium heat, toast the chiles, stirring them around for a minute or so until they are very aromatic (some will have slightly darkened spots on them). Cover with hot tap water and let rehydrate for 30 minutes.

In the same skillet, roast the garlic, turning regularly, until soft and blotchy-dark in places, about 15 minutes. Cool and slip off the papery skin.

Roast the tomatillos on a baking sheet 4 inches below a very hot broiler until darkly roasted, even blackened in spots, about 5 minutes. Flip them over and roast the other side—4 or 5 minutes more will give you splotchy-black and blistered tomatillos. Cool, then transfer the contents of the baking sheet (including any juices) to a blender or food processor.

Finishing the salsa: Drain the chiles and add them to the tomatillos along with the garlic and tomatoes. Puree, then scrape into a serving dish. Stir in enough water to give the salsa a spoonable consistency, usually about 1/4 cup. Season with salt, usually a scant teaspoon, and the sugar. Refrigerated, the salsa keeps for several days.

Ghee whiz!

Ghee is something I was always afraid of making but there's really no reason for it. It's as simple as melting butter. I'm not sure if I got it as clear as it could be, but I figured I would just keep it in the fridge until I needed it. It tastes right, in any case.

Sometimes referred to as clarified butter, ghee is golden and clear. It has a much higher smoke point than butter due to the removal of the milk solids (485F/252C) which makes it a very easy to use in cooking. The smoke point is even higher than canola (rapeseed) oil that I ordinarily use!

Ghee [printable recipe]

  • 1 lb unsalted butter
  • cheesecloth

In a small saucepot over low heat, melt the butter. As white foam collects on the surface, skim it off, stirring periodically to keep bringing more milk solids to the top. Once everything has been skimmed and the ghee is golden and clear, remove from heat. Pour into a clean jar through multiple layers of cheesecloth.

. . . .

Ghee is shelf-stable and does not need to be refrigerated, provided that all milk solids have been removed and it is stored in an air-tight container. If you're concerned, store it in the fridge and just set it on the counter a few hours before using (so it liquifies). It'll keep for some time.

Spiced Chicken and Barley

Spiced Chicken with Barley

Some days, I'm too involved in my homework to realize that it's past time to start making dinner. Usually dinner doesn't take too long to make and I can still manage to get it on the table by our normal time, but not always. It's worse with recipes like this one that call for more than an hour of cooking time. Luckily, my wonderful husband has taken to cooking as a duck to water and he picked up the slack the other day so I could concentrate.

He chose to make Spiced Chicken with Barley from one of our Cooking Light collections. I started reading the magazine a few years ago and, while I don't subscribe any more (mainly because I already get two great recipe magazines and would only fall farther behind in making all those nifty dishes with a third), I found that their recipes are fairly consistently delicious and can be easily modified to suit my taste. One in particular, Cooking Light Superfast Suppers: Speedy Solutions for Dinner Dilemmas, is still my favorite, but today's recipe comes from The Complete Cooking Light Cookbook.

I don't often cook with this combination of spices nor do I often make barley for our starch/carb of the meal. I think that is going to change! Barley is definitely underutilised, despite being high in fiber and having a tasty, chewy texture. I loved the combination of the spices with red peppers and tomatoes which gave a very warm, hearty and intense flavor. Definitely a keeper.

One of the best things about this dish is that it can be very easily adjusted to suit vegetarians. The chicken is good but it' s not essential by any means -- exchange it for some cannellini or great northern beans, even lentils, and you'll have a great dish.

Spiced Chicken with Barley

Spiced Chicken and Barley [printable recipe]

Adapted from The Complete Cooking Light Cookbook
Serves 2

  • 1 tsp ground cumin
  • 3/4 tsp chili powder
  • 1/2 tsp salt
  • 1/2 tsp ground cinnamon
  • 1/2 tsp dried mint or spearmint
  • 1/2 tsp garlic powder
  • 1/4 tsp dried red chile flakes
  • 6 - 8 ounces skinless chicken breasts or thighs (boneless optional)
  • oil
  • 1 small onion, chopped
  • 3/4 cup roasted red bell peppers, chopped
  • 1 tbsp soy sauce
  • 2 cups turkey or chicken stock
  • 3/4 c pearl barley
  • 1 14.5 ounce can of diced tomatoes, drained

Combine spices (first 7 ingredients) in a small dish and rub well onto chicken.

In a large skillet over medium-high heat, add oil. Add chicken and cook about 3 minutes per side until browned. Remove.

Add onion and cook for 4 minutes. Add bell pepper and continue cooking for another 2 minutes. Stir in soy sauce, broth, barley and any leftover spices.

Rest chicken (if it has bones) on top and bring to a boil. Cover and reduce to a simmer, cooking for 45 minutes. Uncover and let simmer an additional 10 minutes until liquid is almost evaporated. (If you use boneless chicken, add the chicken during the last 5 minutes of covered simmering.)

Let stand for 10 minutes before serving. Garnish with green onions if desired.

Kāpostu tīteņi (Cabbage-wrapped meatballs)

Kāpostu tīteņi

Every week I make a dish from Latviešu ēdieni.

I sat, tapping my pen on our menu sheet, trying to decide which recipe to make from Latviešu ēdieni. My husband thought for a few minutes and said, "You know what I would like to have this week? Kāpostu tīteņi! I haven't had that in years."

Kāpostu tīteņi are basically kotletes wrapped in cabbage leaves. Strangely, this variation doesn't appear in our little cookbook, but since we'd made kotletes earlier this summer using a recipe from Latviešu ēdieni that came out incredibly well, we decided just to adapt from there.

I have to say, it came out beautifully. I absolutely adored this because the browned cabbage leaves add so much flavor and moistness to the meatballs. Plus, it makes enough to feed a crowd -- we have plenty left over for snacks and lunches over the next couple of days!

To prepare this dish, it's best to have either a meat grinder or a food processor, since the meat is ground twice to get a very fine texture. You can use just about any kind of beef or pork you want, lean or not. I used a hunk of tip roast I found on a really good sale along with a couple of boneless pork chops from a similar sale. You can use just about any ratio of beef to pork, it's really just to taste.

All wrapped up!

Kāpostu tīteņi -- Cabbage-Wrapped Meatballs [printable recipe]

Serves many

  • 10 oz beef, ground
  • 10 oz pork, ground
  • 1 medium onion, coarsely chopped
  • 3 - 4 cloves garlic, crushed
  • 1/2 cup cooked rice
  • 1 slice bread
  • 1/4 cup milk
  • 1/4 cup bread crumbs (as needed)
  • 1 tsp thyme
  • 1 tsp oregano
  • 1/2 tsp pepper
  • 1/2 tsp crushed red chile flakes
  • 1 egg, beaten
  • 1 head green cabbage
  • salt
  • oil

Soak bread and rice in milk. Grind beef and pork in a meat grinder or food processor until coarsely ground. Saute onion and garlic with a pinch of salt until edges begin to brown. Drain bread/rice mixture. Combine onions, garlic, bread and rice with meat. Grind or process again until finely ground, running the slice of bread last to catch any leftbehind bits. Mix in spices, about 1/4 cup bread crumbs (more to taste), two big pinches of salt and egg into meat mixture until thoroughly combined.

Carefully separate and remove the leaves of the cabbage and place into a large, microwave-safe dish. (You want to get almost all of the leaves until they become too small to use (the core+leaves will be around the size of a closed fist). Add 2 tbsp of water, cover with plastic wrap and microwave until the leaves are soft and pliable (about 8 minutes). Remove wrap and let cool.

How to roll with a leaf

Lay out a cabbage leaf and fill the leafy end with meat. Tuck up the sides and roll towards the stem end so that you have a little cabbage roll. Set aside and repeat.

Finished rolling and ready to cook

Preheat oven to 325F.

In a large skillet set over medium-low heat, add 1 tbsp oil, swirling to coat. Add three or four cabbage rolls (don't crowd them) and brown nicely on both sides (about 4 minutes). Remove to a 13x9 baking dish. Set the rolls quite close together. Cover with foil and bake for 30 minutes.