Flourless Chocolate Cake (With a Twist)

Flourless Chocolate Bean Cake

I admit it, we clip coupons. (When did coupon-clipping become passé? Even with the new frugality kick brought on by the recession, coupon-clipping still is somewhat lagging. Frankly, I'd rather save money than worry about the Joneses.) Most of the coupons we find, to be honest, aren't coupons we can use, but every so often something pops up, like the day we found high-value coupons for Truvia and SunCrystals, low-calorie sugar substitutes that use stevia.

I'm not much for sugar substitutes. I find them really somewhat odd and artificial, even chemical. Yes, even the "natural" ones. Maybe it has something to do with the "substitute" part? Still, we don't get to have too many desserts because of the whole high-calorie sugar thing, much to my dismay.

Then I ran across this post for a flourless, black bean-based, supposedly fudgey, chocolatey and low-cal dessert. It reaches that low-cal by using Whey Granular sugar substitute. (I've never heard of this one, actually.)

A flourless chocolate cake made from beans? That I have to try. It's just so out there, at least to my mind, that I really want to see if it works and if it really, honestly, truly tastes like chocolate fudge cake.

Did I mention I love chocolate? Especially chocolate fudge and chocolate cake? That I've gone out with chocolate cravings that can only be assuaged by rich, dense chocolate cake? And that I have no idea how many pounds that's added to my ass?

Right. I just had to try this one. And we have these high-value coupons and wouldn't it be interesting to test out sugar substitutes?

Exactly. It's all in the name of science.

Of course, as I mentioned last time, it helps that I wanted a special dessert to go along with our anniversary, which we wanted to spend at home. (Frankly, we put together a better meal cheaper than going out to eat -- and we got to drink as much as we wanted since we don't have to drive. Cooking together is one of our great pleasures too.)

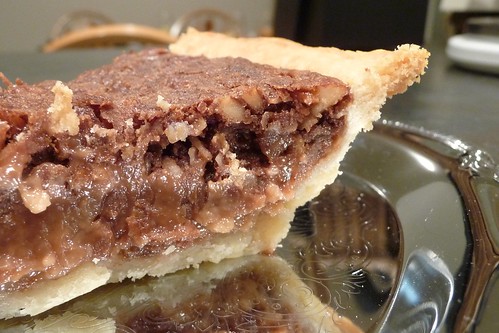
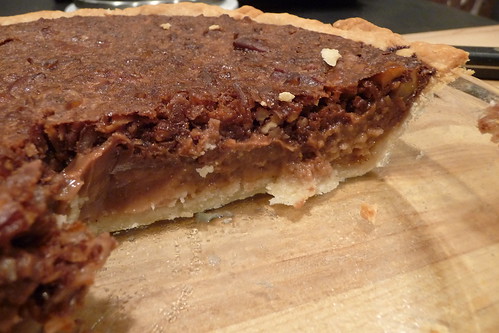
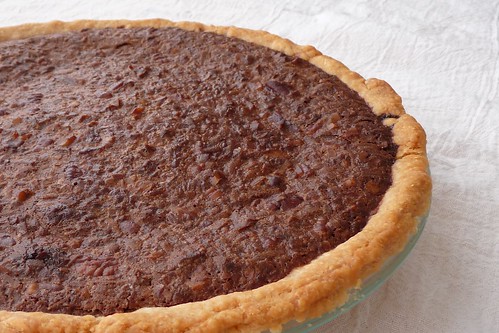
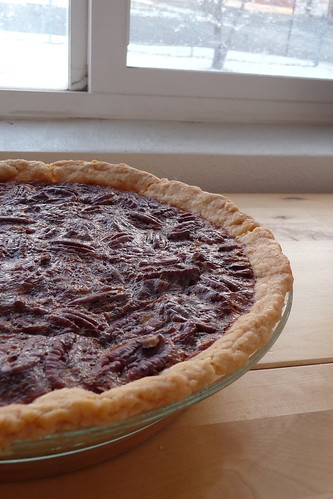
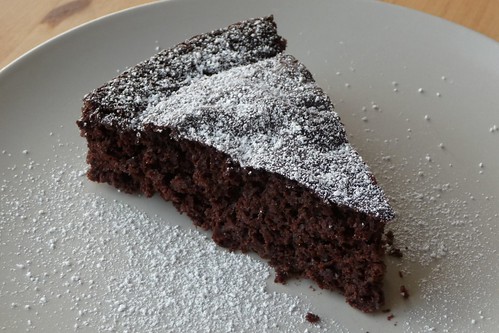
The verdict? Soft, fudgey and definitely chocolatey. Guilt-free chocoholism at its finest. The Truvia worked well, though I wonder if I cooked it even slower than might have been strictly necessary.

Flourless Chocolate Cake [printable recipe]

Adapted from Eating Well, Living Thin
Makes 1 9" cake

  • 1 14.9 ounce can black beans, drained and rinsed OR 10 ounces cooked black beans
  • 1 tablespoon strong coffee
  • 1 tablespoon vanilla extract
  • 6 tablespoons unsweetened cocoa powder
  • 1 teaspoon baking powder
  • 1/2 teaspoon baking soda
  • 1/2 teaspoon salt
  • 6 tablespoons butter, softened
  • 24 packets Truvia (about 1/3 cup + 1 tbsp)1 OR 1 cup granulated sugar OR Splenda (See note 4)
  • 5 eggs

Preheat oven to 300F. Grease and flour2 a 9" cake pan.

Process or puree beans, coffee and vanilla until smooth. Cream together butter3 and Truvia (or sugar or other substitute). Add eggs and beat on medium until the color lightens and the mixture becomes fluffy (a few minutes). Add bean mixture and mix until combined, then add cocoa powder, baking powder, baking soda and salt. Beat until smooth and creamy.

Pour batter into the prepared pan and bake for 40 - 45 minutes, or until a toothpick inserted in the center comes out clean (cake test). Cool on a wire rack for 10 minutes, then remove from pan and cool completely on the rack.

Cake keeps best tightly wrapped or covered. (It started going stale for me about 24 hours later without being wrapped.)

Notes:

  1. I used the conversions specified by Truvia on their site. If you don't want to use artificial sweeteners (and here I do not blame you), use 1 cup of sugar instead.
  2. The original recipe called for spraying the pan with nonstick spray. I did this, it failed miserably (about 1/3rd of the cake was left in the pan) and worse, the cake bits left in the pan were so greasy! My method of greasing and flouring the pan thus makes this not quite a true flourless cake, but it does get the cake out in one piece. I can live with that.
  3. I also managed to have problems getting my butter soft enough. I wound up with bits and chunks of butter instead of a nice, creamy mass. Next time, I'll remember to leave it on the counter for a couple of hours.
  4. To use Splenda, try 24 packets or 1 cup of the No-Calorie Granulated Sweetener, or 1/2 cup of the Sugar Blend.

Happy Anniversary to us!

Yesterday was my husband and I's 1st anniversary. We'd been discussing what we should do for a few months, floated the idea of going to our tiny town's new fancy restaurant, Sostanza, and mused over our options.

In the end, we decided to stay home and cook a multi-course meal of some of our favorite dishes. Our reasons were twofold:

  • We can buy alcohol much cheaper at the liquor store and get exactly the brand and types we want. This is doubly important for me as I generally can only drink sweet wines and ciders. Plus, no need for a designated driver when you're already home.
  • We can put together exactly the food we want at a fraction of the price of going out.

So, we decided on a menu. We decided we'd cook over two days, preparing the more labor-intensive items the day before and the easy stuff on the day of.

Menu: - Buljons with buljona pīrādziņi - Baked egg rolls with spicy peanut dipping sauce - Karbonāde (pan-fried chicken cutlets) - Stir-fried brussels sprouts - Boiled & fried potatoes with garlic and rosemary - Flourless chocolate cake

You can read more about the recipes via the links, though the cake will be discussed further in a future post. For today, I thought I'd share buljons with you.

Buljona pīrādziņi

Buljons and buljona pīrādziņi are an interesting combo in Latvia. Buljons, as you might expect since it sounds like bouillon, means broth. It's typically served in a mug with chopped green onions along with a pastry filled with cheese or meat (or both). It might seem a little weird to drink broth as a drink rather than a meal, but try going out and shoveling over half a foot of snow before coming in to a steaming mug of deliciousness. Suddenly, all will be right with your world. Guaranteed.

For the buljons itself, I used the broth from the Daring Cooks Pho challenge and based it on a dark, rich chicken stock we made the day before. When we did that challenge, my husband absolutely loved the broth and asked me to make it again so he could have it this way. We had saved a chicken carcass from a roasted chicken meal and found some chicken thighs and drumsticks on sale, so we decided to make a big batch of stock - for us, about 4 quarts when finished since it's the maximum our equipment allows. This time, the stock came out beautifully rich and nut-brown. It was absolutely perfect. There are two things I attribute this success to: frying the chicken to brown it first and letting it all cook for 5 hours.

As for the pīrādziņi, they're actually very simple, just a bit of puff pastry folded around a cheese or meat filling. Now, Latvians have their own version of laminated doughs that seem a bit easier than the French version I know and refuse to tackle in my tiny, cramped kitchen. I'm planning to try the Latvian version later this winter, but for yesterday, I decided just to use a sheet of store-bought puff pastry since we were cooking so many different things already. It's really simple to do -- take some thawed puff pastry, cut it into squares, fill the squares with your favorite cheese, fold them in half to make triangles, then brush them with beaten egg and bake at 400F for 15 minutes until golden brown. Easier than pie.

It was a great dinner and it's been a great year together. Here's to many more!

Black Bean & Bacon Soup

Black Bean & Bacon Soup

Saturday was cold and snowy, the first day of the storm system that was predicted to cruise through here for several days, which meant soup was on the menu for lunch. The snow was falling softly, one of those pretty snows where you're happy to be inside but not dreading shoveling it off the walk. In short, a perfect day for soup.

This is one of those "kitchen sink" soups. I was going to make my favorite Spicy Black Bean Soup but I didn't have some of the ingredients, so instead, I just threw in what I had and wanted to use up. Soups are forgiving that way. And adding collard greens or chard adds a lot of nutrients and vitamins, not to mention flavor.

So, in short, if you don't have everything in the recipe, throw in what you do have. It will still be good.

Black Bean & Bacon Soup [printable recipe]

Makes about 2 quarts

  • 3.5 ounces bacon ends or ham, diced
  • 1 medium yellow onion, chopped
  • 1 roasted red bell pepper or 1/2 poblano or other large, mild pepper, diced
  • 3 cups of collard greens, chard or kale, stemmed and sliced
  • 1 14 ounce can of black beans, drained and rinsed
  • 1 carrot, finely grated
  • 1/4 cup quick-cooking barley
  • 1/4 cup white wine
  • 4 cups chicken broth/stock
  • 1 tbsp tomato paste
  • 1 tsp cumin
  • 1 tsp oregano
  • 1 tsp thyme
  • 1/2 tsp garlic powder
  • 1/2 tsp chile powder
  • salt, pepper to taste

Saute bacon ends until the fat renders and the bits begin to brown. (If using ham, saute in some olive oil until lightly browned.) Add onions and saute until lightly browned. Add bell (or poblano or other) pepper along with carrot, cook for another minute. Stir in all of the spices, cook for 30 - 45 seconds, then add white wine and stir well for another minute.

Add barley, beans, greens and stock. Stir well. Bring to a boil then reduce to a simmer and cover. Cook for 10 - 12 minutes.

Serve with sour cream.

Caribbean Rice and Beans

Caribbean Rice and Beans

"We have got to have this again," said my husband as he polished off a second helping.

"I agree but next time, let's not forget the salt," I replied.

"Plus, I think the Red Wine Sausauge [Ed. from Colosimo's] is wasted. The dish just doesn't need it and the flavor is lost."

"Yeah, any reasonable sausage will work here. Andouille would be particularly good but we can't easily obtain it here." I sprinkled a little salt over my portion and dug in.

"Oh well. This is still great, however!"

"I'm definitely going to write this one up so we don't forget the alterations I made to it. Next time, I want to make it with those red beans we bought at Winco."

Caribbean Rice and Beans [printable recipe]

Adapted from the Nov/Dec 2008 Food Network Magazine
Serves 2

  • 1 can black or red beans, drained and rinsed
  • 2 tbsp olive oil
  • 1/2 pound italian sausage or bratwurst, casings (if any) removed and sliced
  • 1 bunch green onions, sliced, green and white parts separated
  • 1 medium yellow onion, roughly chopped
  • 6 cloves garlic, crushed
  • 1 jalapeno, minced
  • 2 tsp jerk seasoning1
  • 2 tsp thyme (or 1 tbsp fresh)
  • 2 tbsp tomato paste
  • 3/4 cup medium-grain brown rice
  • 4 cups (175 g) collard greens, stemmed and roughly chopped
  • 2 1/4 cups water
  • salt

Heat the oil in a large skillet over moderate heat. Saute the white parts of the green onions, garlic, jalapeno and onion with a generous pinch of salt until soft and beginning to brown. Remove. Add sausage, thyme and jerk seasoning and again, cook until the meat begins to brown. Add tomato paste and saute for another minute or two.

In a rice cooker2, combine the onion mixture, meat, rice and water. Stir well and top with the collard greens. Set it to Cook. When it finishes, fluff rice mixture and stir in the reserved green parts of the green onions. Serve.

Notes:

  1. Jerk seasoning is a Caribbean spice mix which generally consists of some combination of allspice, dried Scotch bonnet peppers, cloves, cinnamon, nutmeg, thyme and garlic. Like garam masala and curries, there's as many ways to mix this as there are cooks. I bought mine on St Maarten and I really have no clue what's in it. Tastes good though.
  2. I've said before that I'm no good at cooking rice on the stove. Here's how the original recommended cooking it: Instead of a rice cooker, use a large, deep skillet for the combined onion and meat mixture. Add the water and rice, then bring it to a boil. Add the collard greens and reduce the heat to low. Cover and simmer undisturbed for about 50 minutes until most of the liquid is absorbed. Let rest off the heat for 10 minutes.

German Chocolate Pie

German Chocolate Pie

As I mentioned in my last post, I usually do a lot of baking for Thanksgiving. I haven't bought pies in years since I usually bake them myself. (Which is good because if you don't get to Marie Callendar's or Village Inn early enough, you can find yourself pie-less over the holidays. Horrors!) Since we were celebrated Thanksgiving over at my mom's, I asked her what she felt like this year.

Which is how I came to make German Chocolate Pie for the first time. Now, I'm used to having this at restaurants (like the aforementioned two) and I remember it being this creamy, pale chocolate with chunks of pecan and coconut. I've never made such a pie before (not that I'd let that stop me) and started hunting around for a recipe.

I quickly found that there seemed to be a "traditional" German Chocolate Pie since most of the recipes I came across were very similar, and finally chose one at MyRecipes.com.

German Chocolate Pie

This is not the light, creamy, soft chocolate pie I was expecting. (Maybe I should have looked for a "silk" pie?) Instead, this is a dark, rich and extremely good pie. Because I altered the recipe slightly, I wound up with a bit too much filling, which I promptly poured into some mini pie shells I had lying around and baked in my toaster oven. One serving mini-pies are a fantastic thing and something I really need to do more often.

German Chocolate here does not refer to Germany. Instead, it refers to a sweet chocolate commonly referred to as "German's Chocolate" if you, like me, grew up with Baker's brand chocolate. It's one step up from semi-sweet on the sweetness scale. In American groceries, you can find it in the baking aisle of your local megamart (German Chocolate is the one in the green box).

If you can't find it, here's the conversion: 1 ounce of German chocolate = 1 ounce of unsweetened chocolate + 4 teaspoons of sugar. Alternatively, you can also substitute 1 ounce unsweetened cocoa + 4 teaspoons of sugar + 2 teaspoons butter. (Foodsubs)

This pie, like pumpkin and pecan, does not require the shell to be blind-baked.

German Chocolate Pie I chose not to top it as my husband is sensitive to sweet and often prefers to top desserts like this with sour cream. I put whipped cream on mine. Delicious!

German Chocolate Pie [printable recipe]

Adapted from Southern Living as posted on MyRecipes.com
Makes 1 9" pie

  • 1 recipe Alton's pie crust (do not blind-bake)

  • 4 ounces German's sweet baking chocolate

  • 1/4 cup (1/2 stick / 65g / 4 tbsp) butter
  • 12 ounces (1 can) evaporated milk
  • 1 1/2 cups sugar
  • 3 tbsp cornstarch
  • 2 eggs, beaten
  • 1 1/2 teaspoon vanilla extract
  • 2/3 cup flaked coconut (sweetened or unsweetened)
  • 1/3 cup chopped, toasted pecans
  • 1/4 tsp salt

Preheat oven to 375F. Prepare a pie pan and pie shell.

Melt chocolate and butter together using your preferred method (see Note). Stir in evaporated milk and set aside.

Mix together sugar, cornstarch and salt, then add eggs and vanilla. Whisk in chocolate, then stir in pecans and coconut.

Bake for 45 - 50 minutes. It will appear soft and jiggly, but will firm up as it cools. Cool for 4+ hours to room temperature then refrigerate overnight. Serve topped with whipped cream and chocolate shavings (or, if you're like my husband, with sour cream!)

Notes:

  1. I love my microwave for this reason: It has a melt function. So, I melt chocolate and butter in it rather than fussing about with a pot on the stove or a double boiler or any of that nonsense. You should melt the chocolate and butter together however you prefer. As long as it all gets melted, it doesn't matter.
  2. I baked my mini-pies (using a package of Keebler mini graham cracker pie crusts) in the toaster oven at 350F for 20 minutes.

Maple Pecan Pie

Maple Pecan Pie

Every year, I make my dad a pecan pie, his favorite. Still, I like to change things up as well, so every year, I use a different recipe. Last year, I made a pecan pie with molasses that came out extremely well, but what to do this year? I usually spend a few weeks reviewing recipes and looking for the variation that appeals, but this year, I didn't find the one I wanted until two days before I was due to start baking. I had barely enough time to do the shopping!

This year, Kevin at Closet Cooking posted a link back to his post on Maple Pecan Pie which he did last year in Thanksgiving Ideas post. When I saw the title, I knew I'd just found my pie for this year. How could I resist swapping out corn syrup for maple syrup? It sounded perfect. Plus, Dad loves maple syrup, so it was definitely a win-win.

I'm not a huge fan of pecan pie, so I usually don't miss not having a slice. This time, however, the remains of the filling in the bowl were so good, I wished I'd made two pies -- or at least some mini pies for myself and my husband. It was that good.

In fact, this time, I really didn't alter much. It was almost perfect as written and I only tweaked it slightly. I just wish I'd had enough filling left over to make myself a mini pie!

Since I didn't get to have a slice, I'll leave you with the rave reviews of those who did: Dad - "It's really rich. This is the best pecan pie I've ever had! I love the crust, what did you use?" My sister-in-law - "Wow!"

Well, Dad, my secret ingredient in my pie crusts is not so secret. It's lard. Real, honest-to-goodness, made-from-a-pig lard. Do not, on pain of death, substitute Crisco. Please, I'm begging you.

As always, the pie crust I use is from Alton Brown. You can find it on FoodNetwork here. Pecan pies do not require blind baking, so you need to stop at the point of lining the dish with the dough and come back to this recipe. I promise, this recipe is definitely a must for your holiday baking list this year.

Maple Pecan Pie [printable recipe]

Barely adapted from Closet Cooking (Original recipe here)
Makes 1 9" pie

  • 1 recipe Alton's Pie Crust (through trimming edges, do not dock or blind-bake)

  • 1 1/2 cups pecan halves
  • 1 cup dark brown sugar
  • 2/3 cup maple syrup (I prefer Grade B for its stronger flavor)
  • 1/2 stick (1/4 cup/4 tbsp/60 g) butter
  • 3 large eggs (lightly beaten)
  • 1/4 cup whipping cream
  • 1 1/2 teaspoon vanilla extract
  • 1 1/2 teaspoon salt

Preheat the oven to 350F. Spread pecans out into a single layer on a cookie sheet and toast them for about 8 - 12 minutes. They should darken slightly and give off a wonderful toasty-pecan scent.

In a medium saucepot, heat sugar, syrup and butter to a boil, stirring constantly. Allow it to boil for 30 seconds and then remove from heat. Pour off into a medium bowl so it will cool faster.

Beat together in a separate bowl the eggs, cream, vanilla extract and salt. You can temper the eggs by pouring in a little bit of the syrup into the eggs and beating well. Or wait for the syrup to drop to about 100-110F and beat everything together then, which is what I did.

Arrange the toasted pecans on the bottom of the pie crust. Pour the egg-syrup mixture over them carefully. Bake for 40 - 50 minutes or until a toothpick inserted in the center comes back clean.

. . .

Edited on December 2: I guess I should have posted the German Chocolate Pie first and saved this one for today. Still, I'll submit this for participation in the Tried and Tasted Event hosted by Salt to Taste because frankly, it's a great dish and I'm glad I found it.

Poppy and Caraway Seed Rolls

Poppy Seed Rolls - Ready for Baking

I hardly ever make rolls and I don't really have a good reason why. They're awfully good and a nice complement to most meals. But I always make them for Thanksgiving and other holidays, so maybe I just need to consider any dinner a special occasion.

Formed Rolls Rising

You can use just about anything to top these little rolls. I went with poppy and caraway, but sunflower seeds would be great too, as would minced dried garlic or onion, even a mix of all four (or five!) like my favorite "Everything" bagels. The sky's the limit with these and no one says you couldn't knead in a bunch of seeds too.

Now, I'll be honest here. Even though these came out really well, they could have been better. Here's what I did wrong -- and what you should do right.

  • I brushed the rolls with melted butter midway through the rise. (Actually, it was the end of the second, but then I found out there wasn't enough room in the oven for them, so I let them continue rising for another 30 minutes.) But I couldn't brush them again because I already sprinkled seeds on. Oops!
  • An egg wash would have given a much better crust, though brushing with butter again just before baking would have helped too. There just wasn't enough left after the "third" rise to brown them. :(
  • I didn't sprinkle on anywhere near enough seeds. Nor did I knead in any because I forgot.
  • I didn't knead them long enough, so they were denser than I'd like and forming them into balls wasn't as easy as it could have been.

Still, despite all of those faults, they came out really well. I'm seriously considering some variations on these for future dinners because I really ought to make rolls more often.

Poppy and Caraway Seed Rolls

Poppy and Caraway Rolls [printable recipe]

Adapted from Taste of Home
Makes about 16-18 rolls

  • 1 package (1/4 ounce or 2.5 tsp) active dry yeast
  • 1/4 cup warm water (110F/43C)
  • 1 teaspoon plus 1/4 cup sugar divided
  • 1 cup buttermilk
  • 1/2 cup shortening
  • 1 1/2 teaspoons salt
  • 1 egg, beaten
  • 3-3/4 to 4 cups all-purpose flour
  • 1 egg white, beaten with 1 tbsp water
  • Poppy seeds
  • Caraway seeds
  • Salt

In a large bowl, dissolve yeast in warm water with 1 teaspoon of sugar, let stand for 5 minutes. It should bloom and make "suds". If nothing happens, your yeast is dead.

Mix in buttermilk, shortening, salt, egg and remaining sugar. Add enough flour to form a soft dough. Like most bread recipes, this will vary, so add 3 1/4 cups then add more flour as necessary until it forms a nice dough that's not too sticky. If you accidentally add too much, just drizzle a bit of water over and work it in.

Turn it out onto a floured surface and knead the dough until it becomes smooth and elastic. This should take a few minutes. Place in a greased bowl and turn so the top of the dough is oiled too. Cover and let rise until doubled in a warm place, about an hour.

Punch down the dough and divide into 16 to 18 pieces. (Mine averaged 65g each.) Shape each piece into a ball and arrange equally in 9" cake pans that have been lightly sprayed with non-stick spray. Make sure you leave room between them. Cover and let rise again until doubled, another 30 - 60 minutes, depending on how warm your kitchen is.

Preheat the oven to 375F. Brush the tops of the rolls with the egg white wash and sprinkle lots of poppy or caraway seeds over. I also sprinkled sea salt over the tops. Bake for 13 - 15 minutes or until golden brown. Remove to cool on wire racks. Serve warm.

Notes:

  1. Always check the expiration date of your yeast. They do die and usually at the most inconvenient time.
  2. You can use melted butter instead of egg wash too. Just brush it on right before baking.

Happy Thanksgiving!

Thanksgiving Dinner

I hope you all enjoyed your Thanksgiving as much as I did! We had a lot of great food at my Mom's today and brought home enough leftovers for at least an entire dinner.

Thanksgiving Dinner

Now I'm going to go laze around while I digest, maybe play some more of the Wii game we rented for the weekend.

Happy Thanksgiving!

Maple-Honey Acorn Squash

Acorn Squash Golden Acorn Squash, Carnival Squash and Green Acorn Squash

It's almost Thanksgiving and I'm busy in the kitchen baking pies for my family and friends. For Dad, I'm baking his favorite pie with a twist: Maple Pecan Pie (adapted slightly from Closet Cooking). I'll post about it once I hear back from him how he likes it. The other pie is actually a first for me. I've never made a cream-type pie before but German Chocolate Pie was requested from me, so it'll be an adventure. I'll be posting about both pies next week once Thanksgiving is over.

Today, I'd like to tell you about one of my absolute favorite vegetables and one that will be featured at my Thanksgiving table: acorn squash.

Right now is the time to try this great, buttery squash as acorn squash and its close cousins are popping up on sale everywhere. I recently picked up a few green acorn squash for the incredibly cheap price of 48c each! Considering one squash makes enough for four, this is only 12c per person of squash. They also seem to keep for a long time in a cool, dry place, so I stocked up. It's possible to freeze them raw, but I've found they don't last very long before the texture begins to change - about two weeks or so. It's better to keep the squash whole in the pantry or root cellar.

My favorite way to have it is also one of my laziest recipes because it's fast, easy and one of the very few dishes I make using the microwave. Oh, I could easily roast the squash and it would be divine but often we don't decide on dinner until the last minute. With this method, my husband will often peel the squash while I cook and the squash will be ready when we are. Acorn squash is too hard to peel with a vegetable peeler, so you need to be able and comfortable peeling with a paring knife. Trust me, it doesn't take long to become proficient!

Acorn Squash

Maple-Honey Acorn Squash [printable recipe]

  • about 1/2 of 1 medium acorn squash, peeled and cubed
  • 1 tbsp honey
  • 1 tbsp maple syrup
  • 1 tbsp butter, cut into pieces
  • salt and pepper

Mix together in a microwave-safe bowl. Cover and heat on high for 5 - 7 minutes until tender.

Kvass (квас)

Kvass Extract

In a lot of ways, I almost feel I shouldn't post this since it calls for an ingredient that is potentially very difficult to obtain. Then again, it might not be, depending on where you live.

So what is this ingredient? Kvass extract.

There are many, many ways to make kvass. My sister (heart, not blood), Lily, gave me a recipe for her version. Latviešu ēdieni has a couple of different ones, as does the Ukrainian book we had. There's just one problem: for most kvass recipes, dark rye bread is required and it's extremely expensive where we live. I don't want to waste good rye bread on kvass that might not come out -- plus kvass extract makes it very cheap to make a rather good kvass. The jar we bought will make 25 liters for the price of a 2 liter bottle of kvass!

For my American readers, I advise you to find a Russian/Eastern European market. If you live in a large city, this should be no problem. In the Western US, I've found that if the market's name has "European" in it, such as "European Delicatessen", it's probably Russian or close to it (think former Soviet republics here). My favorite one in Salt Lake is called "European Tastees" and is run, I believe, by an Armenian family. It's located on 9th East and Van Winkle in the Ivy Place shopping center. The exact address is: 4700 S 900 E Ste 51, Salt Lake City, Utah. Don't expect to find much in these markets featuring English translations, so you'll need to look for "концентрат квасного сусла," or some variation thereof (or ask for help).

If you've never had kvass before, buy a bottle of it before you buy extract so you know what to expect. In Latvia, I remember hearing about a survey that was conducted that found Latvians preferred kvass to Coca-Cola! (I can't blame them. kvass IS better than Coke!) Making kvass this way does produce a somewhat "yeastier" tasting kvass, but I found once I adjusted to that, I liked it better than the commercial stuff. Beer drinkers should appreciate it, as kvass is somewhat beer-like and somewhat cola-like.

Now, on to the extract. If you speak and read Russian, you don't need my help. Follow the instructions and you'll get kvass. If you don't, keep reading. The directions usually want you to make it in 5 liter batches, which we can't easily accommodate, so we adjusted it down to 3 liters.

Instructions for Making Kvass

Kvass from Extract [printable recipe]

  • 1 cup sugar
  • 1/2 tsp active dry yeast
  • 3 liters warm water (105F - 110F)
  • 6 tbsp kvass extract
In a large container, combine all ingredients, stirring well. Loosely cover and find a warm place for it. If you have a gas oven with a pilot light, this is ideal. You need the same warm conditions as you would if you were proofing bread - slightly above room temperature at 75F-80F. Leave it alone for 18 - 20 hours. Carefully pour off the kvass into another pitcher or large bottle, such as a growler, discarding the sedimentary layer at the bottom. Refrigerate for the remainder of the day.